Autoclave Use and Safety in the Department of Biological Sciences
Preface:
This document is intended to give some background on the safe and effective use of an autoclave. Information on the principals, hazards and load preparation are applicable to any autoclave but details on the controls and cycles are specific to the many Amsco models that are currently in use in our department. For other models, contact local users for specific instructions.
Note: Because of the hazards associated with autoclaves and the high costs to repair one that has been abused, all users must receive practical instruction from a knowledgeable and competent person before they use an autoclave.
1. Introduction
2. Hazards
3. Emergency Shutdown of an Amsco Autoclave
4. Load Preparation
5. Amsco Autoclave Controls and Cycles
6. After the cycle is completed
7. Other Topics
1. Introduction:
- the purpose of sterilization is to achieve compete destruction of microbial life forms including spores
- may be done in several different ways using: chemicals, radiation or heat (dry or moist)
- critical that the concentration of the treatment and duration of exposure is sufficient to achieve the desired goal of 100% destruction of microbes and that all points within the load experience these conditions
1.1 Steam Sterilization theory:
- heat destroys microbes by denaturing proteins (destroys membrane function, enzymes, etc.)
- dry or moist heat can be used but moist heat is more effective so it can be done at lower temperatures and for shorter periods compared to dry heat
1.2 Energetics of Steam:
- to raise the temperature of a liter of water from 23C to 100C (the boiling point) requires 80 kilocalories of energy.
- to change the liter of water from 100C completely into steam requires another 540 kcal (this is referred to as the latent heat of vaporization)
- when steam contacts something cool, it condenses onto the object and transfers this amount of energy (540kcal/L) into the material. This is why steam is used to transfer heat, because it does this so effectively compared to a dry air transfer of energy
- It is also why a steam burn is more damaging to tissue than one from boiling water
- it has been found that exposing microbes to 121C for at least 15 minutes is sufficient to ensure complete destruction of even the spores of bacteria that are able to survive at high temperatures.
- to reach 121C (which is above the boiling point of water at 100C), the steam must be pressurized to about 15 psi (pounds per square inch) or 103 kPa above atmospheric pressure
1.3 Autoclave design and operation:
There are several models in the Department of Biological Sciences and the control features can differ. Some of the most common ones are Amsco gravity models that were installed in the 1970's. Gravity refers to the way steam enters from the top of the chamber and forces air out the drain at the bottom (Figure1). The objective is to get all the air out of the chamber and replace it with steam. Other models may use a vacuum to remove air from the chamber before the steam is allowed to enter.
Because steam enters from the top and fills from the top down, this affects how you arrange your load to avoid trapping cold air in the load and decreasing the effectiveness of the process:
- empty glassware should be laid on its side so air flows out as the steam enters
- packages of tools or materials should be arranged vertically like dishes are loaded into a dishwasher so the steam has better access to surfaces (Figure 2).
- bags of waste should be open, not tied shut to allow steam to enter and penetrate deep into the bag. Leave space around bags if there is more that one on the cart
 |
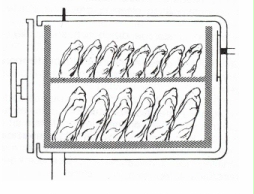 |
| Figure 1. Steam flow from top to bottom. The floor drain must be clear for the autoclave to work properly | Figure2. Arrange packages vertically to promote contact with the steam |
2. Hazards in using Autoclaves: (back to top)
- are from heat (hot metal, hot liquids and steam) and pressure
- you avoid injury from these hazards by following the correct procedure for loading, unloading and operating the equipment and by using Personal Protective Equipment (PPE*)
| Hazard: | Example: | Control Measure: |
|---|---|---|
| Burn | hot metal: cart, chamber wall | always wear PPE * |
| hot liquid:glass breakage, boil over |
use only PyrexTM glass for liquids, |
|
| steam: when opening door | use PPE, open slowly; stand back | |
| Pressure release | steam leak around door | close door tightly before start program; tighten further to stop leak |
| steam on before door is closed | NEVER try to close and seal door while steam is entering chamber (see 3.1 below) | |
| * PPE - Personal Protective Equipment = lab coat + thermal gloves + eye protection + shoes (no sandals). | ||
Some examples of injuries or near misses with autoclaves:
1. A BioSci graduate student was removing acid jugs containing water from the autoclave so she could use it. The jug(s) of water were placed in the autoclave by another student. The plastic lid on the jug had melted during the run so that the contents were under pressure (maybe 15-20 psi) and the glass was not PyrexTM (not thermo stable). The glass ruptured and the student was scalded and hospitalized from the burns she received.
Recommendation: only use PyrexTM or KimaxTM glass for liquids; lids must be vented or threaded very loosely on the top and must be autoclavable plastic; don't handle glass containing liquid directly: place vessels in a metal tray and lift the tray.
2. Someone in another department at the UofA autoclaved a solvent bottle containing a solution. They were removing the load on the autoclave cart when the top blew off the jug from the high pressure inside. The cap went straight up, smashed through the plastic cover on the ceiling fluorescent light and dented the metal fixture.
Recommendation: as above
3. A Biosci worker was opening an autoclave door when there was still pressure inside the chamber. The autoclave had been malfunctioning lately since steam was always leaking into the chamber, probably due to some debris caught in a valve. To work around this, people would select a cycle that used a vacuum stage after the steam was released and they would try to open the door when the vacuum step ended but before the steam pressure got too high. They misjudged the timing and a blast of steam hit the operator's forearm causing a burn that eventually resulted in a layer of skin peeling off. The leaking steam valve was repaired after this when it was reported to the Biotron staff.
Recommendation: do not use an autoclave that is not working properly; use a log book for tracking the operation and note any anomalies; report any problems to the repair people ASAP; put a note on the equipment to warn others not to use the autoclave; wear PPE whenever opening or closing an autoclave.
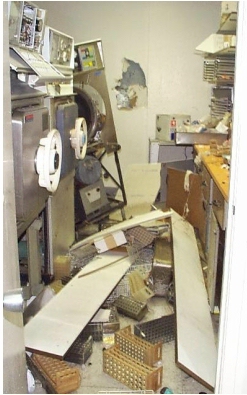
4. The American Industrial Hygiene Association (AIHA) described an incident where a door blew off an Amsco autoclave when it was under pressure. The room was not occupied at the time and no one was injured (Figure 3). The 80 lb door damaged the wall and the autoclave ripped away from the plumbing and electrical connections (assuming a door area of about 400 square inches, at 15 psi the force on that door would be around 6000 pounds). Many test tubes of biohazardous material were smashed in the room. The cause of the door failure was not determined but this is why all autoclaves are inspected annually by the Alberta Boiler Safety Association. There is specific provincial legislation governing the operation of pressure vessels.
 |
|
Figure 3. Door blew off an Amsco Autoclave under pressure
|
Recommendation: have the autoclave inspected regularly; report any problems to the repair people; put a warning sign on any equipment that you think is malfunctioning; do not use an autoclave if you think it is not operating correctly.
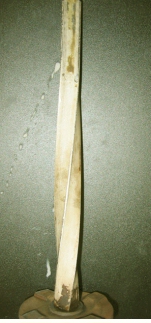
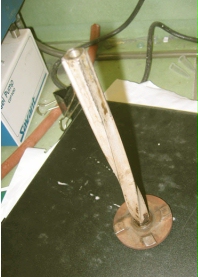
5. Because of the high pressure in the chamber when the autoclave is operating, there is a safety interlock on Amsco units that is intended to prevent someone from turning the door wheel when there is pressure on the inside of the door. However, if this interlock is broken, there is nothing to prevent someone from opening the door. Sometimes people are not strong enough to open the door by hand and resort to using a lever on the door wheel. There have been at least 3 instances of damage to the steel shaft that is part of the safety interlock on the Amsco doors in the Department of Biological Sciences (as of 2004). Look at the picture of a ¾" square stainless steel shaft that has been removed from one of our autoclaves in room G506 and note that the shaft has been twisted 90 degrees. If it broke, there would be no protection from opening the door under pressure and if the Chamber pressure gauge was defective, a person might not realize there was pressure inside. This shaft must have been damaged by someone using a tool or bar to open or close the door wheel since it seems inconceivable that an "average person" could twist a shaft this size by hand.
|
Figure 4. A 3/4" Stainless steel shaft that is part of the door safety interlock on an Amsco autoclave
|
|
 |
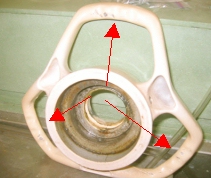 |
| Figure 5. This shaft has somehow been twisted 90 degrees. If broken, the door can be opened when there is still pressure inside the autoclave. | Figure 6. Marks on the inside of the door wheel from a lever used to force the wheel to turn |
Recommendation: Never use any tool to open or close the door wheel; always check the Chamber Pressure gauge before attempting to open the door; as you open the door, the metal rods begin to retract from the frame: make sure you can rattle the door before the rods are fully retracted from the frame (if you cannot rattle the door, it may be under pressure; seal it up again and call for assistance).
6. Here (PDF, 47kb) is a description of how someone was able to open an autoclave door while it was under pressure. This occurred at a hospital in Adelaide in 1995 (at least they were close to a medical facility). Part of the safety mechanism to prevent the door from being opened under pressure was defective due to misuse and lack of maintenance.
Recommendation: as above, don't abuse the equipment, inspect and maintain the autoclave and train operators about the risks and how to avoid injury
7. Another example from the AIHA files describes a person who was scalded from water in the bottom of a NalgeneTM tub that was holding bottles of liquid media. Some people believe that adding water to the tray prevents the glass vessels from breaking but this will not happen if the vessels are PyrexTM and they are not damaged before they are put in. The NalgeneTM plastic was softened by the heat and buckled when being lifted spilling the hot water onto the operator.
Recommendation: do not use plastic trays in the autoclave, only use metal trays; use the wheeled cart to move the load on metal trays into/out of the chamber; always wear PPE during loading/unloading
8. An autoclave with a malfunction in the steam trap valve accumulated hot water within the chamber. When the door was opened, a lot of very hot water dumped out onto the operator.
Recommendation: when opening the door, stand behind the door and be prepared to jump backwards should there be water inside the chamber. If any water leaks out the door as it is being opened, reseal the door seal and call for assistance. This is another reason for using metal trays under loads of agar or plastic waste: if the container/bag leaks, the material can plug the drain and prevent steam from being released from the chamber or possibly causing water to accumulate inside the chamber.
| !! Autoclave Training is mandatory for users in the Department of Biological Science !! You cannot learn how to use an autoclave safely and effectively without some practical instruction from someone who is knowledgeable and experienced with that model. The instructions and notes presented here and posted near the autoclave are for reminding people about the do's and don'ts for using an autoclave. Reading these is not sufficient to allow you to operate the autoclave safely. Contact your supervisor to get the training needed. Attend a refresher session if you have not used an autoclave for a year. |
3. Emergency Shutdown of an Amsco Autoclave: (back to top)
There are two situations in which you might need to shutdown the autoclave before it has completed the cycle:
- steam enters the chamber before the door is closed and sealed
- after the door is shut and the cycle started, there is a steam leak around the door because it was not tightened sufficiently
3.1 Steam enters the chamber before door is closed:
This can happen if the operating wheel is turned to Sterilize either manually or by pressing the cycle selector button. The Amsco models do not have any safety interlock to prevent steam from turning on when the door is open.
Do not try to close the autoclave door
Escaping steam is considered less of a hazard than a partially sealed door under pressure (which if it fails, will make a big bang and release steam anyway)
You can:
1. leave the autoclave door open, walk away and contact Biotron staff (2-5169) or, after hours, the Control Center (2-5555) to shut off the steam.
2. if you can do so safely, turn off the steam supply valve (below chamber at the front, see Figure 12) or, if accessible, at a valve on the steam line behind the autoclave.
3.2 Small steam leak after sealing door: (not generally serious)
if the door was not sealed properly before starting the cycle, you might develop a leak that requires a shutdown. You can hand tighten the wheel further (or get someone stronger to do it) but, do not use any tools to tighten the door.
If you cannot stop the leak, then shut the steam off and call the Biotron staff for assistance.
Note: the chamber will be under pressure until a manual exhaust is implemented.
Post a warning sign on the autoclave.
4. Load Preparation: (back to top)
4.1 Containers for autoclaving:
The primary container is what your material is in: e.g. PyrexTM glass, metal tubes for pipettes, paper for instruments or tools; polypropylene bags for biohazardous waste.
You should always use a secondary container to hold the primary container in case of leakage during the cycle or in case the glass breaks as the media is being removed (to protect the operator).
Not all plastics can withstand autoclaving. Polypropylene (PP) is the material used for the autoclave bags and is suitable for steam autoclaving. However, it is not suitable for dry heat sterilization and this is why bags must be removed from the chamber as soon as the cycle finishes since the hot jacket walls produce a dry heat environment inside the chamber and the bag may melt if left inside overnight. Other common plastics like polyethylene (both high and low density PE are not suitable for autoclaving.
Containers for liquids (± agar):
Only borosilicate glass (PyrexTM or KimaxTM) can be used to hold liquids since they can withstand the temperature changes. There should be no visible defects (chips or cracks) in the glass. Regular (flint) glass is not stable and can crack when it is cooling with disastrous consequences for a person holding that vessel. Any glass that holds liquids must have a PyrexTM or KimaxTM label. Acid or solvent bottles, old pickle jars should never be used for liquids.
In addition to using the right glass, always put material into a metal tray so that the user can handle the trays rather than grabbing the actual flask. The trays also contain any spills to avoid having to clean out the autoclave.
Volume should be less than half full to avoid boiling over of the media as the pressure is released and vessels must not be sealed: use a foam plug or paper or tin foil cap. Do not use a stopper or have a threaded lid that is tight to avoid getting pressure inside the vessel. Threaded lids must sit loose on the vessel and when the load is removed, tighten the lid to avoid drawing unsterilized air into the container as the liquid cools.
Containers for solids:
Make sure they can withstand the temperature of the autoclave (121C), especially for plastic containers (bags, plastic lids, etc). Consult a NalgeneTM catalogue that has a table of the chemical and thermal resistance properties of a variety of different materials. Also, it may be that an autoclave bag is rated at 125C for steam heat, but be aware that after the steam is released from the chamber, the walls stay hot because there is steam in the jacket around the chamber. Thus after the cycle is over, the bag is exposed to dry heat as long as they sit inside the autoclave and we believe this is when the bags can melt. Remove all bags within 2 hours; don't leave them overnight as they may melt. Always place bags in a metal tray to contain any leaks or melting plastic.
4.2 Bagged Biohazardous Waste:
Waste must be labeled as biohazard until it goes into the autoclave. Collect material in a clear plastic (polypropylene) autoclavable bag. Do not place waste directly into an orange bag with the Biohazard label as these cannot be discarded into the dumpster after autoclaving (some people, for whatever reason, object to seeing orange biohazard bags in the dumpster or at the public landfill). After proper autoclaving, the waste should not be biohazardous so you should remove any labels.
In labs we use the clear autoclavable bags to collect the waste and place the clear bag inside an orange Biohazard bag to act as a label. Only the clear bag is autoclaved, the orange label bag is reused. The clear bag should have a biohazard label until it goes into the autoclave.
Because steam must contact all parts of the load to effect sterilization, the top of the bag should be openwhen placed in the autoclave. Steam cannot penetrate through the plastic. To help get air out of the bag, add a cup of water just before putting the bag into the autoclave. As the water heats up, it will form steam and provide more thorough heating of the material.
Again, always use a metal tray under the bags of waste in case there is a leak (hole in the bag or bag meltdown). Don't overfill the bag as the top should be open when placed in the chamber.
Do not overfill the autoclave chamber: Steam must get into the bag from the top and must be able circulate around the outside to effectively heat the material. If you pack too much in, you will not get an effective sterilization which means the material may still contain biohazardous material after the procedure.
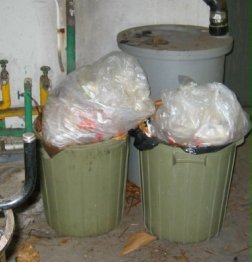
Remove the bags as soon as possible after the cycle is completed and you must dispose of the material directly into the dumpster at the loading dock. We used to have garbage cans in the autoclave room but people misused them by putting hot leaking bags directly into the green garbage bags or piling waste above the capacity of the garbage can.
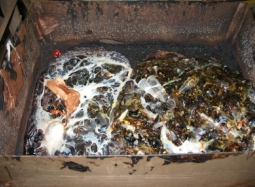
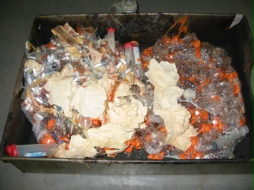
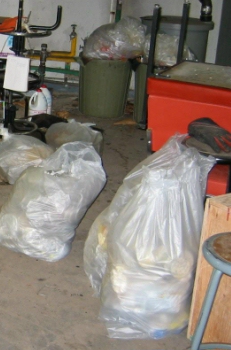
Figures 7-11 show some problems that we have experienced in G006 with handling of biohazardous waste.
 |
 |
|
| Figure 7. Melted bags: wrong plastic or too long in chamber after cycle finished (dry heat) | Figure 8. The bag is gone. | |
 |
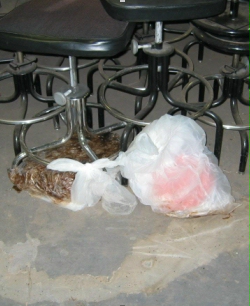 |
| Figure 09. This is how people disposed of their autoclaved waste when garbage cans were made available to them in G006. Building Services Staff should not have to handle waste like this. Now users have to transport their waste to the dumpster. | Figure 10. Bags abandoned on the floor.Note the stain from a bag that has leaked. |
 |
|
Figure 11. More bags on the floor, none labelled as Biohazardous waste.
|
4.3 Loading the Autoclave:
Always wear Personal Protective Equipment (PPE) consisting of a long sleeved lab coat, safety glasses or goggles and thermal gloves. Operators should wear long pants and closed-toe shoes (not sandals).
Check that the drain at the bottom of the chamber near the door is not plugged with debris. Contact the Biotron staff if there is a problem clearing the strainer in the drain.
Place all loads into the stainless steel tray on the wheeled rack that can be slid into the chamber and push the rack inside the autoclave. This avoids having to reach into the chamber.Seal the door by turning the door wheel CW P using hand force only, then set the time and cycle.
5. Amsco Autoclave Controls and Cycles: (back to top)
There are several AMSCO models in the Department, not all controls exist on all autoclaves. There are also autoclaves from other manufacturers. Most of these are newer with more safety features. Consult the manual and local operators for instructions on their use. The autoclave in Room G006 is shown in Figure 12.
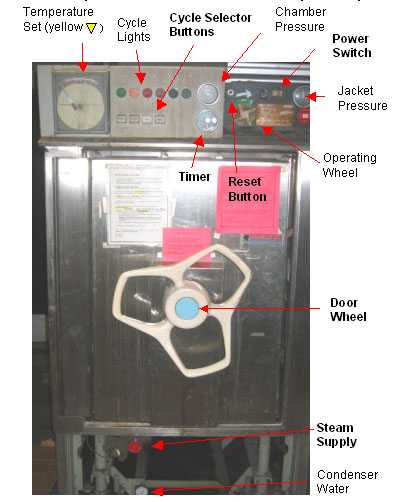 |
|
Figure 12. Controls on a typical Amsco autoclave
|
5.1 Start-up Check:
Normally the steam supply to jacket and chamber is turned ON. There will be pressure in the Jacket but there should not be in the Chamber.
You should not adjust any other controls than those indicated in bold.
Contact the Biotron staff (2-5916) if you think controls are not set correctly.
| Order | Control: | Desired Position: | If not correct: |
|---|---|---|---|
| 1 | Operating Wheel | OFF, green background color showing (no red color) | notify Biotron staff |
| 2 | Power Switch | ON | turn ON |
| 3 | Steam Supply | OPEN | turn open (CCW Q ) |
| 4 | Jacket supply | OPEN (jacket pressure 18-22 psi) | notify Biotron staff |
| 5 | Chamber Trap Bypass | normally closed | notify Biotron staff |
| 6 | Condenser Water | normally closed | notify Biotron staff |
| 7 | Jacket Pressure | 18 - 22 psi | notify Biotron staff |
| 8 | Chamber Pressure | 0 psi (needle is in white zone) | autoclave is in use; come back later |
| 9 | Yellow temperature set point | 121 C | notify Biotron staff |
| 10 | Timer | 15 - 75 minutes | set 15 - 75 min |
5.2 Set time:
set timer by turning the knurled knob: minimum 15 minutes (use at least 60' for waste)
- 121C & >15 minutes duration to kill most organisms
- larger volumes require longer time (see chart below)
- for a kill run, set time at >60 minutes
| Items: | Time: (minutes)§ |
|---|---|
| Solids: | |
| glassware, empty | 15 |
| metal instruments (unwrapped) | 15 |
| metal instruments (in covered tray or wrapped in paper) | 20 |
| bulky items (paper towels, Kleenex) | 30 |
| Liquids: | |
| 75 mL | 20 |
| 500 mL | 25 |
| 1000 mL | 30 |
| 2000 mL | 40 |
| Bagged Biohazardous Waste: | |
| Bag must be OPEN at top to allow steam to enter Add a cup of water before autoclaving to help displace the air Don't pack chamber too tightly; steam must contact all parts of load |
>60 |
| § times from Amsco Equipment Manual (1965) | |
5.3 Select the Cycle to start the steam:
The cycle selected determines the rate of pressure release at the end of the time period and whether there is a drying phase under vacuum.
Liquid: to avoid boil over of liquids, the chamber pressure is released slowly at the end of the cycle (slow exhaust over ~10 minutes).
Wrapped or Unwrapped: solid material can have the pressure released quickly (fast exhaust) using the unwrapped cycle and items that are wrapped (in paper or covered trays) can have a vacuum applied after a fast exhaust to get rid of moisture and dry the material (wrapped cycle).
| Cycle: | Use for: |
Exhaust Rate:
|
Vacuum Dry step | |
|
Slow
|
Fast
|
|||
| Unwrapped | solids only: glassware; instruments, bags of solid waste/Petri dishes with agar |
no
|
P
|
no
|
| Wrapped | solids in envelopes or cans |
no
|
P
|
P
|
| Liquid | vessels with liquid (± agar) |
P
|
no
|
no
|
Select the cycle you want by pressing a button. After you press the cycle button, steam begins to enter the chamber so recheck the door wheel before you press that button.
WAIT, don't leave yet !
wait until the Chamber Pressure reaches at least 15 psi before leaving the room. You can check there are no door leaks and ensure that the temperature indicator starts to rise. The timer will not start until the temperature gauge reaches the set point (121C) so if there is a problem with the sensor, the cycle will never be completed.
One reason the temperature may not rise if is a leak occurred previously that allowed molten agar or plastic to run down the chamber drain. If the agar solidifies, it can prevent steam from entering the drain where the temperature sensor is located (this is another reason we put all loads into a metal tray, to avoid plugging the drain).
6 After the Cycle is completed: (back to top)
6.1 Chamber Pressure Check:
After the cycle has ended, the Chamber pressure should be at zero (needle in the white area of the scale). The Operating wheel will be on Slow or Fast exhaust depending on the cycle selected and the Jacket Pressure will be around 20 psi.
If the buzzer is sounding, press the Reset button to silence it.
Ensure that you are wearing the PPE mentioned during loading of the autoclave.
*** Do not attempt to open the door if there is any pressure in the chamber ***
Never use any tool or a lever to open the door wheel as this may break the safety interlock that is supposed to prevent the door wheel from turning if there is pressure inside the chamber (not having this safety feature working would be analogous to driving a car where the brake lines had been cut).
Turn the door wheel slowly CCW Q to open. Before the metal bars have retracted completely from the edge of the frame, be sure that the door can be rattled slightly. If there were pressure on the door, you will not be able to rattle the door. Also, make sure there is no liquid draining around the door. Under some conditions of autoclave failure, the chamber may fill with hot water and you can be scalded if you open the door completely. If you cannot rattle the door or water runs out the door before it is fully open, reseal the door and call for assistance. Post a warning note on the autoclave before leaving the room.
If you can rattle the door and no liquid is leaking out, then the chamber should not be under pressure and you can continue turning the door wheel to fully retract the metal rods. Stand behind the door and open it slightly to allow a puff of steam to escape. As the door is opening, the Operating Wheel will automatically turn to the OFF (green background) position.
6.2 Unloading the Autoclave:
If the load contains liquids, open the door a few centimetres and wait 5 minutes to allow the liquids to cool further as they will be above the boiling point and are susceptible to boil over if they are jostled. This is similar to what happens if you overheat coffee in a microwave. The liquid is unstable and when you add sugar, the liquid can boil over the mug.
After 5 minutes, or if the load does not contain liquids, fully open the door and stand back until the steam clears.
Remove the load by pulling the wheeled rack onto the cart and ensure the rack is locked before moving the cart. Pull the cart back so you can close the autoclave door but do not seal the door tightly. Simply turn the door wheel 1-2 turns so the metal rods just engage under the edge of the frame. If the door is left open, the room will heat up since the walls of the chamber are over 100C due to the steam in the jacket. We don't seal the door tightly to preserve the life of the door gasket.
Unload your samples from the metal trays. Liquids should be carefully transferred into another container (e.g. a polypropylene tray) on a cart before returning to your lab.
Bags of waste can be disposed of by you into the green dumpster at the loading dock. Remove or deface any biohazard labels since the material should not be biohazardous. Do not abandon bags of waste in the autoclave room or place it in a green garbage can for Building Service workers. They are instructed not to touch any material that appears to be biohazardous.
If there was any spill or leak, clean up the autoclave and trays.
7. Other Topics: (back to top)
7.1 Monitoring Sterilization:
There are methods of assessing if the autoclave is working properly
Chemical indicator tape: changes color when heated to a certain temperature but they will not show that you have reached 120C for the required duration. Tape is better suited to judging if some material has gone through the autoclave rather than whether it is sterile.
Biological Indicators: spores of a thermostable bacteria (e.g. Bacillus stearothermophillus) are placed in the load. If they do not grow after being autoclaved, one presumes that the process is working correctly to achieve sterility. Bacterial growth is compared to a control vial that was not autoclaved. The test vials/strips should be placed in an area that is representative of most of the material being sterilized or use several indicators throughout the load to assess performance.
7.2 Service and Repairs:
If you think there is a problem with the autoclave, post a note that autoclave describing the problem and that service has been requested.
Contact the Biotron Staff for any problems/questions concerning autoclaves in the BioSci Dept. Phone 492-5916 or visit Room B212 or B214 (knock if doors are closed).
if there is an autoclave emergency after hours, call the UofA Control Center at
2-5555 and request a plumber to shut off the steam.
7.3 Do's and Don'ts:
Do:
- use a metal tray as a secondary container on all loads
- use the wheeled cart to load/unload the autoclave so you don't have to reach into the chamber
- wear PPE when loading/unloading
- use the proper glass for liquids
- threaded lids are very loose on containers
- use foam, foil or paper covers on vessels
- ensure that containers are not sealed and that all container plastics can withstand the temperatures used
- bags of waste are open at the top
- add a cup of water to each bag of waste as you place it in the chamber
- have a biohazard label on all biohazardous waste until it is placed in the autoclave
- put a warning note on the autoclave if it is not working properly AND notify the Biotron staff to check the unit
- when done, close the door on the autoclave and turn the door wheel a couple of turns to to loosely engage the sealing mechanism
Don't:
- autoclave flammable/combustible liquids (produce flammable vapors), bleach solution (may release chlorine gas) or radioactive materials (may form radioactive volatiles)
- autoclave nitrocellulose tubes (can explode)
- use flint glass for liquids (will rupture)
- place any sealed vessels in the autoclave; no stoppers or plastic caps that can melt
- shake or jostle any liquids taken out of the autoclave until they have cooled below 100C
- leave a spill without cleaning it up
- leave biohazardous waste unattended in a public area; if the autoclave is in use, take the waste back to your lab and return with it later
- leave the door wide open when you are finished
7.4 Links: (back to top)
| Autoclave Safety (PDF, 125kb) poster: shows some pictures of do's and don't's |
| Amsco Instructions (PDF, 69kb) poster (pdf): abbreviated instructions for autoclaving |
If there is any part of these instructions that you do not understand or that you do not agree with, please advise your supervisor and the department safety officer. Comments are welcome.
© Barry McCashin 2006