
Bear Tracks
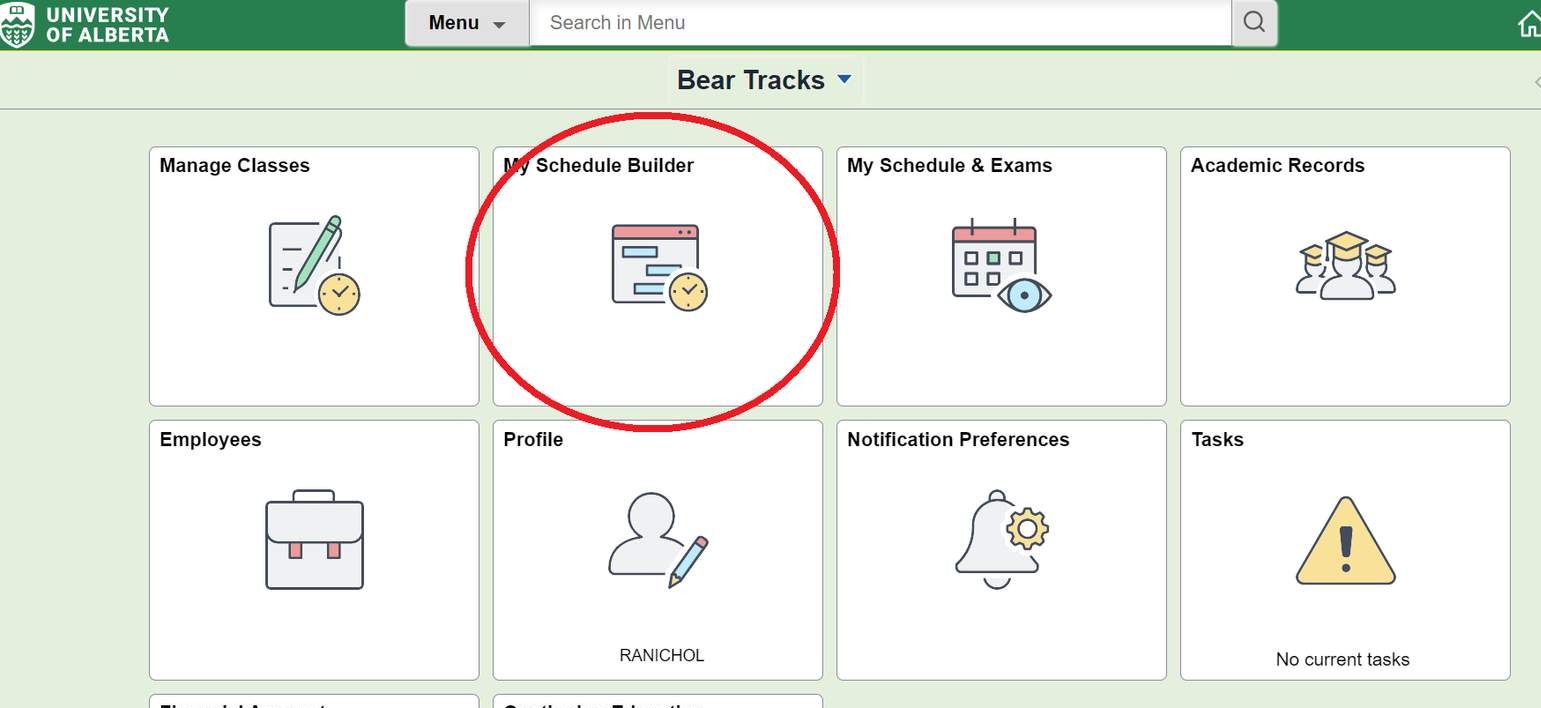
Bear Tracks is the University of Alberta's secure self-service online system for employee and student information. Through Bear Tracks you can securely manage your personal information, financial details, and academic enrollments with the University of Alberta. When on the Bear Tracks homepage, you will see several tiles. For registration purposes, you will use either "My Schedule Builder" or "Manage Classes".
My Schedule Builder is an add-on in Bear Tracks designed to help students build their schedules more easily. Many features of course selection will be accessed from "My Schedule Builder", however, there are some functions only available in "Manage Classes," including swapping, withdrawing, or making changes after classes have begun.
A list of Actions and which app to complete that function in can be found below:

Below are step-by-step instructions on the key aspects of course registration. This walkthrough will teach you how to search for courses, add them to your schedule, enrol, and other important functions in Bear Tracks.
⭐If you are registered or are planning to register with Augustana Proctoring, Accessibility + Student Success, this may influence your course registration.
Connect to Discuss your Schedule
⭐Screenshots were taken from both desktop and mobile versions of Bear Tracks. Depending on your device, the screen may look slightly different but the functions will be the same.
step-by-step guide to building and changing your schedule.
To Begin - Log into BearTracks and have it open in a separate tab.
Bear Tracks Login (Opens in a Separate Window)
Step 1
From the Bear Tracks homepage, click on the “My Schedule Builder” tile.
Step 2
Select your desired term. (We recommend starting with the Fall term).

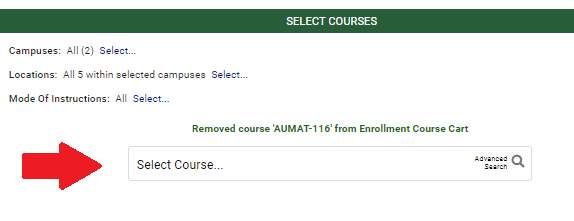
Step 3: Search For Classes
There are several different ways to search for classes using the search bar, or the "Advanced Search" window. In the search bar, you can begin typing in the course code or name of the course that you would like to take.
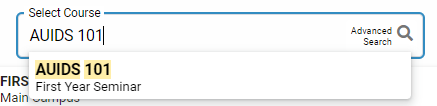
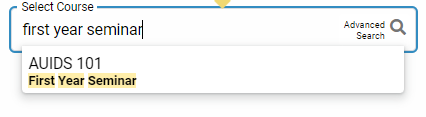
Searching for a Specific Course
If you know the specific course that you are wanting to take, you can enter the course code in the search bar. For example, search for AUIDS 101 (a required course for all first year students).
⭐All Augustana courses start with the letters “AU”.
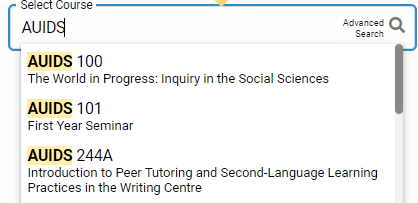
Searching for a Partial Course Number
If you want to look for 100, 200, 300, or 400-level courses in a specific discipline, you can type the partial course number in the search bar, such as “AUIDS 1”.
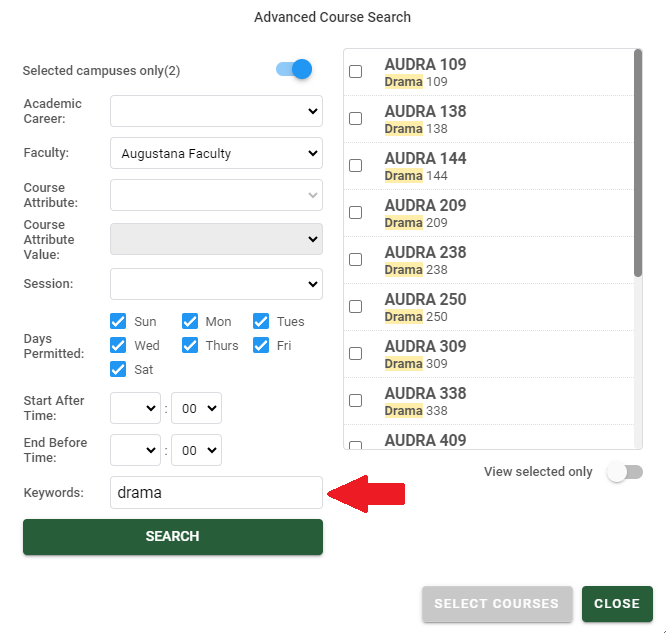
Searching by Topic
If there is a specific topic of interest, such as drama, you can search for that too!
⭐Searching by topic will show you all of the courses taught at the University of Alberta that meet this criteria, including North Campus and Campus Saint Jean courses. You can refine your search results to show just Augustana courses by clicking on the AU course code in the “subject” section on the left-hand side menu. Remember – all Augustana courses start with the letters “AU”.
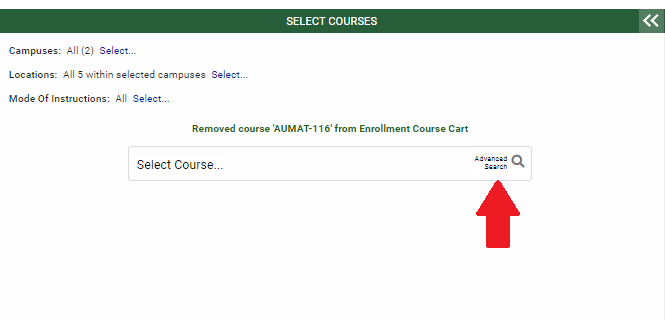
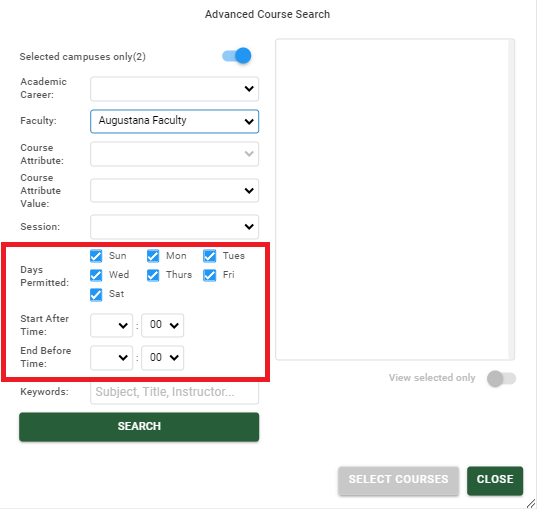
Alternatively, you can also use Advanced Search to find classes under more specific criteria such as the instructor teaching the course, the time of day it is held, or if it is taught in the 3 or 11-week sessions.
⭐If using advanced search, we recommend setting your faculty to "Augustana Faculty"
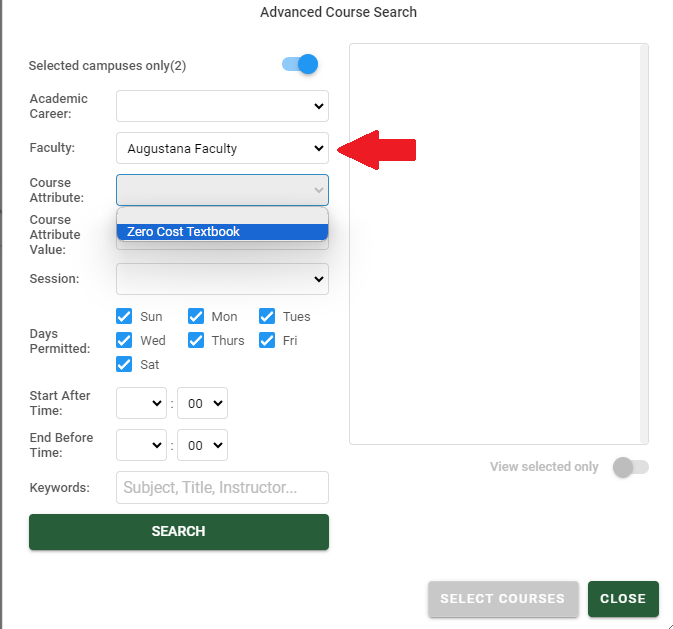
Search by Course Attributes
The drop down menu will allow you to select, and search for classes based on other common course components, such as zero cost textbooks
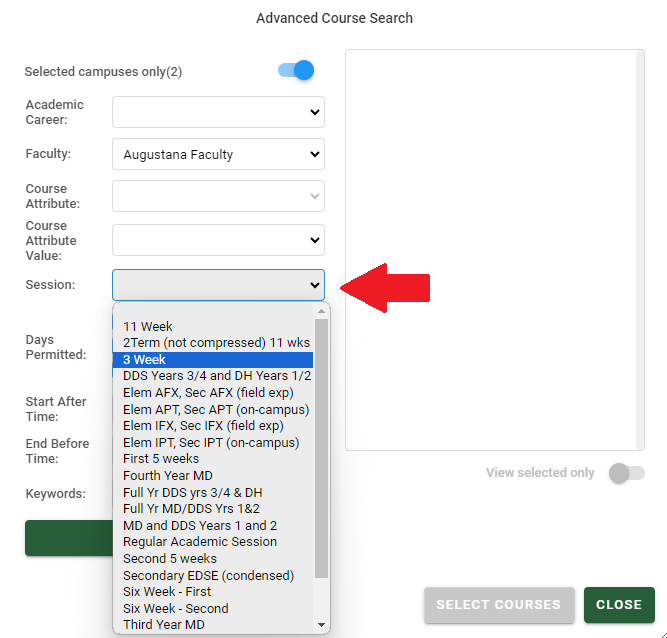
Search by Session
Using this function allows you to filter classes to a specific session within the term, such as the 3-week or 11-week.
Search by Specific Day or Time
If you have a specific time slot in your schedule, want to avoid an early morning class, or are searching for a 3-week course, consider using the advanced filters when viewing your search results.
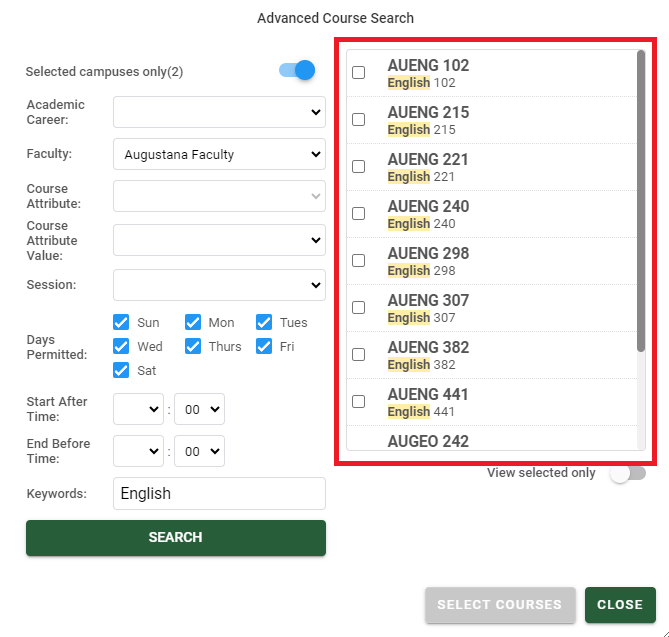
Search by Keywords
This function allows you to search for an available subject, catalogue number, or even an instructor's last name.
⭐You will want to select “Augustana Faculty courses.” All courses offered at the Augustana Campus are grouped in the drop-down menu alphabetically starting with “AU”.
Step 4
Under the search results, you will see the available courses that meet your search criteria.
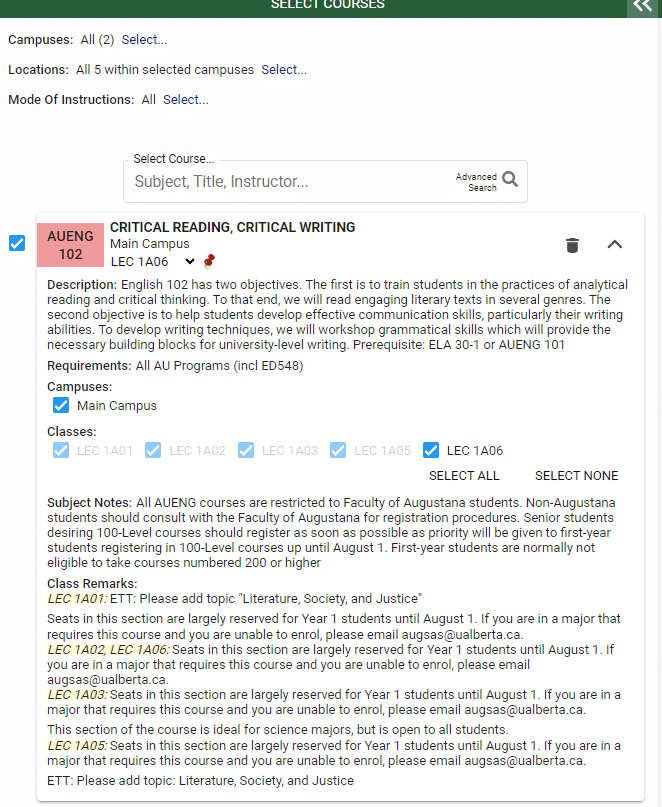
You can check course details by clicking on the drop-down arrow to see a description of the course, its pre/corequisites, as well as all of the available sections for the course. Note: Some courses only have 1 available section.
IMPORTANT information to look at when registering:
Be sure to look at the below information before selecting a course section.
Location
If a room is listed, the course is in-person. If “ONLINE” is listed, then the course will be offered remotely. If a course beginning with “AU” has “MAIN” as room, it does NOT mean that it is on the North Campus. 
Dates
The course offerings available at Augustana may vary in their class dates for each term. When selecting courses, you can determine the duration of the course, using the "Dates" listed to inform whether it is a 3-week, 5-week, or 11-week course. When you add courses to your schedule, you can also visually see when each of your classes is running. The Augustana Course List Tool can also help with this!
⭐Students are permitted to take one ★3 course in the 3-week block and up to four ★3 courses in the 11-week session.
Labs and Lectures
Some science courses have a lecture and a lab component. When this occurs, the system will display all available combinations and you can select your desired lab/lecture combination.
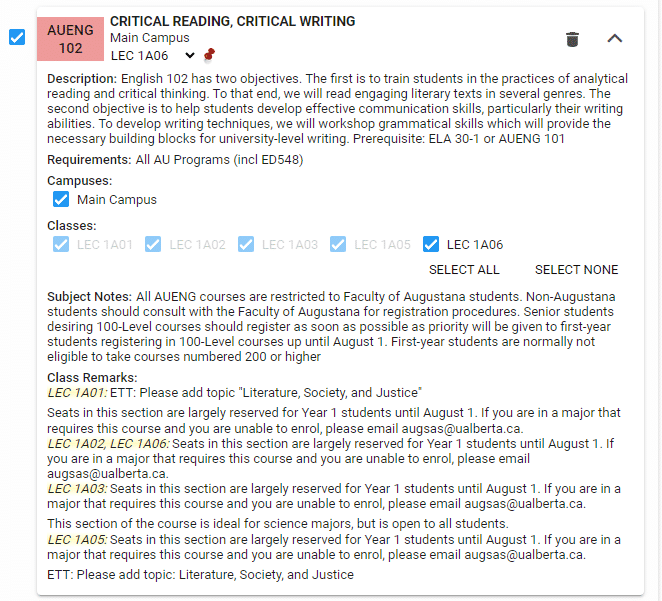
Notes and Class Remarks
Some courses have important notes associated with them such as seat reserves and information about the different course sections. You can view any notes associated with the course section by looking at the Class Remarks section.
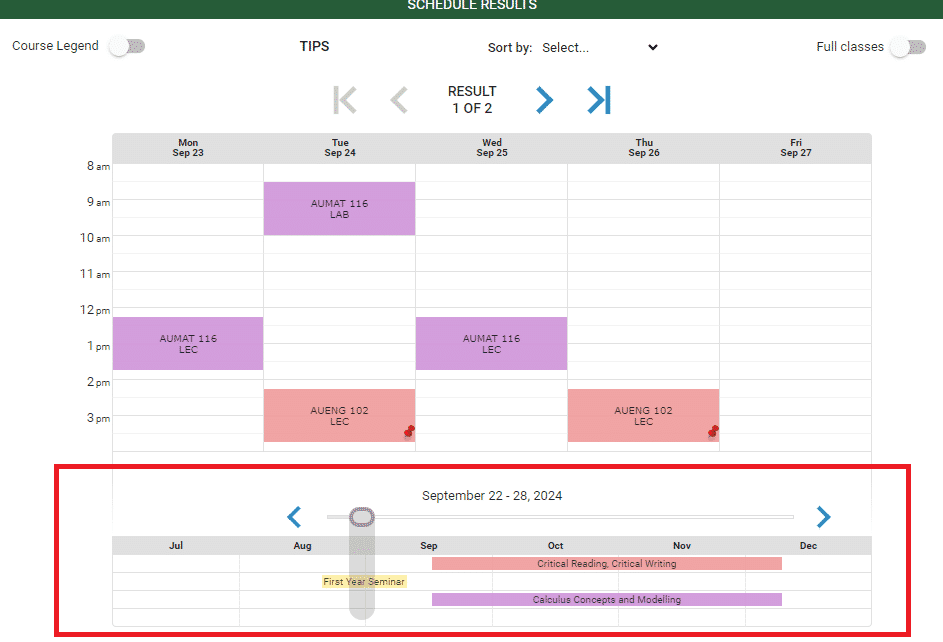
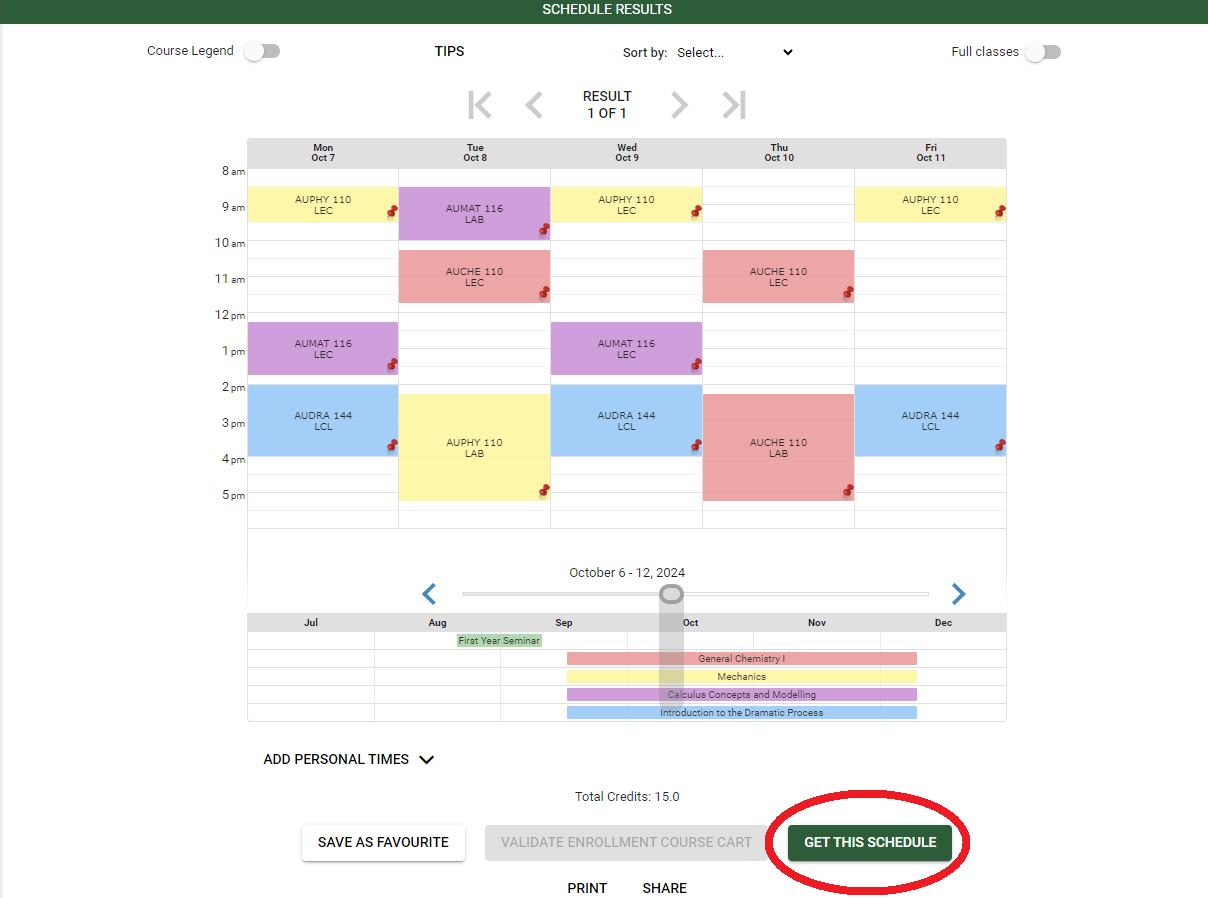
Step 5: Building Your Schedule
Any courses selected or pinned will appear in your visual schedule. In the course legend, you can find additional about the class such as:
- Course description
- Pre-requisites
- Seat reserve information
- Instructor
- Location
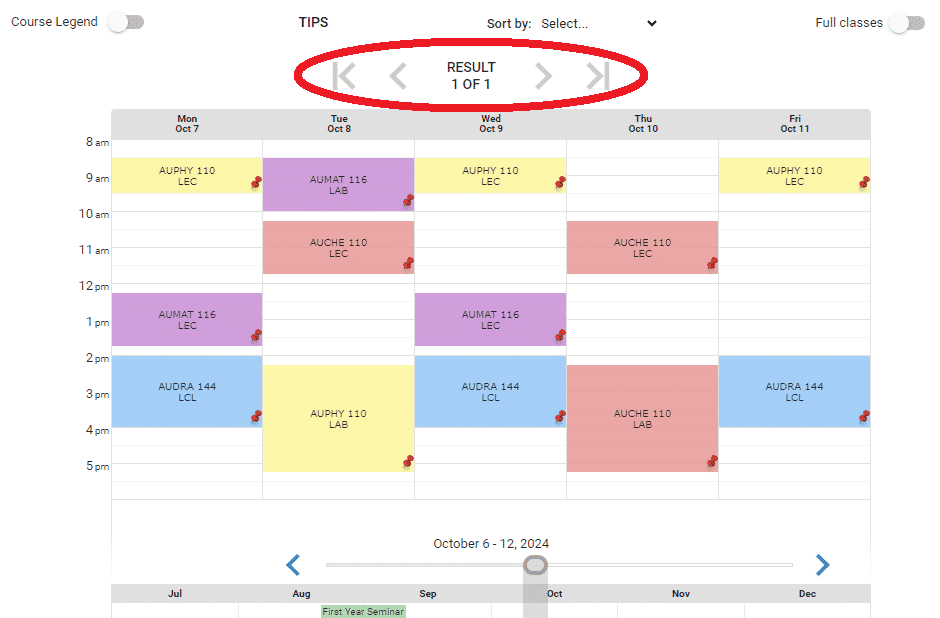
Navigate Schedule Options
Use the right and left arrows to view different schedule options (i.e., Results 1 to 30).
If courses conflict, the visual schedule will show “No results.” Toggle courses on/off using the checkboxes to see your schedule options.
Step 6
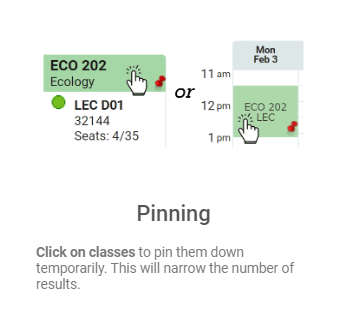
Pin your desired course section. If you are not sure which section you would like, do not pin any sections yet. Instead, search for and add additional courses of interest and then pin your desired section that does not conflict with other remaining courses.⭐ You can also save your preferred schedule by selecting "Save as Favourite."
- Favourites are stored on the right-side panel.
- Save more than one schedule option in case your preferred class is full at registration. You can save up to 10 schedules and can title each schedule.
- To retrieve a favourite schedule, expand the right-side panel by clicking on the double arrows at the top of the panel. Select the schedule you wish to retrieve and then click on “Load.” The schedule will display in your schedule results.
Step 7: Validate Your Schedule
Once you have pinned your classes, and selected your desired course section, you can "Validate" your schedule.
Validating your schedule checks for course restrictions and ensures you meet the requirements for each of the classes you selected. You can perform this step before your enrolment appointment date, helping to speed up the registration process and create a more seamless experience on your enrolment day.
⭐ We recommend validating your enrollment cart before your enrolment appointment. If your enrolment date has already arrived, you will see an 'Enrol' button.
⭐ If the course you are interested in is full, you can add the course to your ‘Watchlist.’ This enables Bear Tracks to notify you when a seat(s) becomes available. All students on a Watchlist are notified of an open seat and registration is first come, first served. Learn more about using your Watchlists below.
Step 8
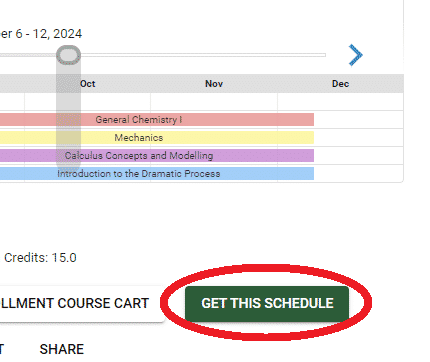
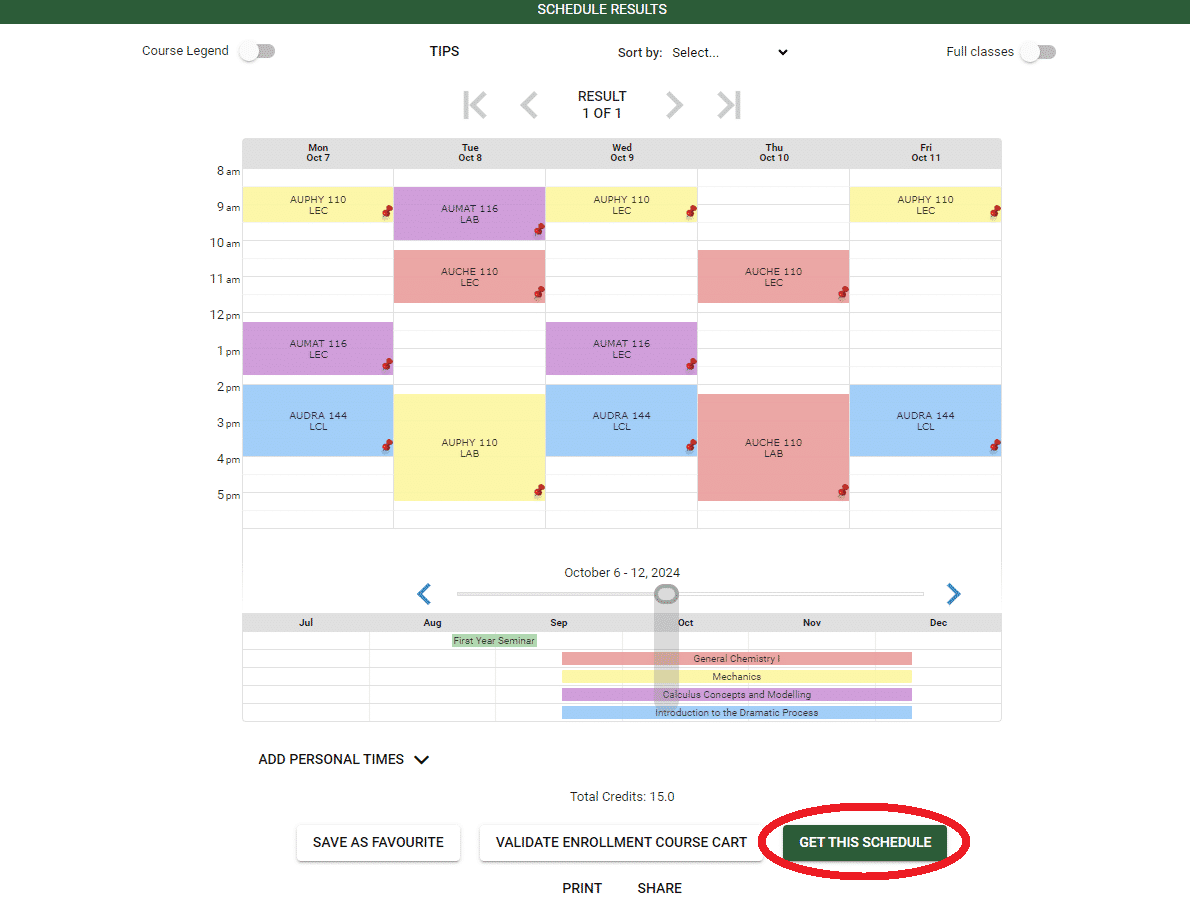
To Validate your course selections, select “Get this Schedule” from the bottom of the screen.

Step 9
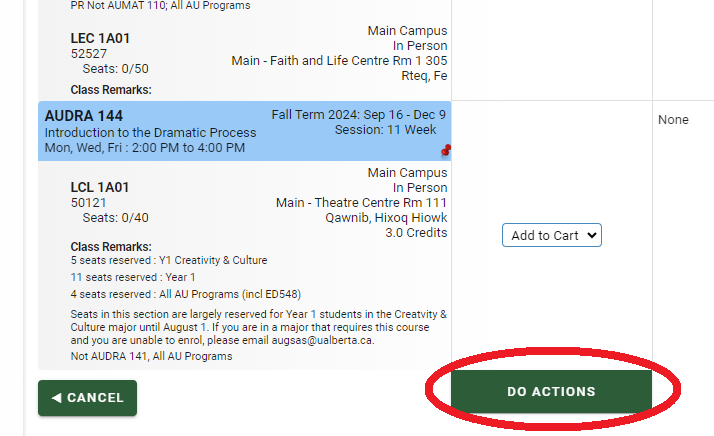
i)In the “Action” column, choose “Add to Cart” from the drop-down menu for every course.
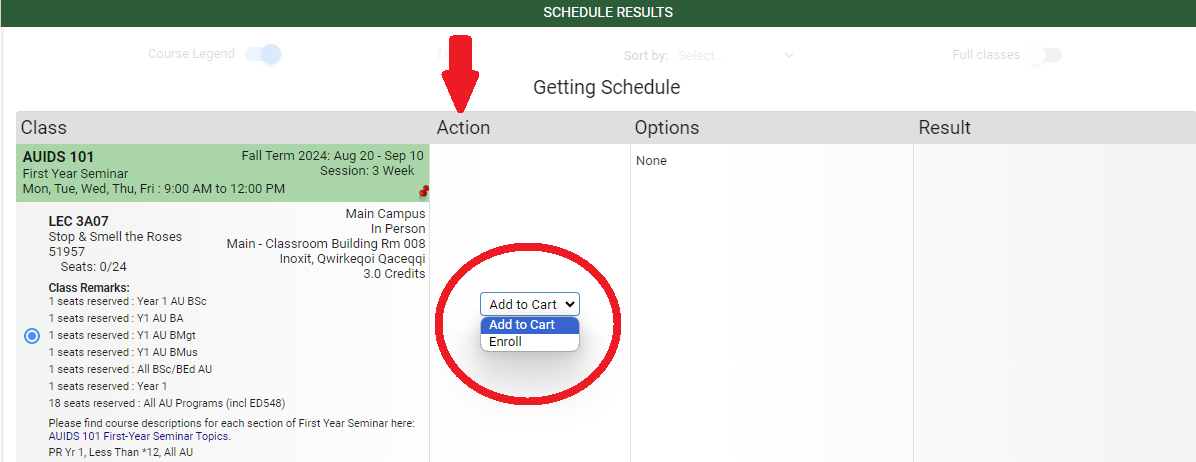
ii) Next, select "Do Actions" at the bottom of the page. If successful, you'll see "Added to Enrolment Course Cart" in the results column.
⭐Note: you have not registered and enrolled in courses at this point.
Step 10
Return to schedule results and select “Validate Enrolment Course Cart.”
⭐ Validating your schedule will alert you to any restrictions in your course selections such as unmet prerequisites or department permission needed to register.
- If successful, you will see the message “OK to Add” in the result column.
- If restrictions are not met, you will see a message in the result column with details.
- Revise your schedule and continue validating new classes until you have drafted a schedule that no longer includes registration errors.
Note: If you are taking a pre-requisite for a Winter term course in the Fall term, the validation function may not work for the winter term. You will be able to register for your Winter term course so long as you register for your Fall term courses first.

Step 11: Complete Registration
Once you have successfully validated five courses for the Fall term (one 3-week course and four 11-week courses), you are ready to register on your Enrolment Appointment Date.
If you validated your schedule before your enrolment appointment date:
Step 1
You will see that your selected courses are displayed as “In Enrolment Course Cart.”
Step 2
Select “Get this Schedule” from the bottom of the screen.
Step 3
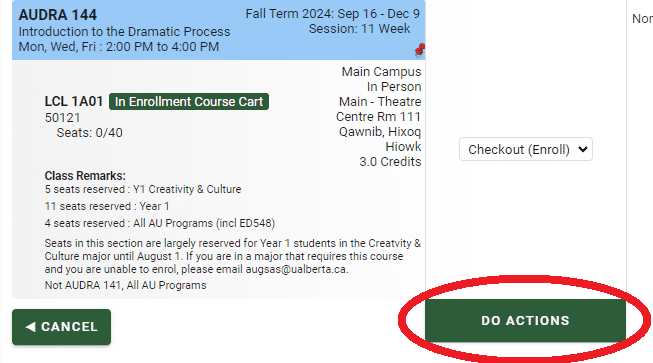
In the “Actions” column, each of your courses will display an action of “Checkout (Enrol)” from the drop-down menu.
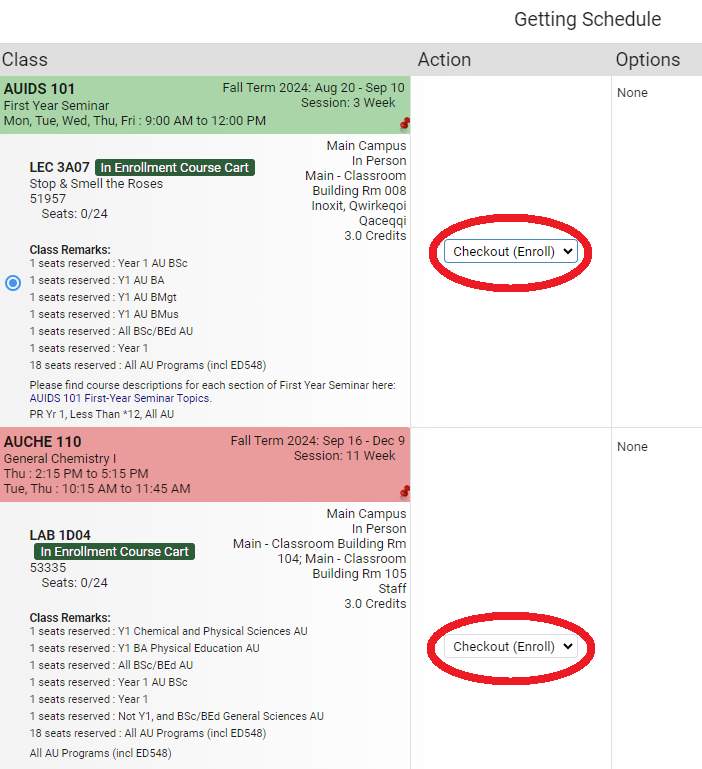
Step 4
Select "Do Actions."
- If successful, you will see the message “Added - This class has been added to your schedule” in the result column.
- If restrictions are not met, you will see a message in the result column with details. Return to “Select Courses” and revise your schedule as needed until you have drafted a schedule without registration errors and enrolled in all of your classes.
If you did not build and validate your schedule before your enrolment appointment date:
Step 1
Build your schedule (see “Search for and select courses”). Once you have your preferred schedule built, you can proceed with registration.
Step 2
Select “Get this Schedule” from the bottom of the screen.
Note: You do not need to add courses to your enrollment cart after your enrolment appointment date has arrived.
Step 3
In the “Action” column, each of your courses will display an action of “Enrol” from the drop-down menu.
Step 4
Select "Do Actions."
- If successful, you will see the message “Added - This class has been added to your schedule” in the result column.
- If restrictions are not met, you will see a message in the result column with details. Return to “Select Courses” and revise your schedule as needed until you have drafted a schedule without registration errors and enrolled in all of your classes.
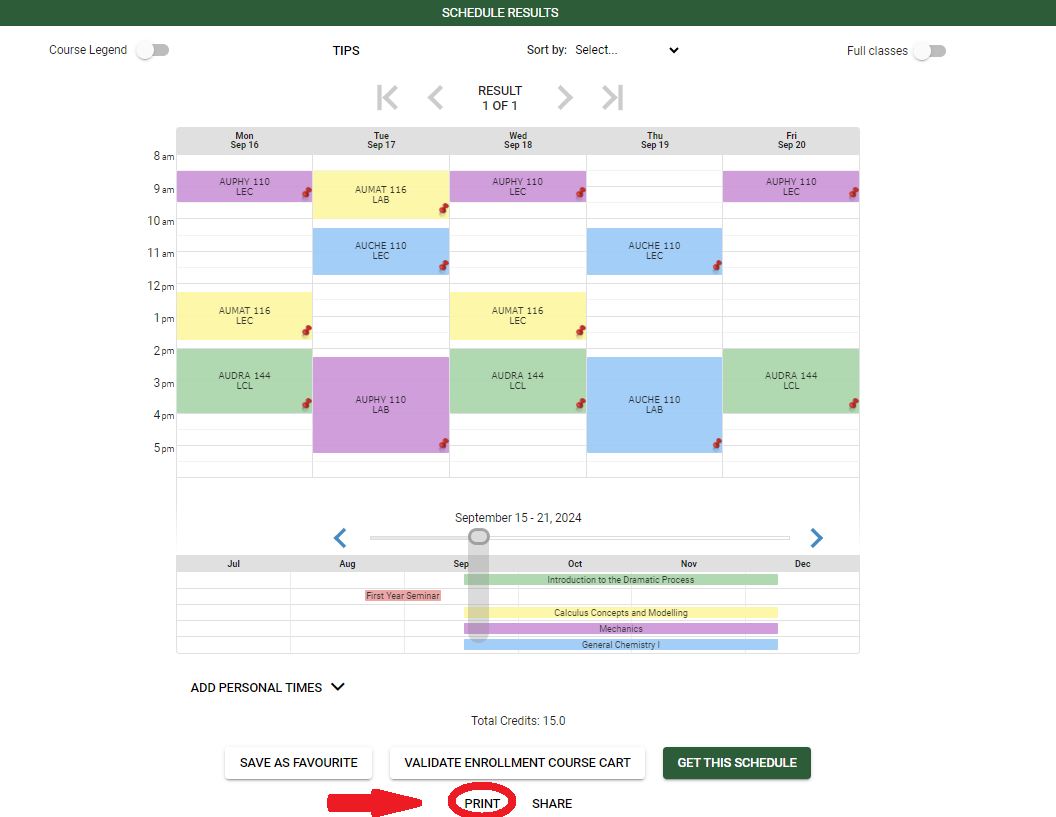
Step 12
Once you have enrolled in courses, you can find a copy of your schedule using the "Print" function at the bottom of the page, to see a detailed view of the weekly timetable and course information.
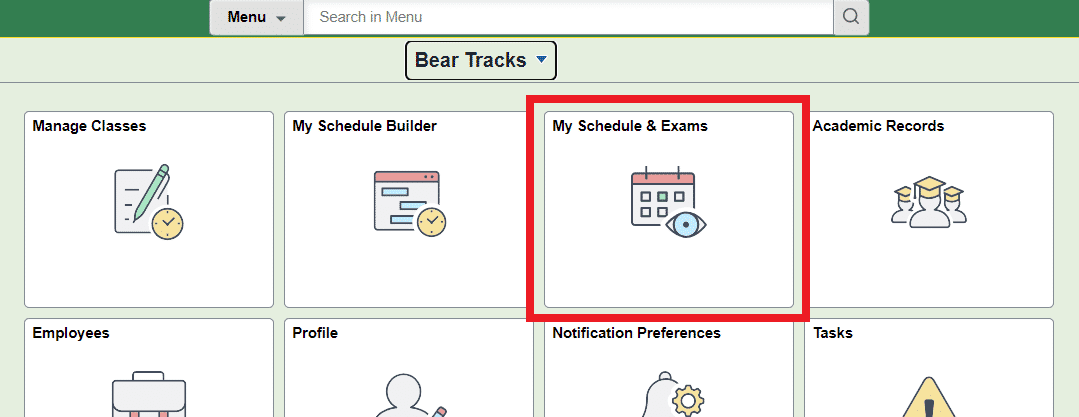
OR go back to the homepage of BearTracks, go to "My Schedule & Exams", select "My Schedule - Calendar" from the left side menu, and then choose your desired term.
⭐Once your schedule for the Fall Term is built, repeat this process for the Winter Term. When building your Winter Term schedule, you may run across time conflicts that require you to switch some courses from the Winter Term to the Fall Term. Use the Augustana Course List Tool to help you find courses that are offered in both terms.
⭐Some courses have seats reserved for specific majors and/or professional intentions. If you are unable to enrol in a course because of a reserve cap, please enrol in another course in its place for the time being. Reserves will be lifted on the first business day after August 1st. As a result, you may be able to enrol in the course then.⭐If you are unable to enrol in a course required for your major and/or professional intention, please connect with us at augsas@ualberta.ca or through the Student Service Portal.
Using the watch list
If a class is full, you can request to receive a notification via your UAlbert email when a spot opens up.
Step 1
Click on the 'Manage Classes' tile from your Bear Tracks homepage and select "Class Search and Enroll"
Step 2
Search for the class you're interested in. Make sure to remove the 'Open Classes' filter so that you can view all courses, including full ones.
Step 3
Click "Watch List" on your desired course(s).
Step 4
To ensure you are contacted when a spot opens up in one of the classes on your watch list, confirm your notification preferences via the 'Notification' tile on your homepage. Make sure that your notifications are enabled.
You will now receive an email if a seat opens up. Watch lists are first-come, first-served; you will not be automatically enrolled in a class once a spot opens up.
Add/Drop Deadlines
Be sure to know the Add/Drop deadlines for the 3-week block. They will often be the day after a classes begins. The Add/Drop Deadline for the 11-week session is generally 8 business days after the start of classes." To confirm the Add/Drop Deadline, check out the “Important Dates” page.
If you plan to drop your 3-week course and add a new class ensure you complete this right away!
Watch a video walkthrough about how to drop a course
Enrolling in courses does not mean your schedule is set in stone! In this video, we’ll walk you through the necessary steps to remove a course from your schedule, no sweat! We also highlight some key things to watch for to ensure you are dropping your course(s) at the right time.
Note: AUIDS 101 is a required course for all Augustana Faculty degree programs. As a result, you cannot drop this course on your own since it is required to graduate. In certain situations if a student is unable to complete AUIDS 101 as their first course, they will still be required to take it the next time it is offered, even if that is the start of their second year.
When to Drop vs. Swap a Class
Dropping a course removes a course from your schedule leaving nothing in its place. It will free up time and credits for you to enrol in another course if you wish. Swapping a course means you are dropping and adding a new course simultaneously (replacing) without the risk of losing the seat in one (or both) course(s). If you are unable to enrol in the new course, the swap will not take place.
⭐The swap feature is great to use when courses start to fill up!
⭐All students are encouraged to perform class swaps and in Bear Tracks using the “Swap” function under the “Manage Classes” tile. Swaps in Bear Tracks are performed at the same time while swaps in the “My Schedule Builder” tile will drop the class before adding the new class. Swapping in “Manage Classes” will ensure you get into your new class before your current class is dropped.
For step-by-step instructions on how to drop and swap a class, please refer to the online registration modules linked below:
ERROR MESSAGES EXPLAINED
Please read the error message you received carefully to help determine the underlying issue. If you are having trouble enrolling in a class the issue could be one of the following:
Closed Class
A class may be closed to web registration due to department restrictions. Study-abroad, field studies, and practicum courses require students to complete a separate application prior to being enrolled. Please speak to a Student Advisor about the process for getting enrolled.
Financial Hold
You will be unable to add any classes to your schedule if you have any outstanding fees. In Bear Tracks, click on the “Financial Account”" tile to see if you have a hold on your record, the amount owing, and which department you need to contact to clear the hold. Once your fees have been paid the financial hold will be lifted and you will be able to enrol in classes. Students should contact the Student Service Centre if they require assistance or have questions about their fees.
Full Class
If a class is full you will be unable to enroll. You can add the class to your Watch list to receive a text notification when a spot becomes available. Once you receive this text, you can log in to Bear Tracks to attempt to register for that class again. (Watch list registration is first-come, first-served. All students are notified so don’t delay!)
Pre/Co-Requisites
If you are missing the listed pre and/or corequisite in the course description, Bear Tracks will not let you enrol. If you are missing the corequisite, enrol in the specified corequisite then try enrolling again. If you have taken a prerequisite from another faculty or institution Bear Tracks may not recognize it, please contact the Student Advisors for assistance.
Repeat Class
If you are enrolling in a class that you have already been granted credit for, Bear Tracks will allow you to enroll but will receive a message stating “you have registered in a class that you have previously taken.” Students at the U of A are not permitted to receive credit for the same course twice with exception to Selected Topics courses.
Restrictions & Reserves
Certain classes will have specific restrictions associated with them, for example: reserved seats for specific year standing or majors (these are removed on August 1st). Most travel abroad options are closed to web registration. Students should visit the (Inter)national course page for applications.
Time Conflicts
If your courses overlap, you will not be able to enrol in them. Re-arrange your schedule so that you do not have time conflicts and then try again to enroll.
Unit Load
Students are permitted to take a maximum of 3 credits in the 3-week block and 14 credits in the 11-week session. You will receive an error message if you are attempting to enrol above the maximum allowed unit load.