Between the Stitches: Tapestry Weaving a Wall-Hanging
Learn about some of the weaving techniques used to make textiles in the exhibition, Dragons on the Tibetan Plateau with firsthand experience.
Create your own tapestry woven wall-hanging with this hands-on, virtual activity! Follow the instructions below and have fun choosing your own colour palette, yarn texture, and weaving pattern, or technique.
Tapestry Weaving Activity:
Time:
Loom Construction: 1-2 hours
Weaving: Varies, depending on the size and detail of your pattern (ours was 3+ hours)
What you'll need:
- 1 large piece of sturdy cardboard
- (We used a piece originally measuring 13 x 13 inches)
- 1 smaller piece of cardboard (optional)
- Hot glue
- Pencil/Pen
- Ruler
- Exacto knife or sharp scissors
- Strong, uncoloured warp yarn
- (We used uncoloured twine)
- Assorted colours of weft yarn
- (We used three pastel colours of various textures)
- Fork
- Yarn Needle
- Unsharpened pencil (optional)
Instructions:
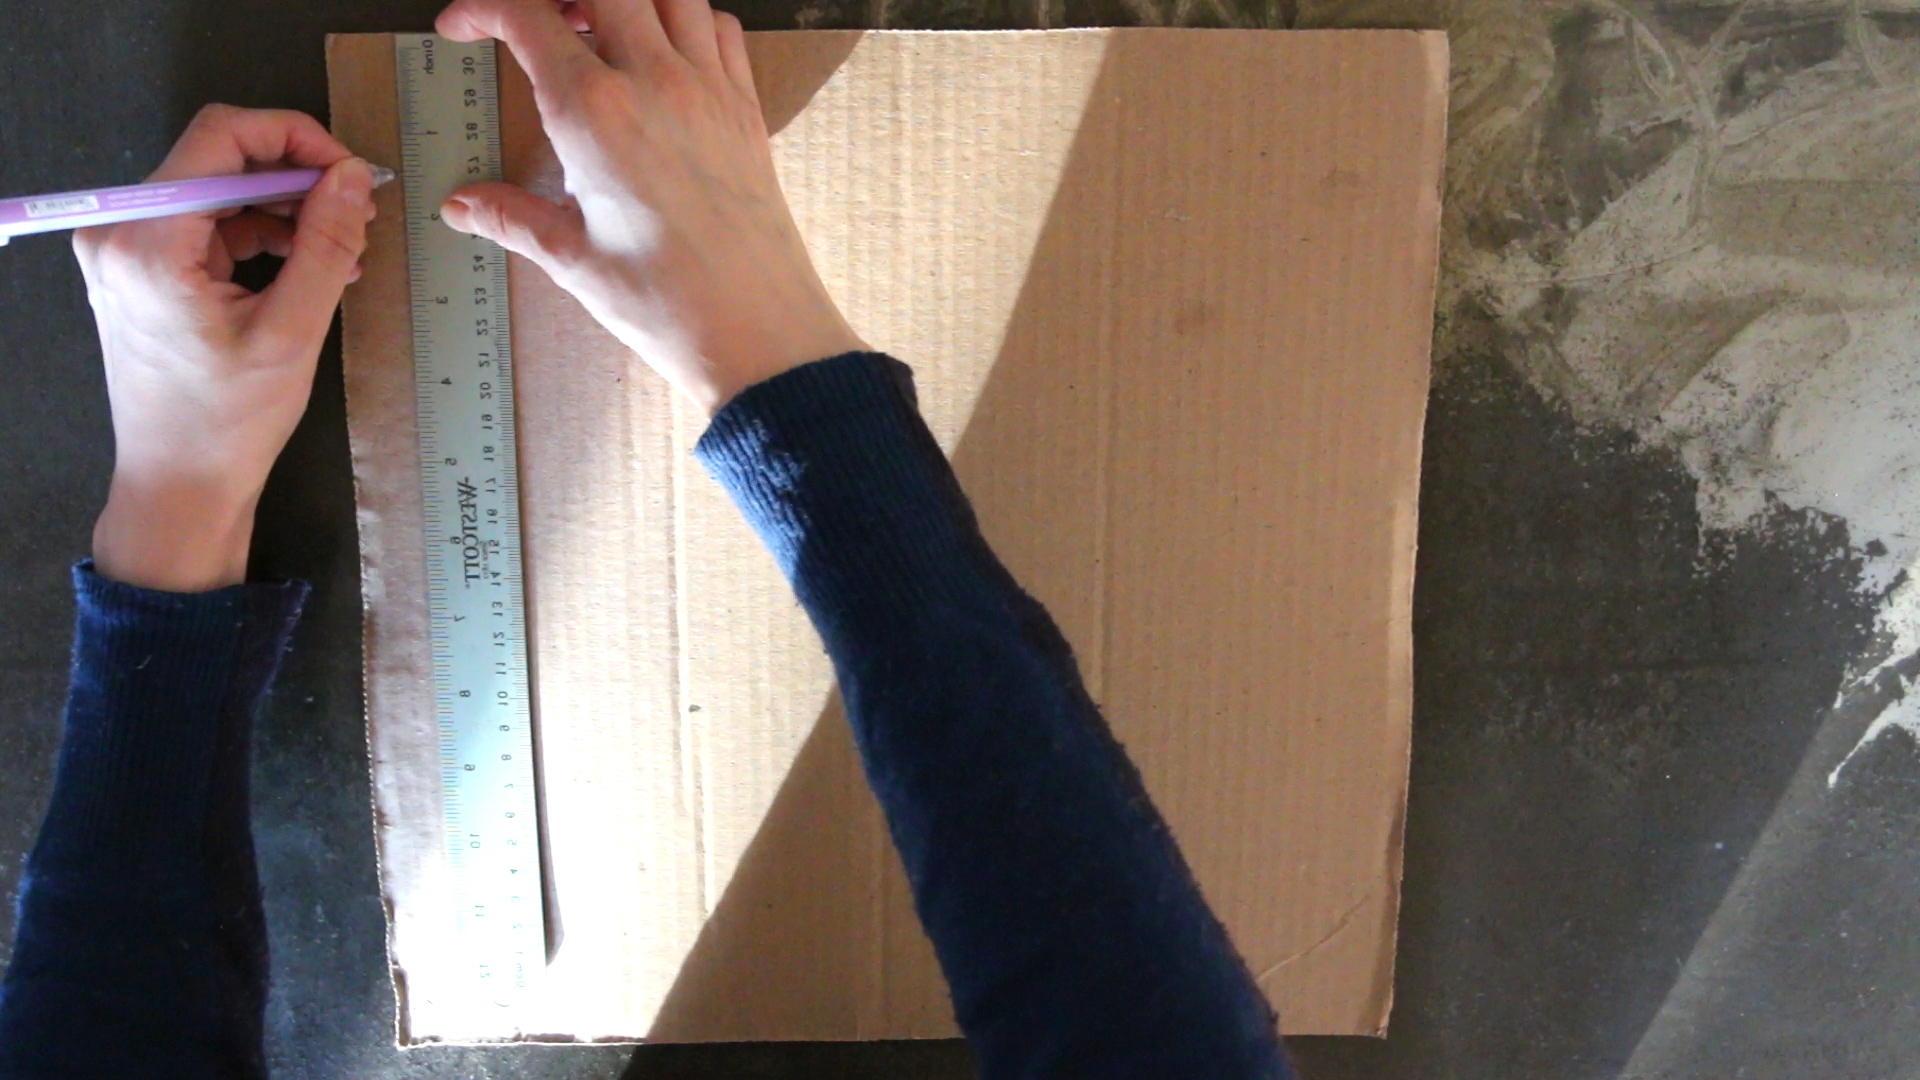
1. Start with a large, sturdy piece of cardboard. Consider the dimensions of this cardboard because it will affect the size of your finished woven piece. The longer and wider the cardboard, the longer and wider your final woven piece will be. We chose an original cardboard piece that measured 13 x 13 inches to end with a finished piece measuring 8 x 8.5 inches.
Alternatively, you can use two separate, smaller pieces of cardboard, which will not affect your measurements. If choosing this option, measure and cut two smaller pieces of cardboard that measure the width of your larger cardboard piece x 1.5 inches - Skip to step 5.
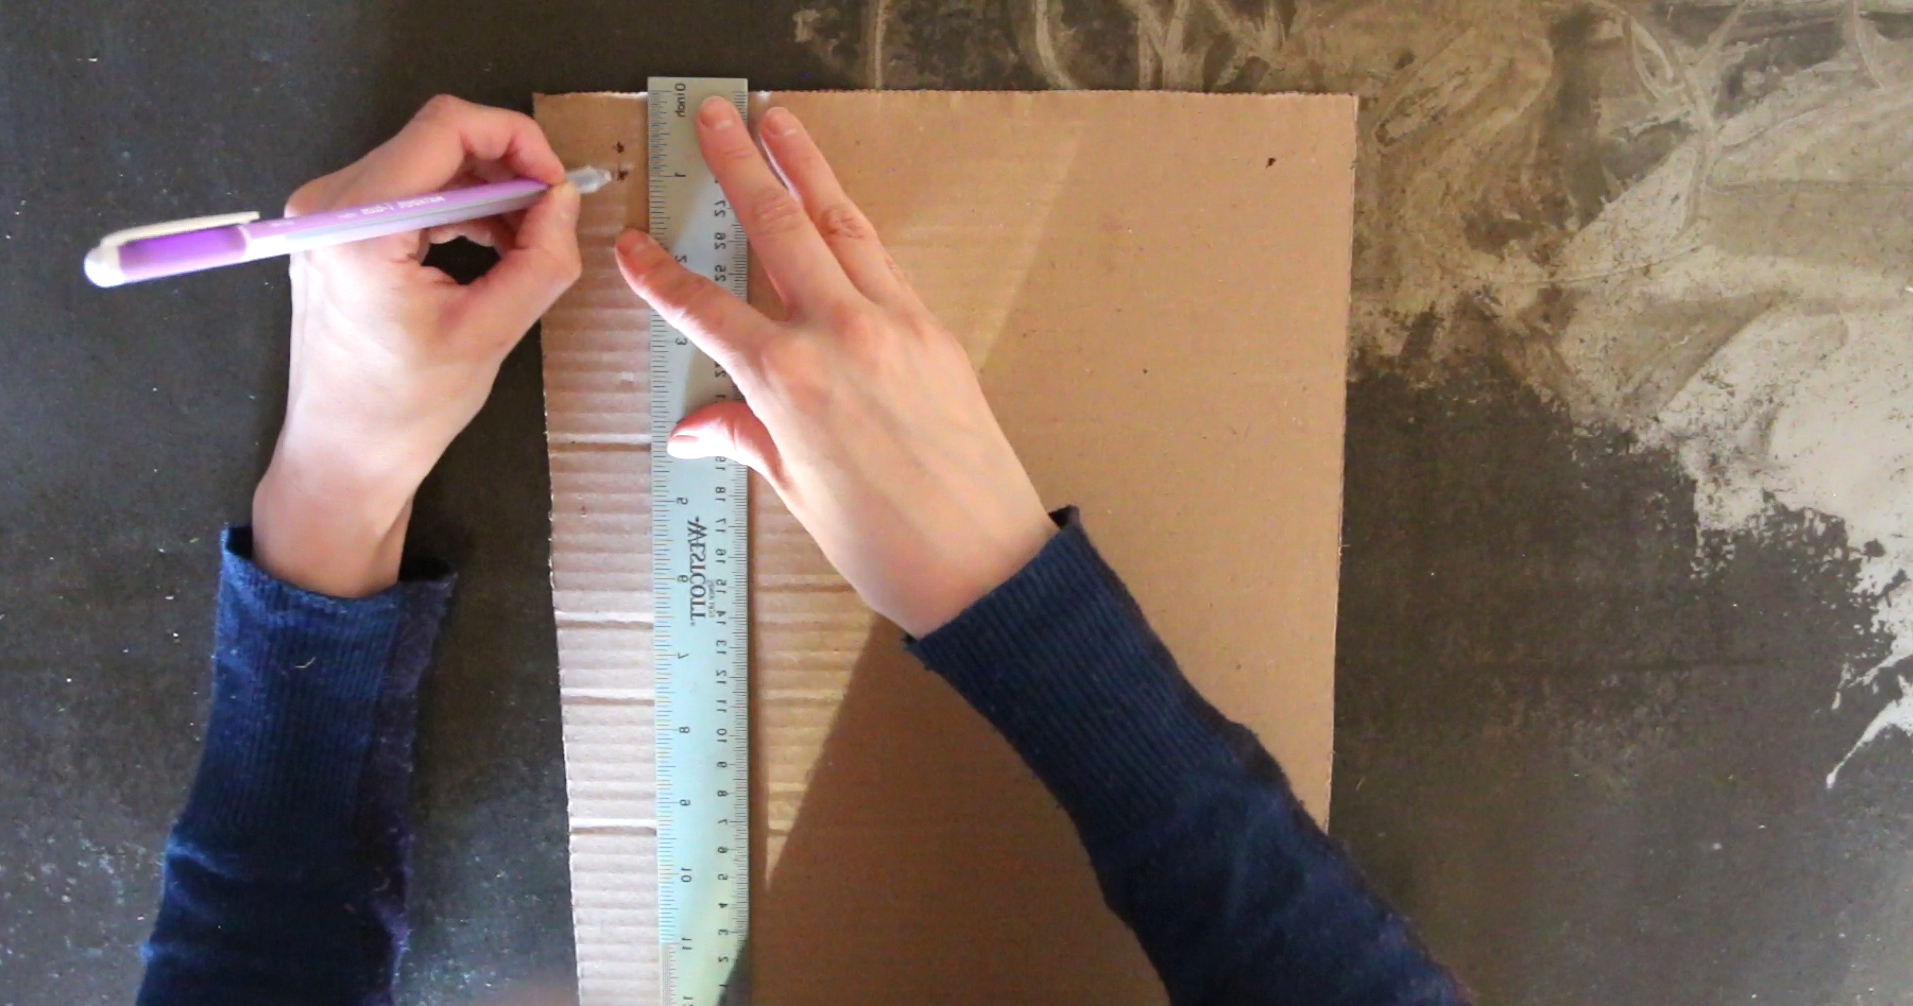
2. With your ruler, measure 1.5 inches; down from the top edge of your cardboard. Using a pencil or pen, make two marks: one close to the left long edge and one close to the right long edge of the cardboard. Using your ruler, draw a clear line across the entire width of the top edge, connecting those two points. This should result in one horizontal line that extends across the entire width of your cardboard, measuring 1.5 inches from the top edge. Repeat this step for the bottom edge.
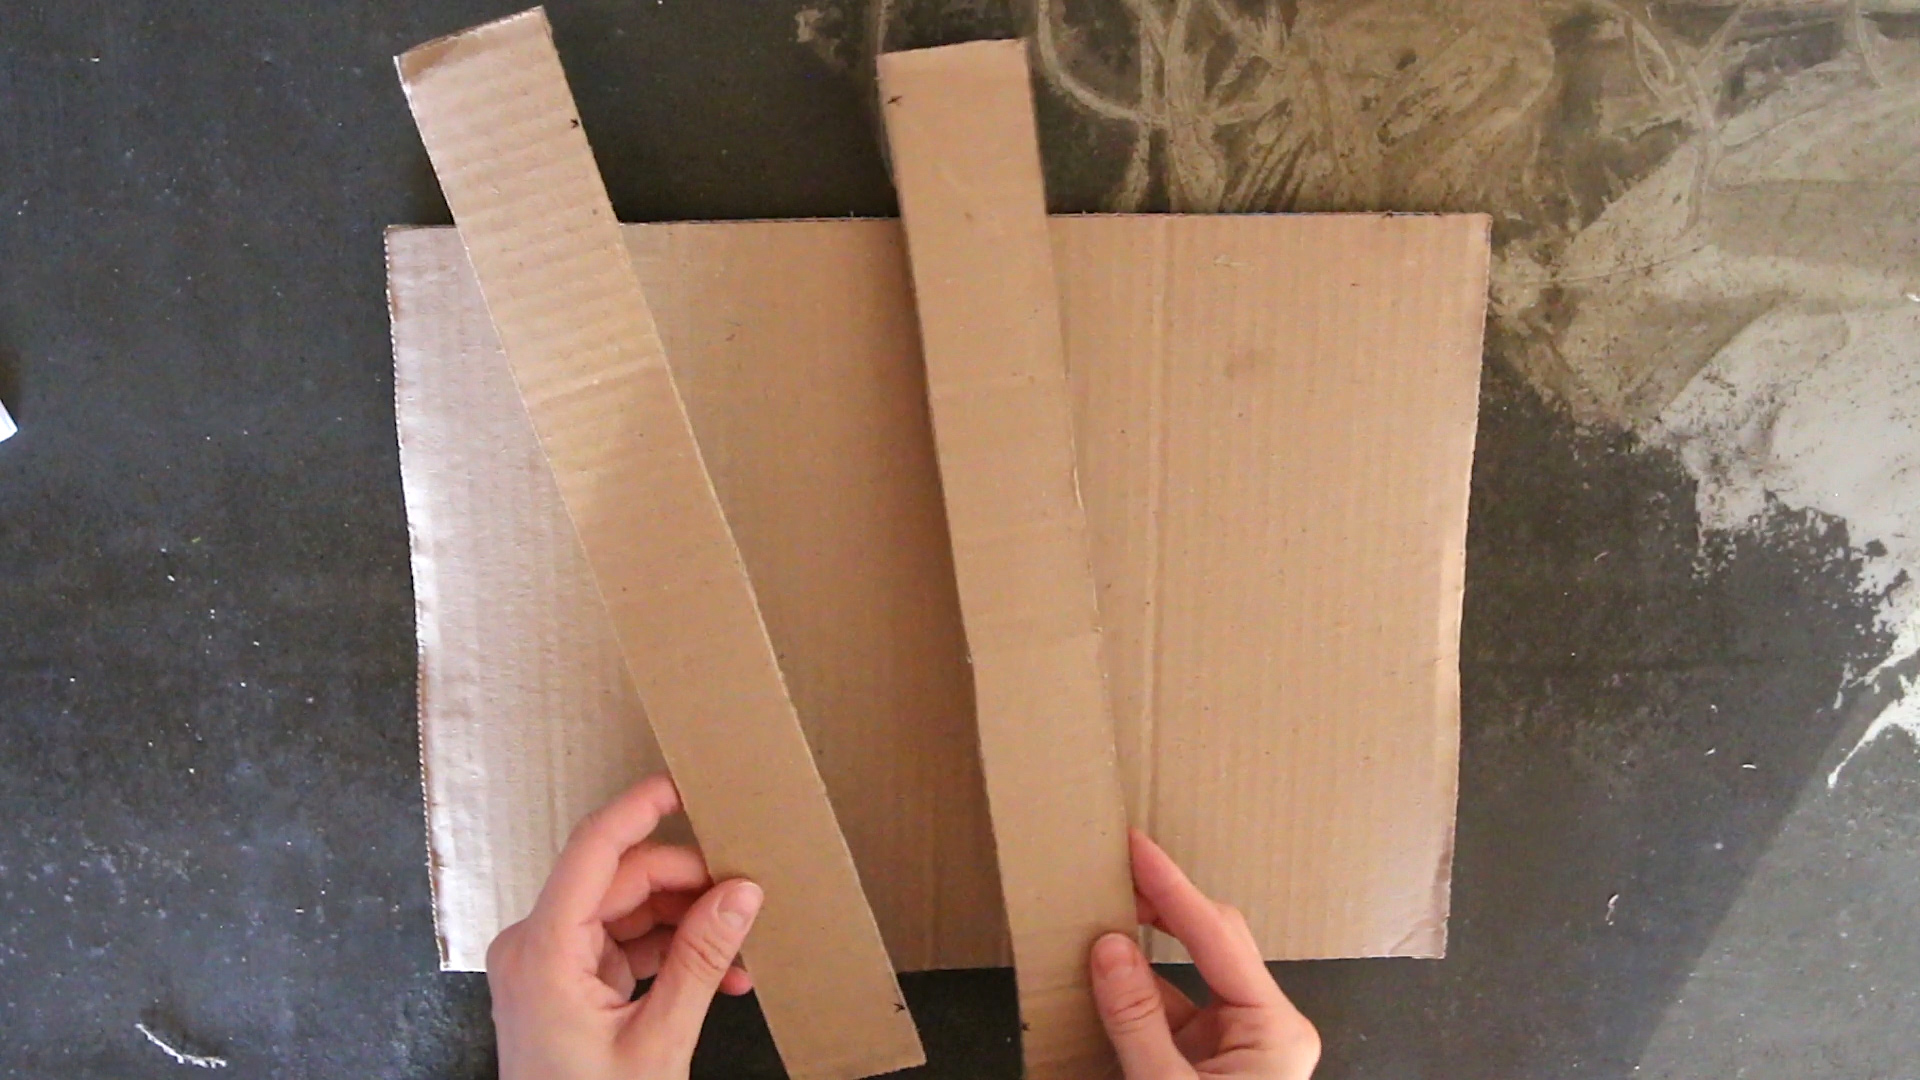
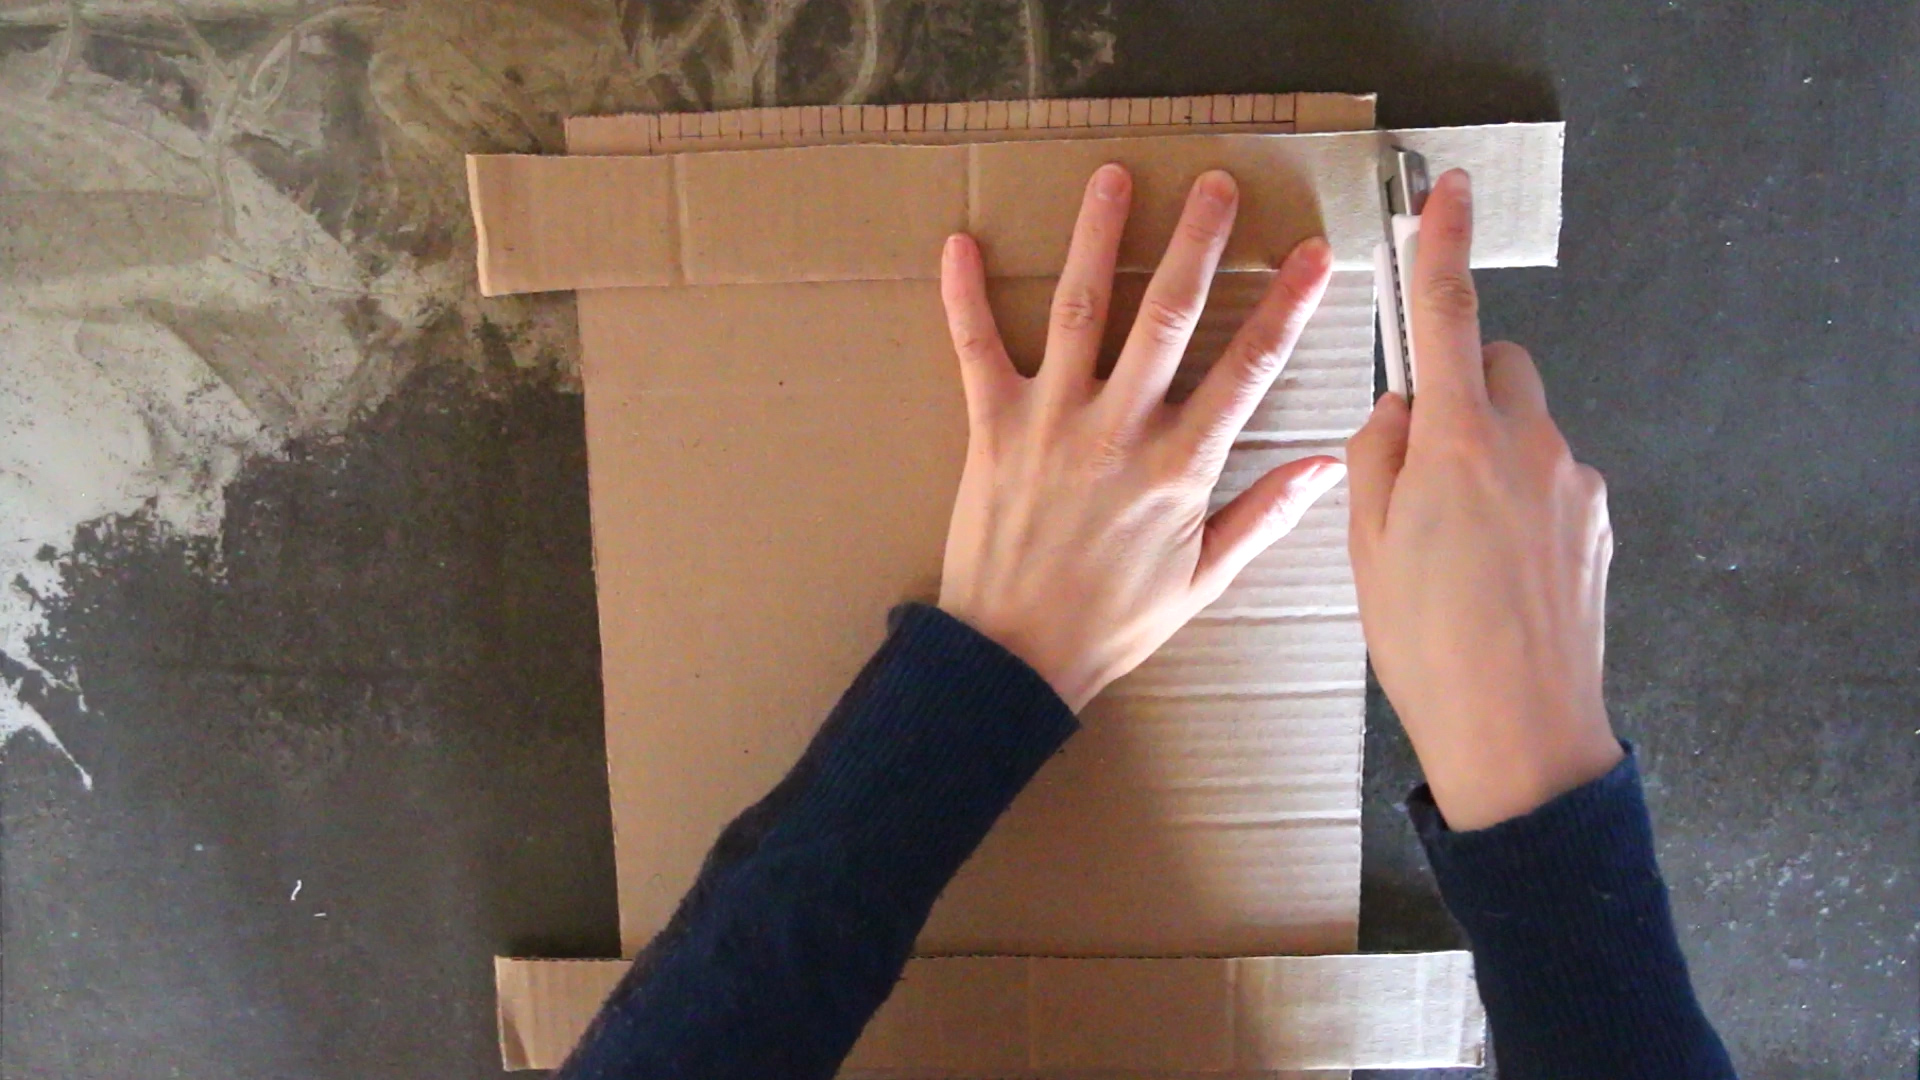
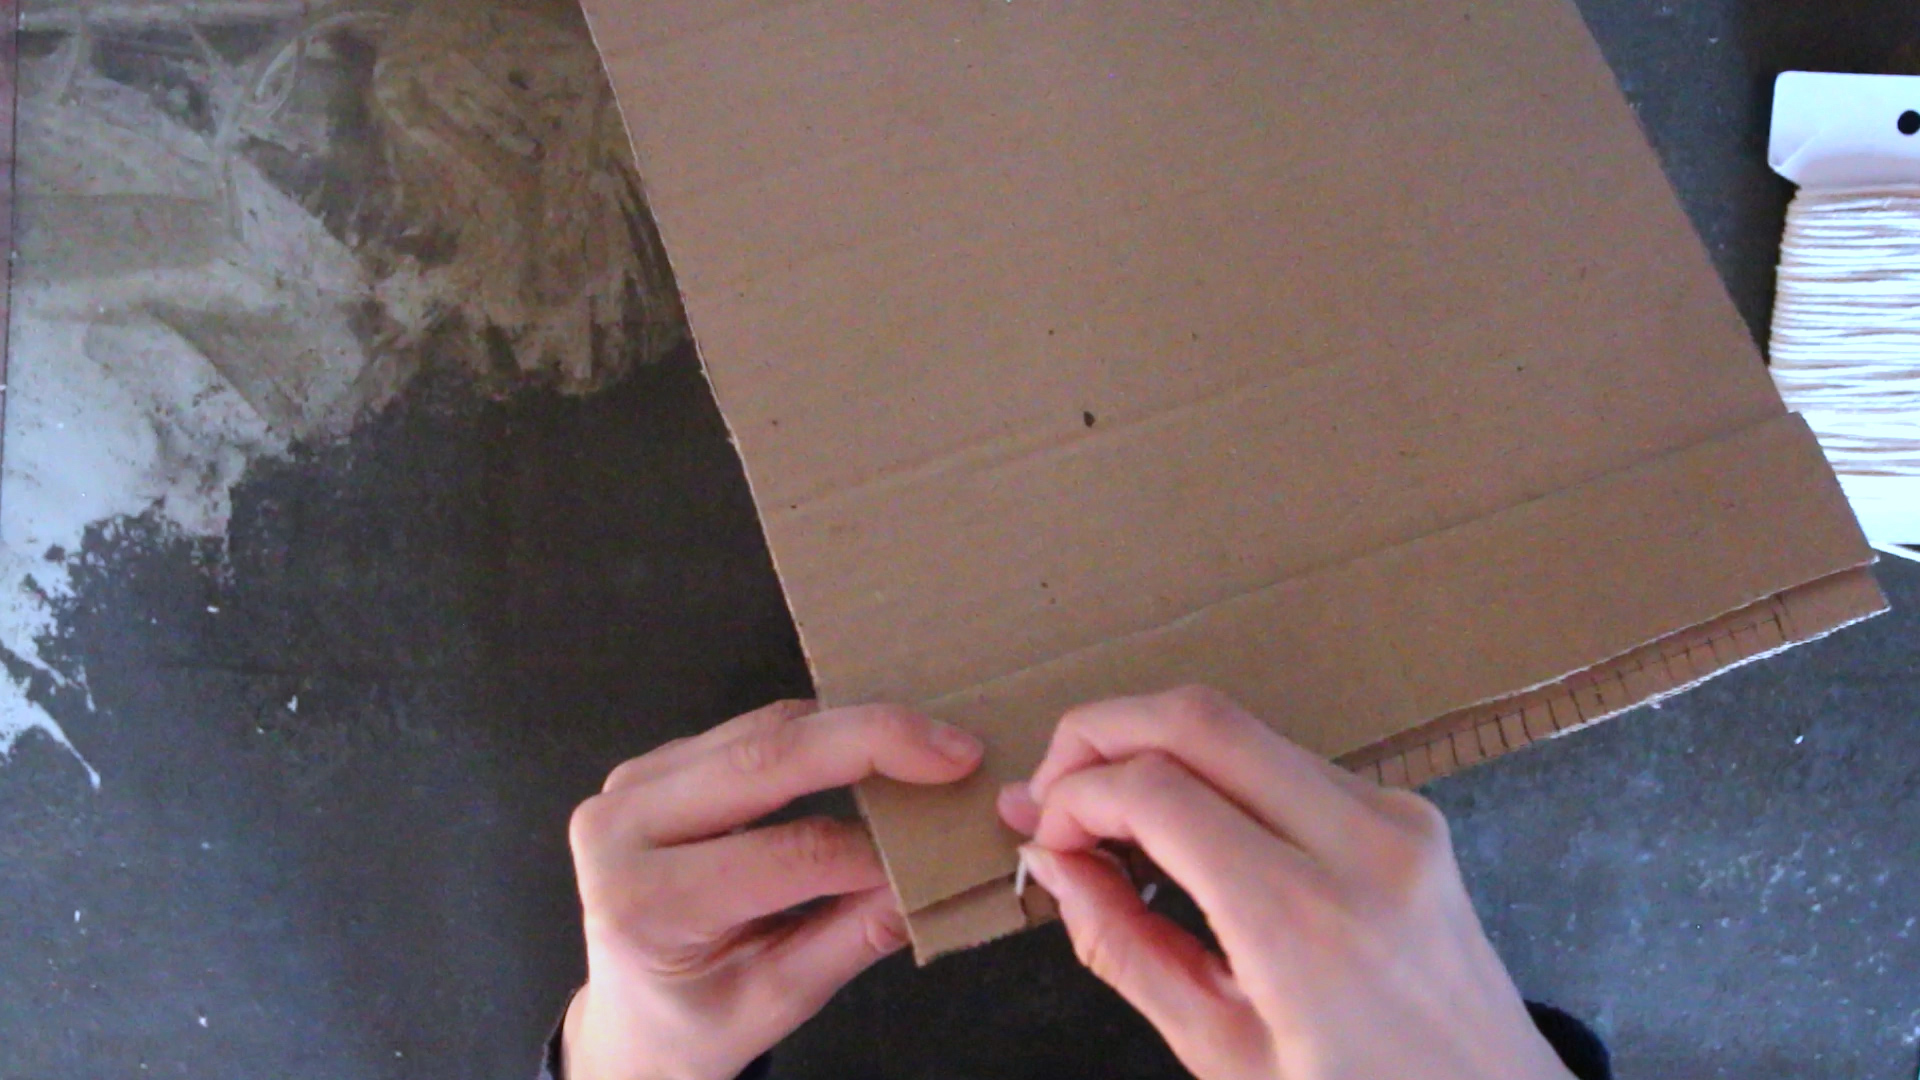
3. Using an Exacto knife or sharp scissors, cut along these two lines. This will result in two separate rectangular pieces of cardboard, measuring the length of your original cardboard by 1.5 inches. Set these pieces aside for now.
4. Rotate your cardboard piece to ensure the left and right edges are longer than the top and bottom edges.
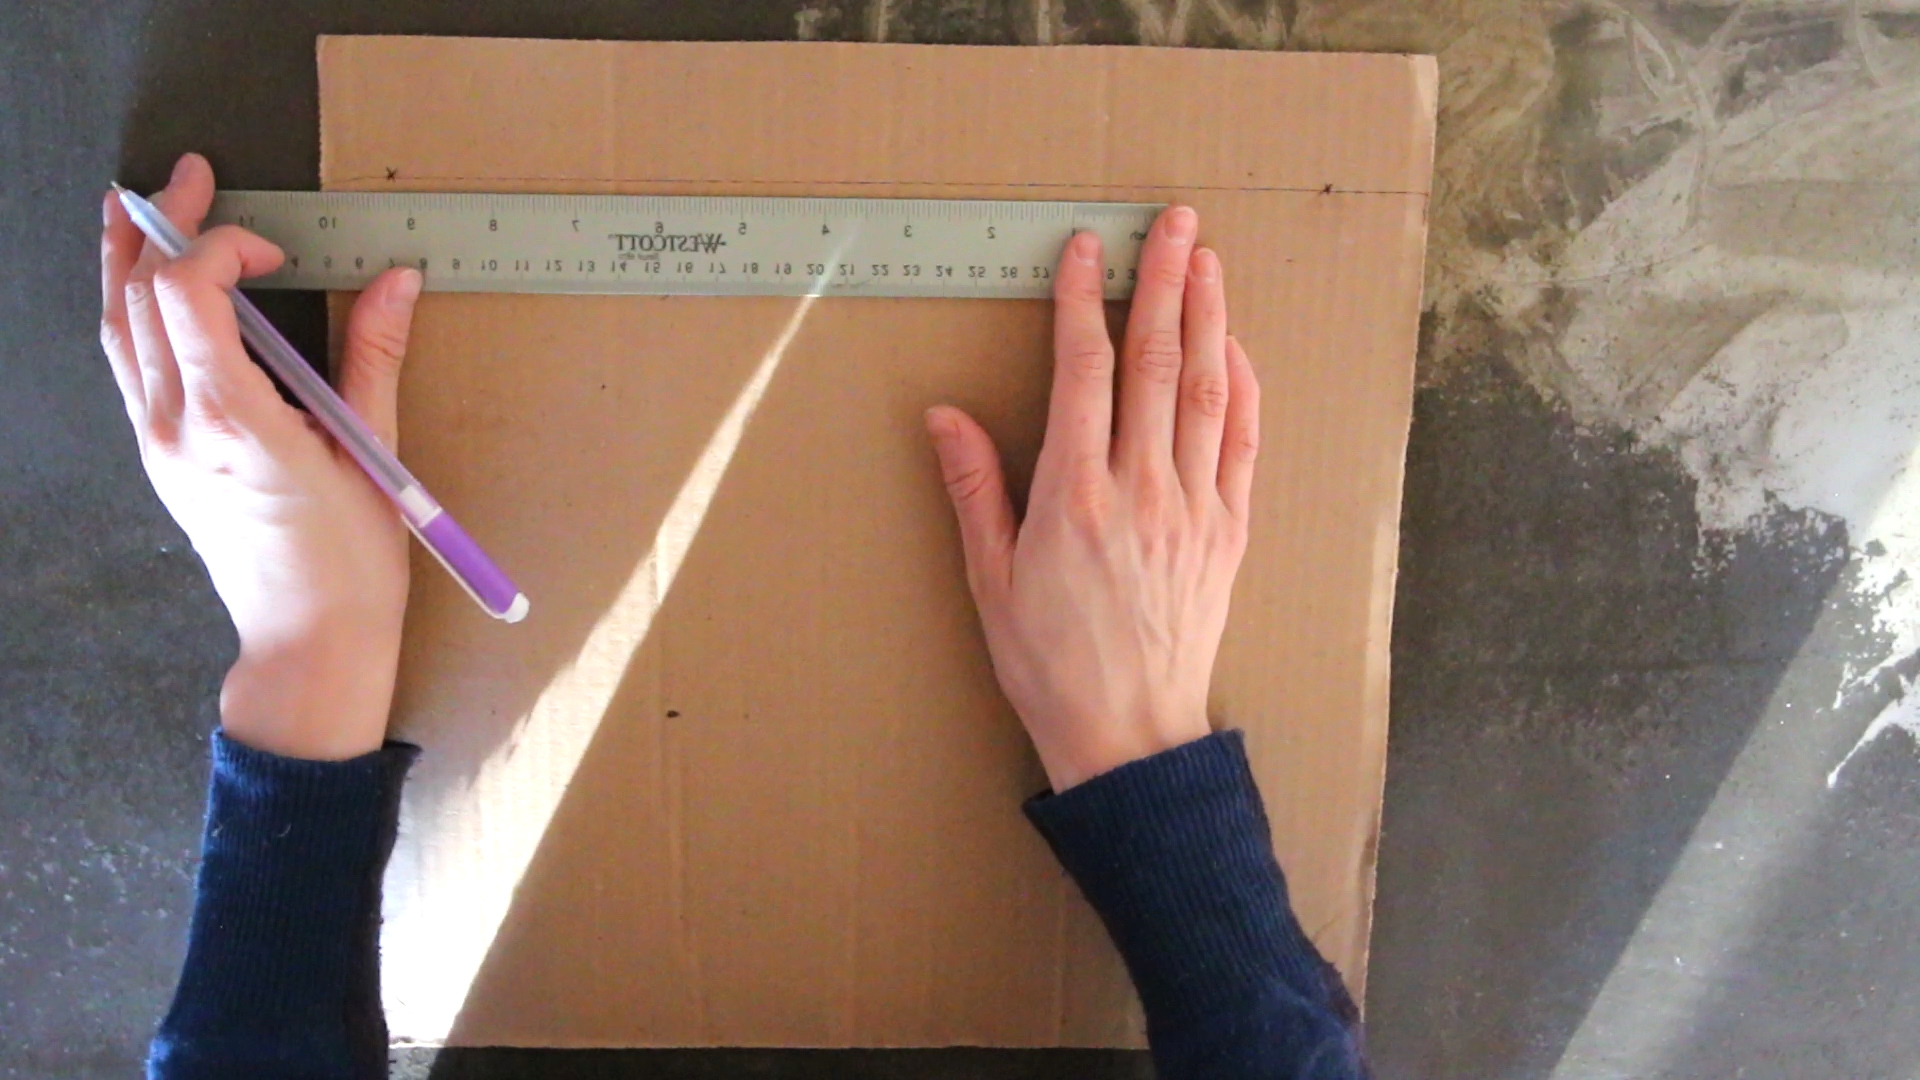
5. Using your ruler, measure 1-inch inside, from the left and right edges, and 1-inch down from the top and bottom. Mark these points at all four corners of your cardboard piece. Draw a short line to connect the top and bottom edges to this 1-inch marking point.
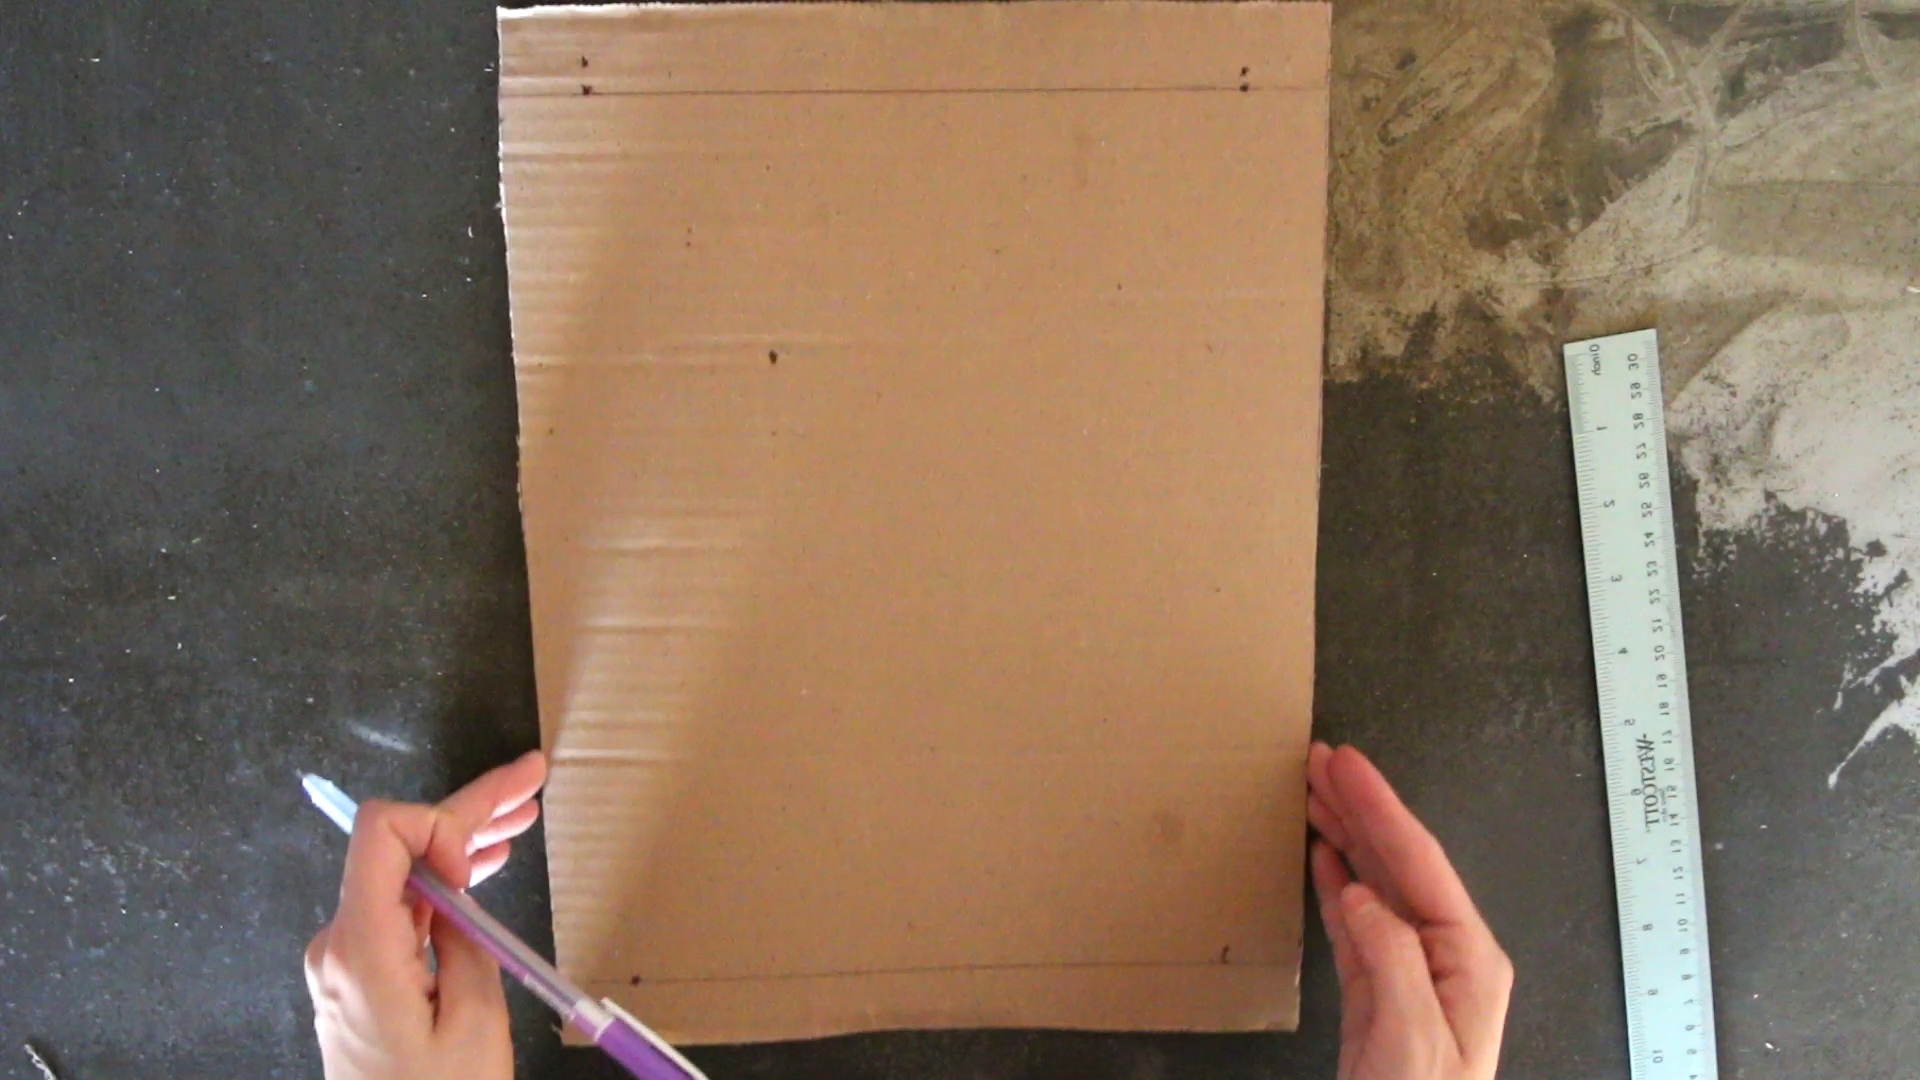
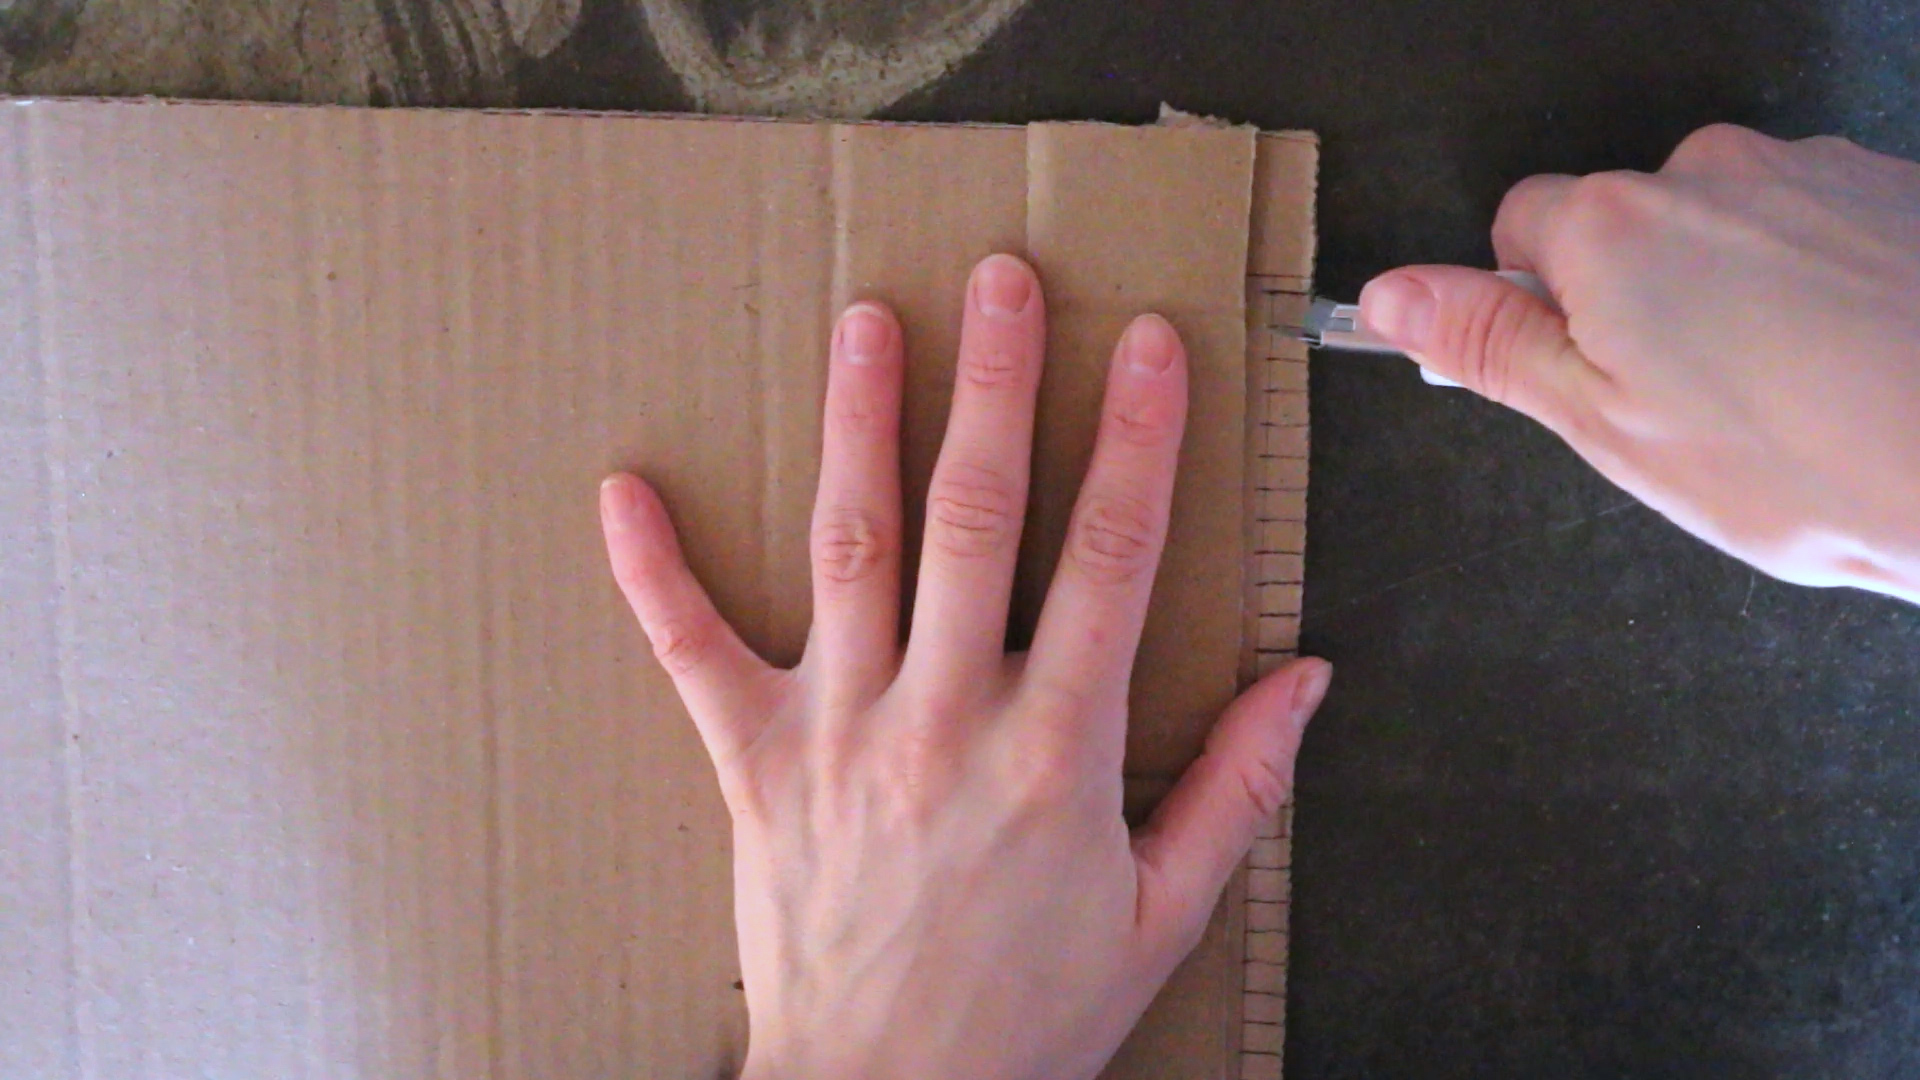
6. Using your ruler, measure ¼ -inch down from the top edge on the 1-inch line marking. Draw a short line. Using your ruler, from this point, mark every ¼-inch until you reach the 1-inch line on the other side of the cardboard. Draw ¼ inch long lines from the top edge of the cardboard to the ¼ -inch mark you just made. This will result in a series of short ¼ -inch lines that are marked between each 1-inch marking, resembling a fine-tooth comb. Repeat this step for the bottom edge. The ticks made that the top should align with the ticks at the bottom.
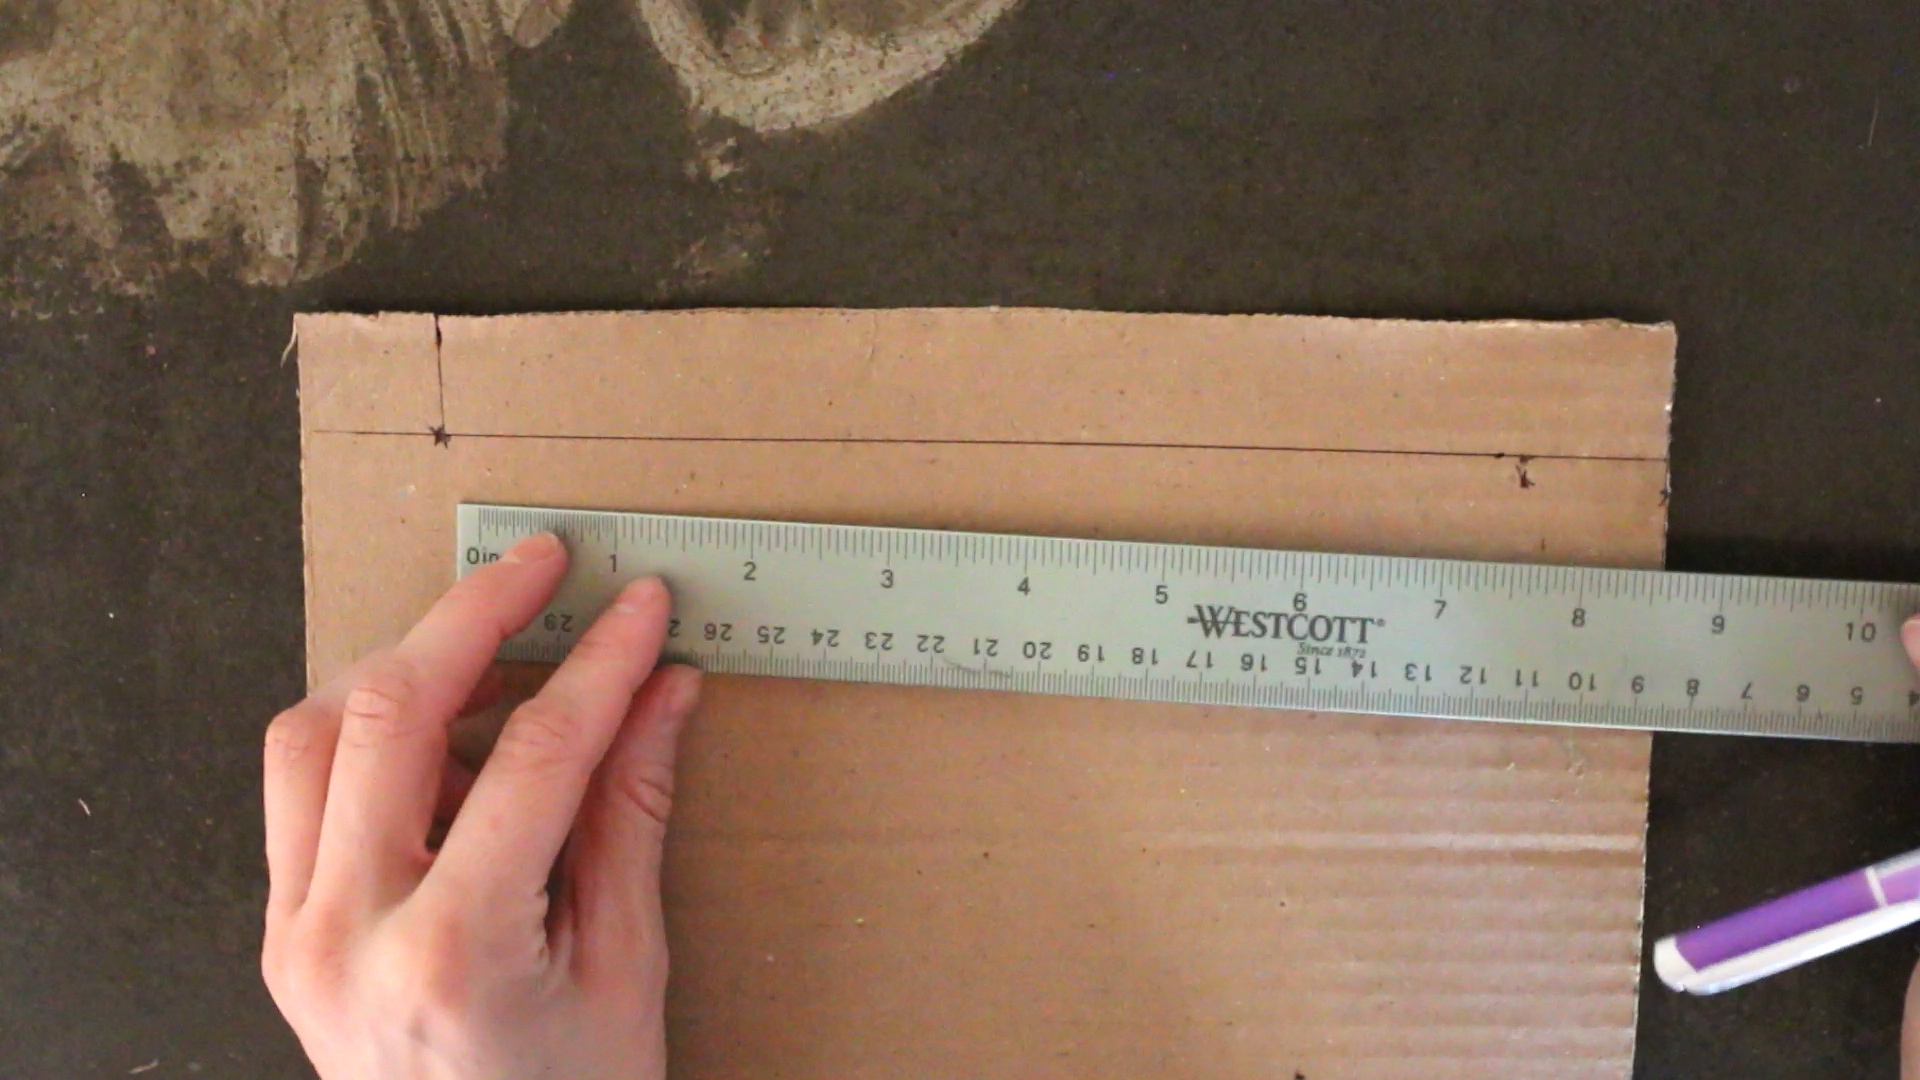
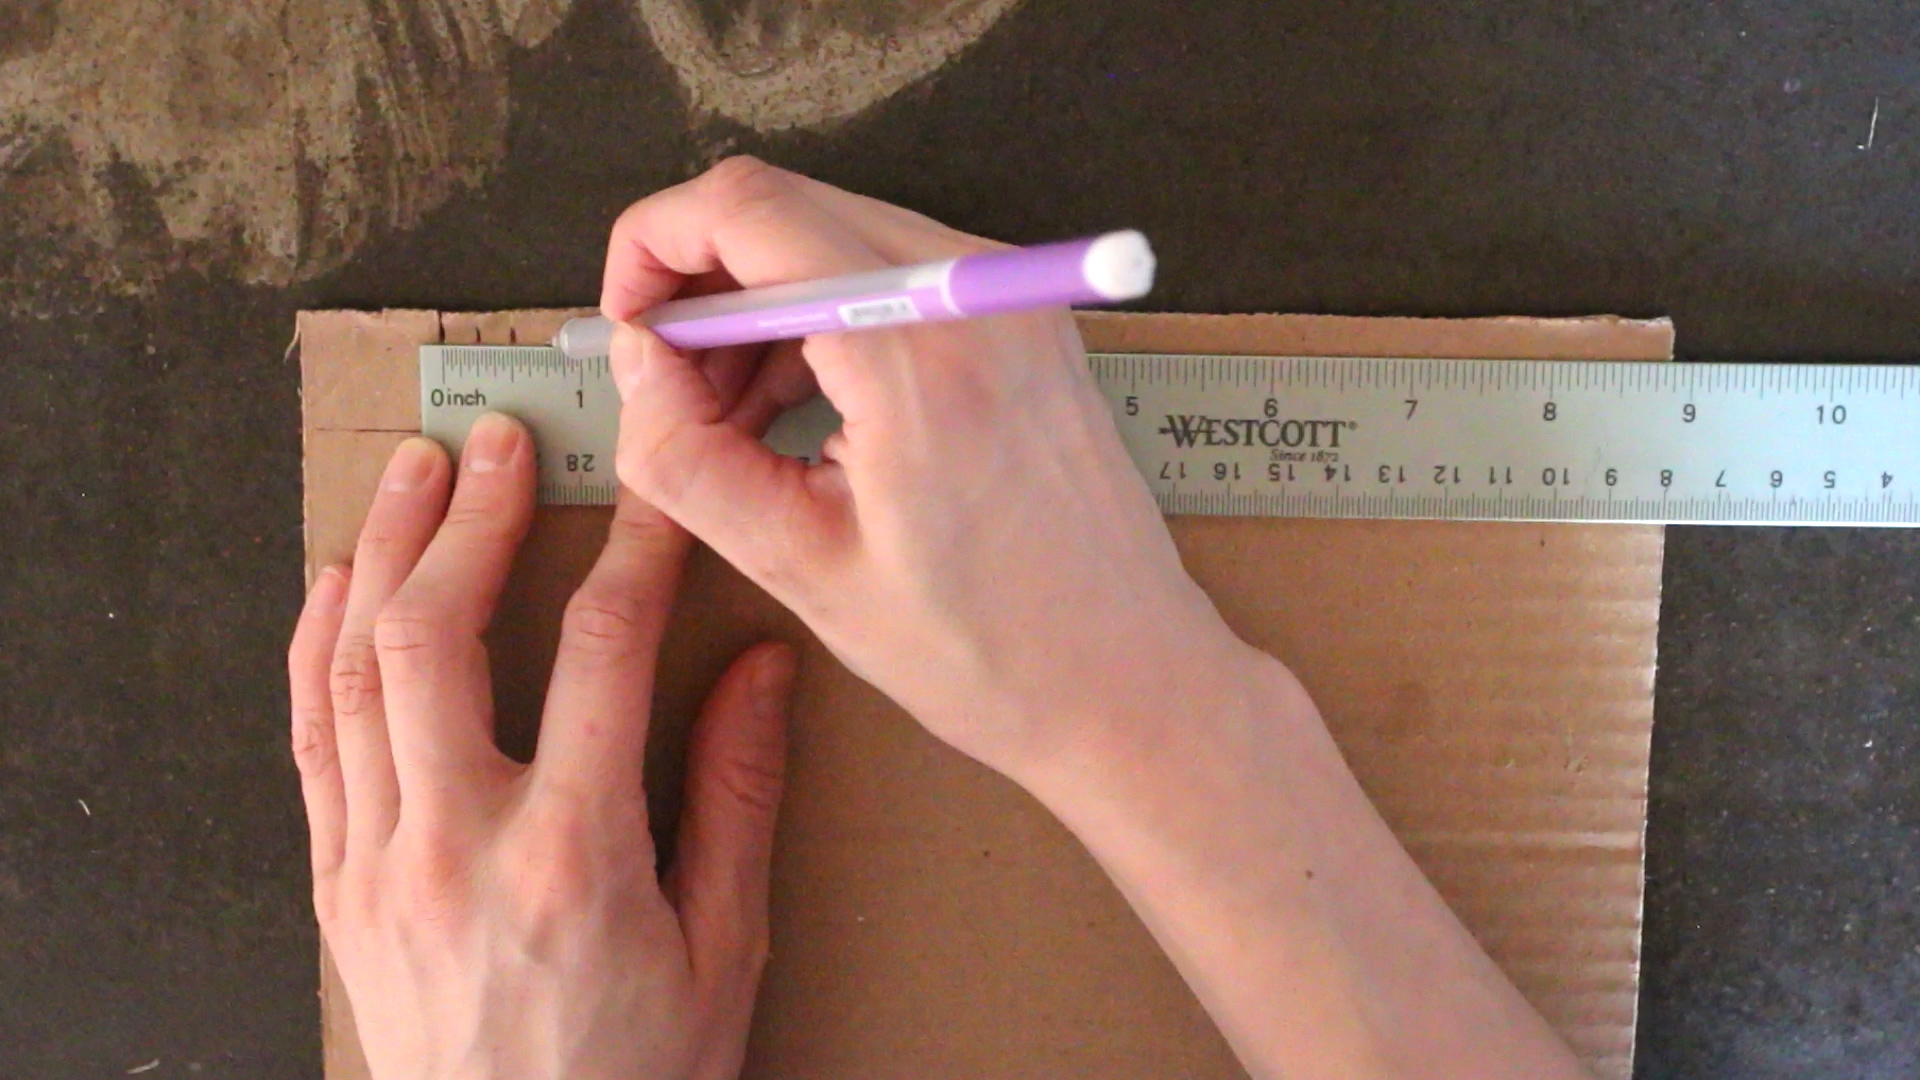
7. With a ruler, double-check to ensure the ticks at the top edge are in line with ticks at the bottom edge. Make adjustments if needed.
Measuring Tip: Make sure to measure twice at all steps of loom construction, especially this step! Aligning these measurements and ensuring they are all equal is very important to ensure a well-constructed loom. If ticks are not in line with one another, this will affect the quality of your woven piece.
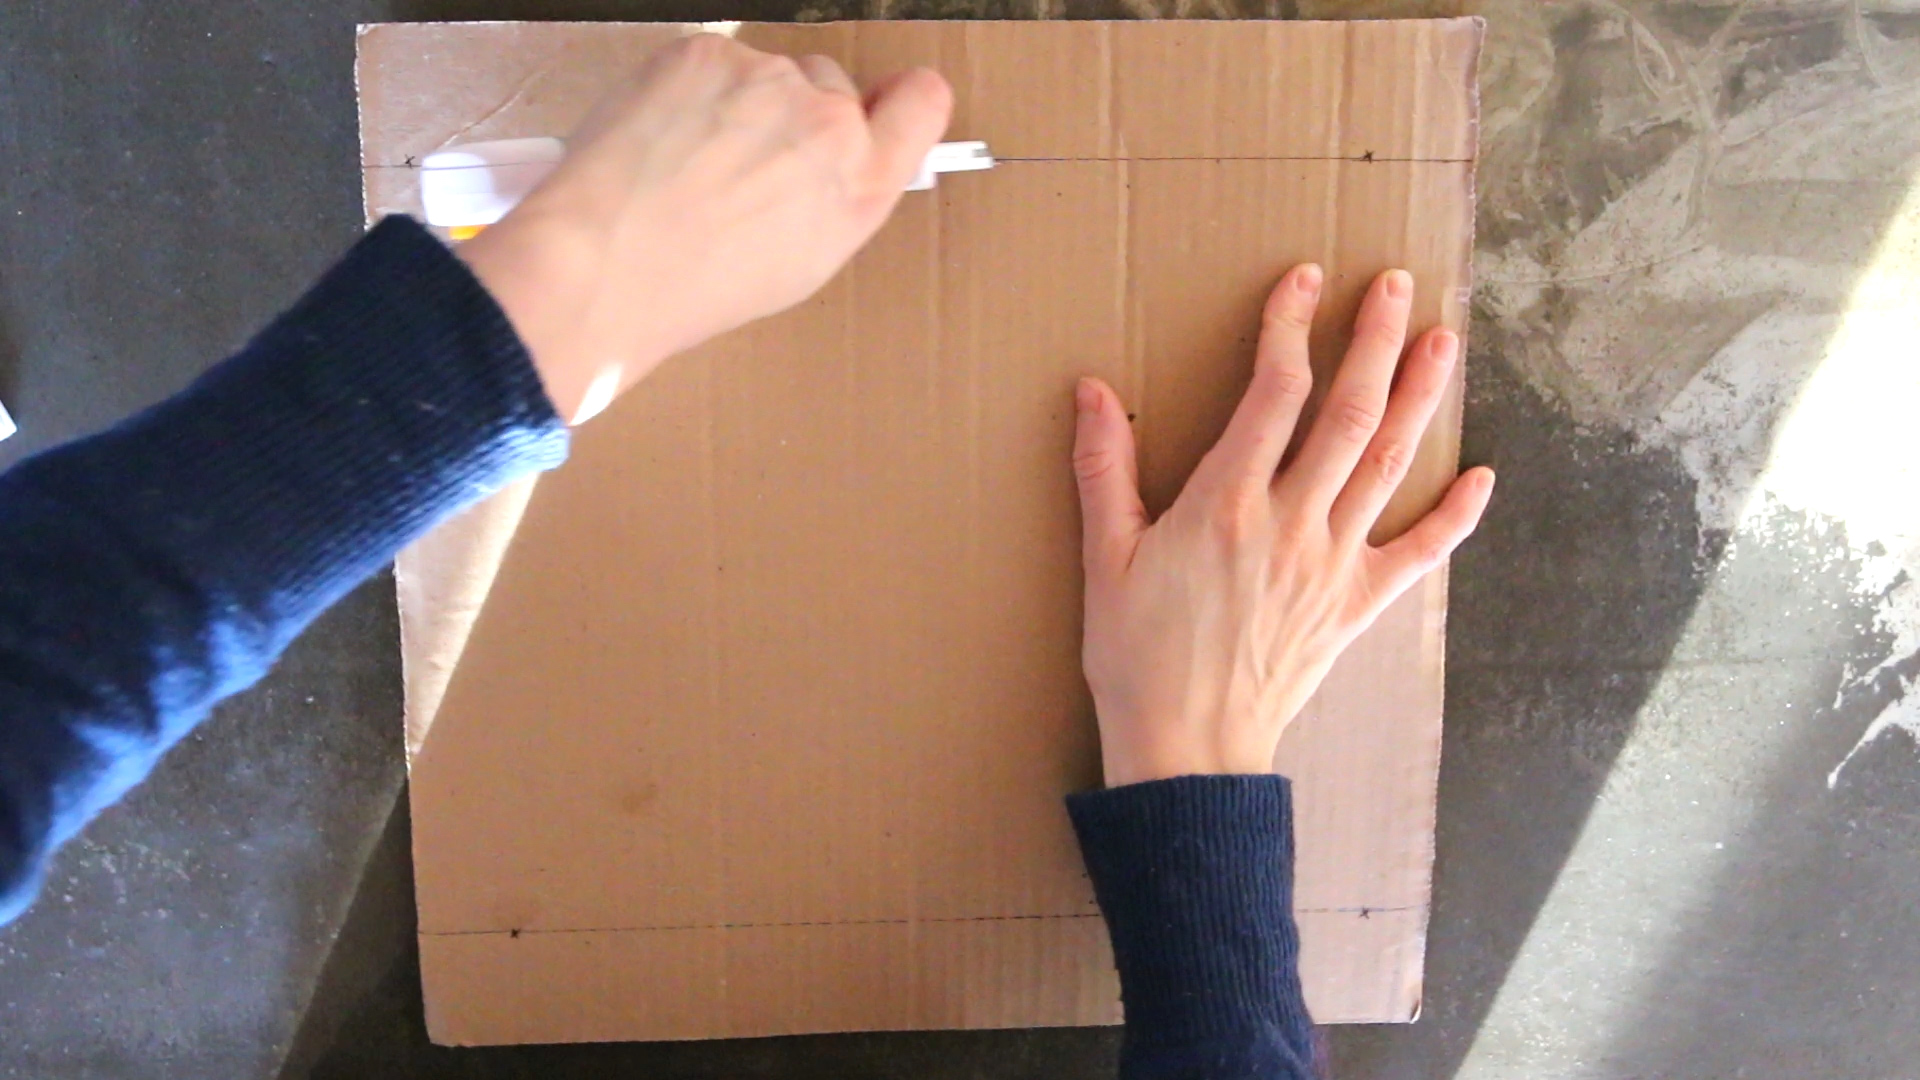
8. Measure 1-inch from the top and bottom edges once more, on both the left and right edges. Draw a horizontal line to connect these two points across the width of the top and the width of the bottom.
Warm-up your hot glue gun.
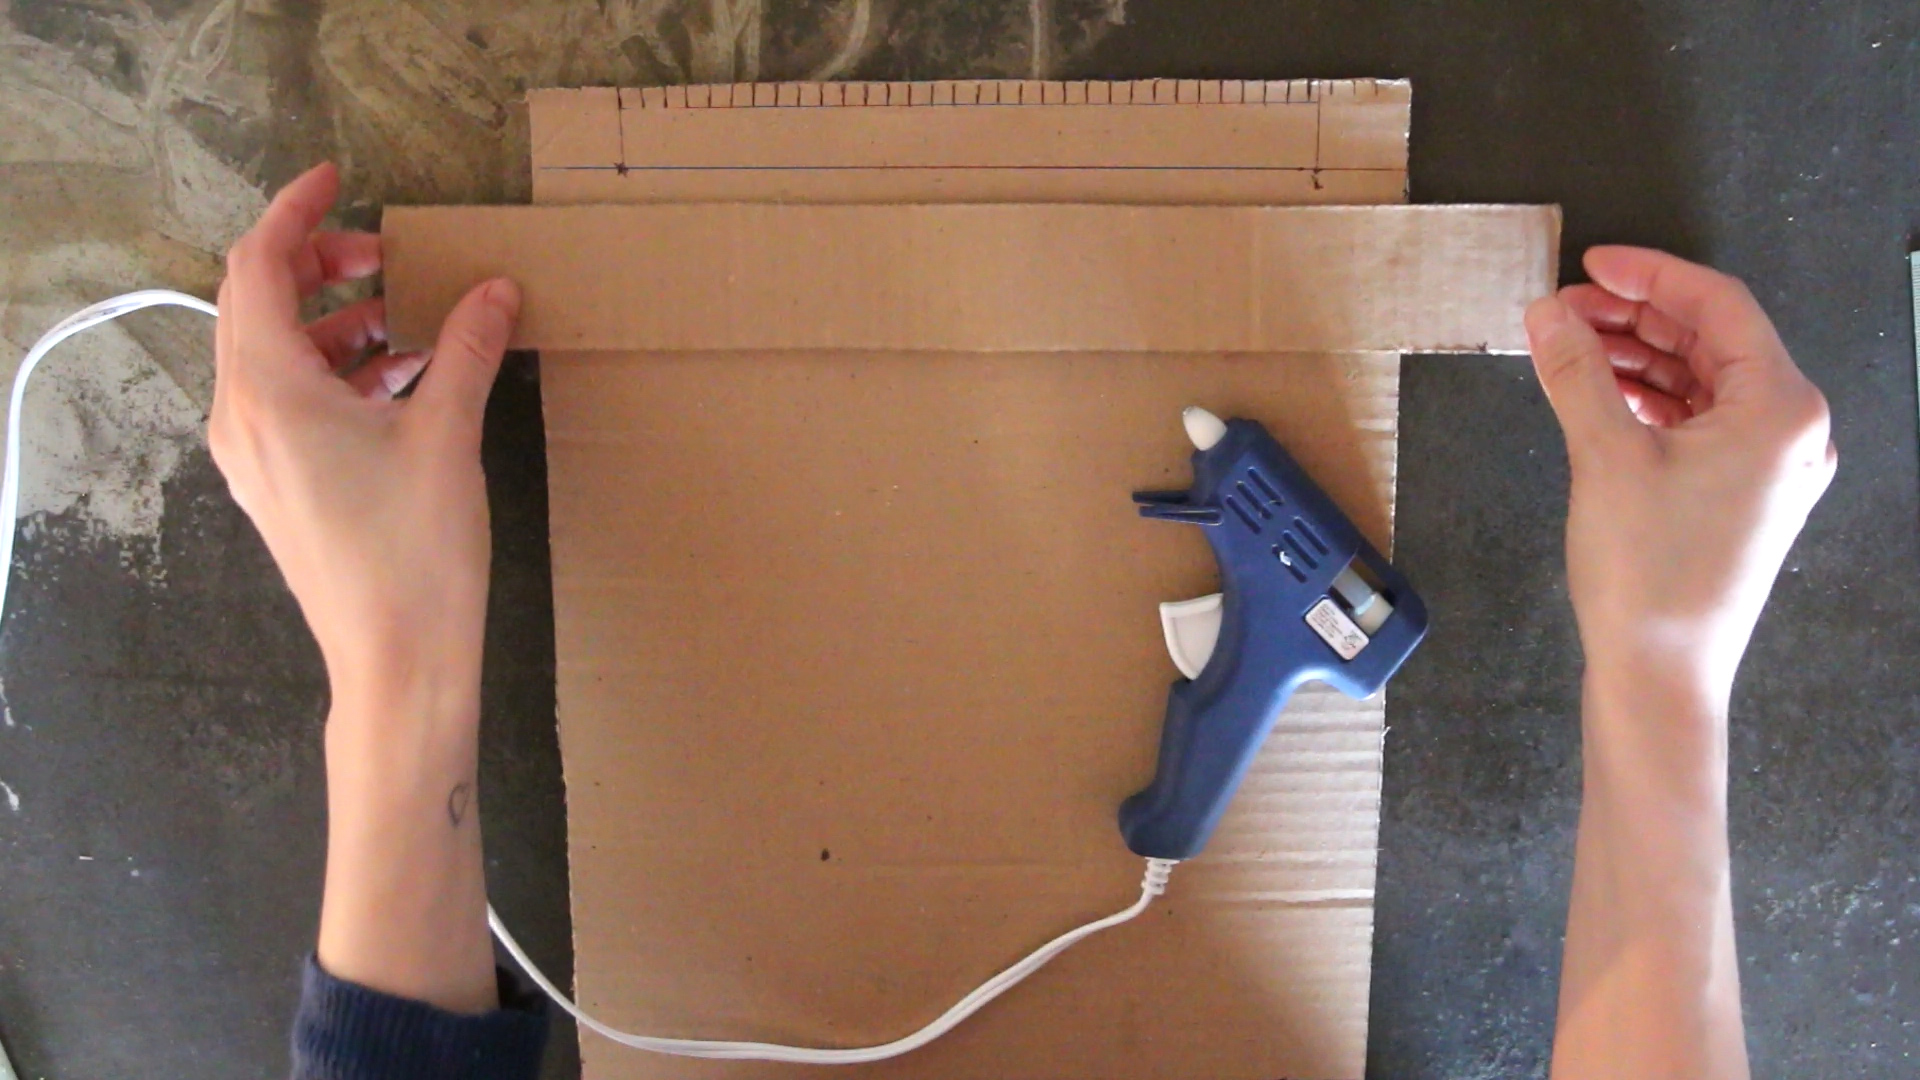
9. Grab the two separate cardboard pieces you cut in step 3. Squeeze hot glue along the 1-inch horizontal line you drew in step 8. Centering the rectangular piece on this line, but not too close to the ticks you have marked above, glue the two together. Repeat this for the bottom edge. Once the glue dries, trim off excess cardboard that extends past the left and right edges.
You are finished preparing your loom! Time to warp.
Warp and weft refer to the direction of the threads used when weaving. Warp threads are vertically oriented, whereas weft threads are horizontally oriented. In weft-facing weaves, like this activity, only the weft threads will be visible to the eye; however, correctly setting up your warp yarn is important to ensure your weft-facing woven pattern will appear as intended.
Warping the loom, or dressing the loom, involves carefully setting up all warp threads for your woven project.
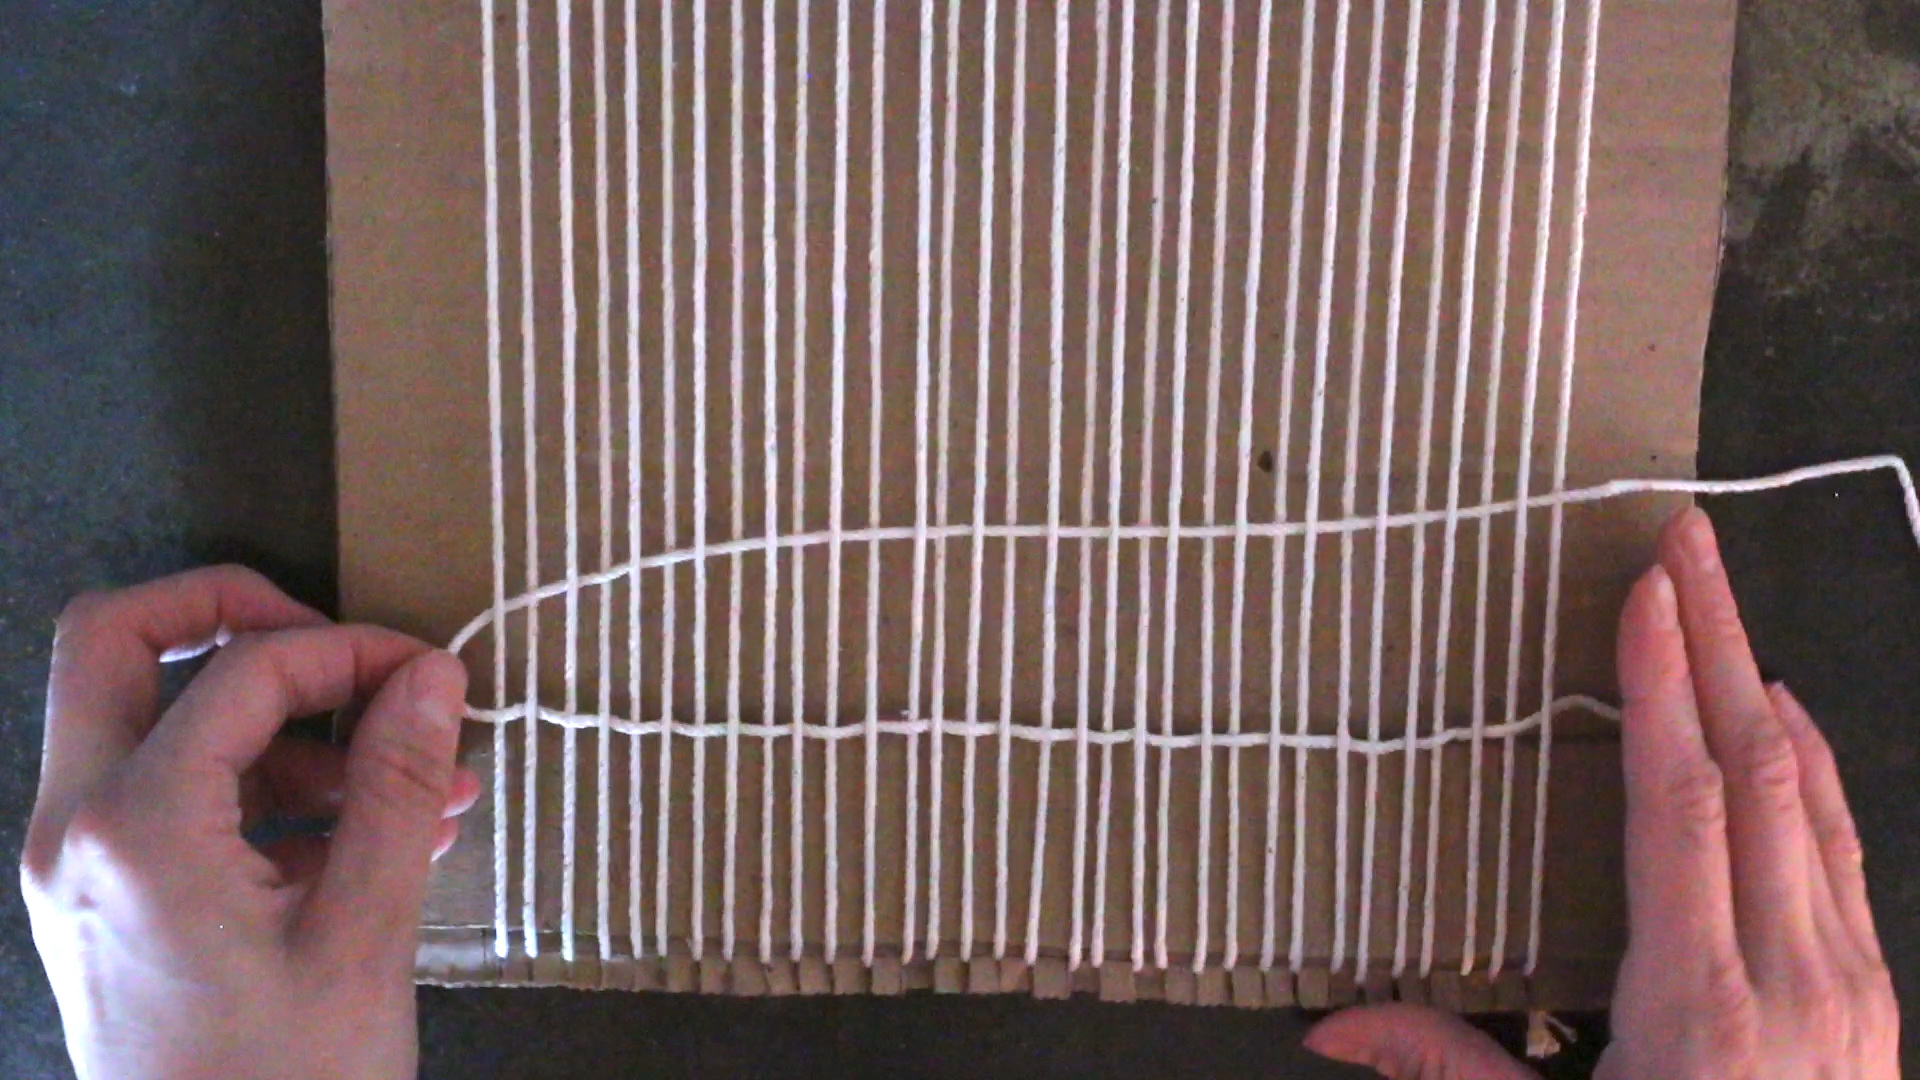
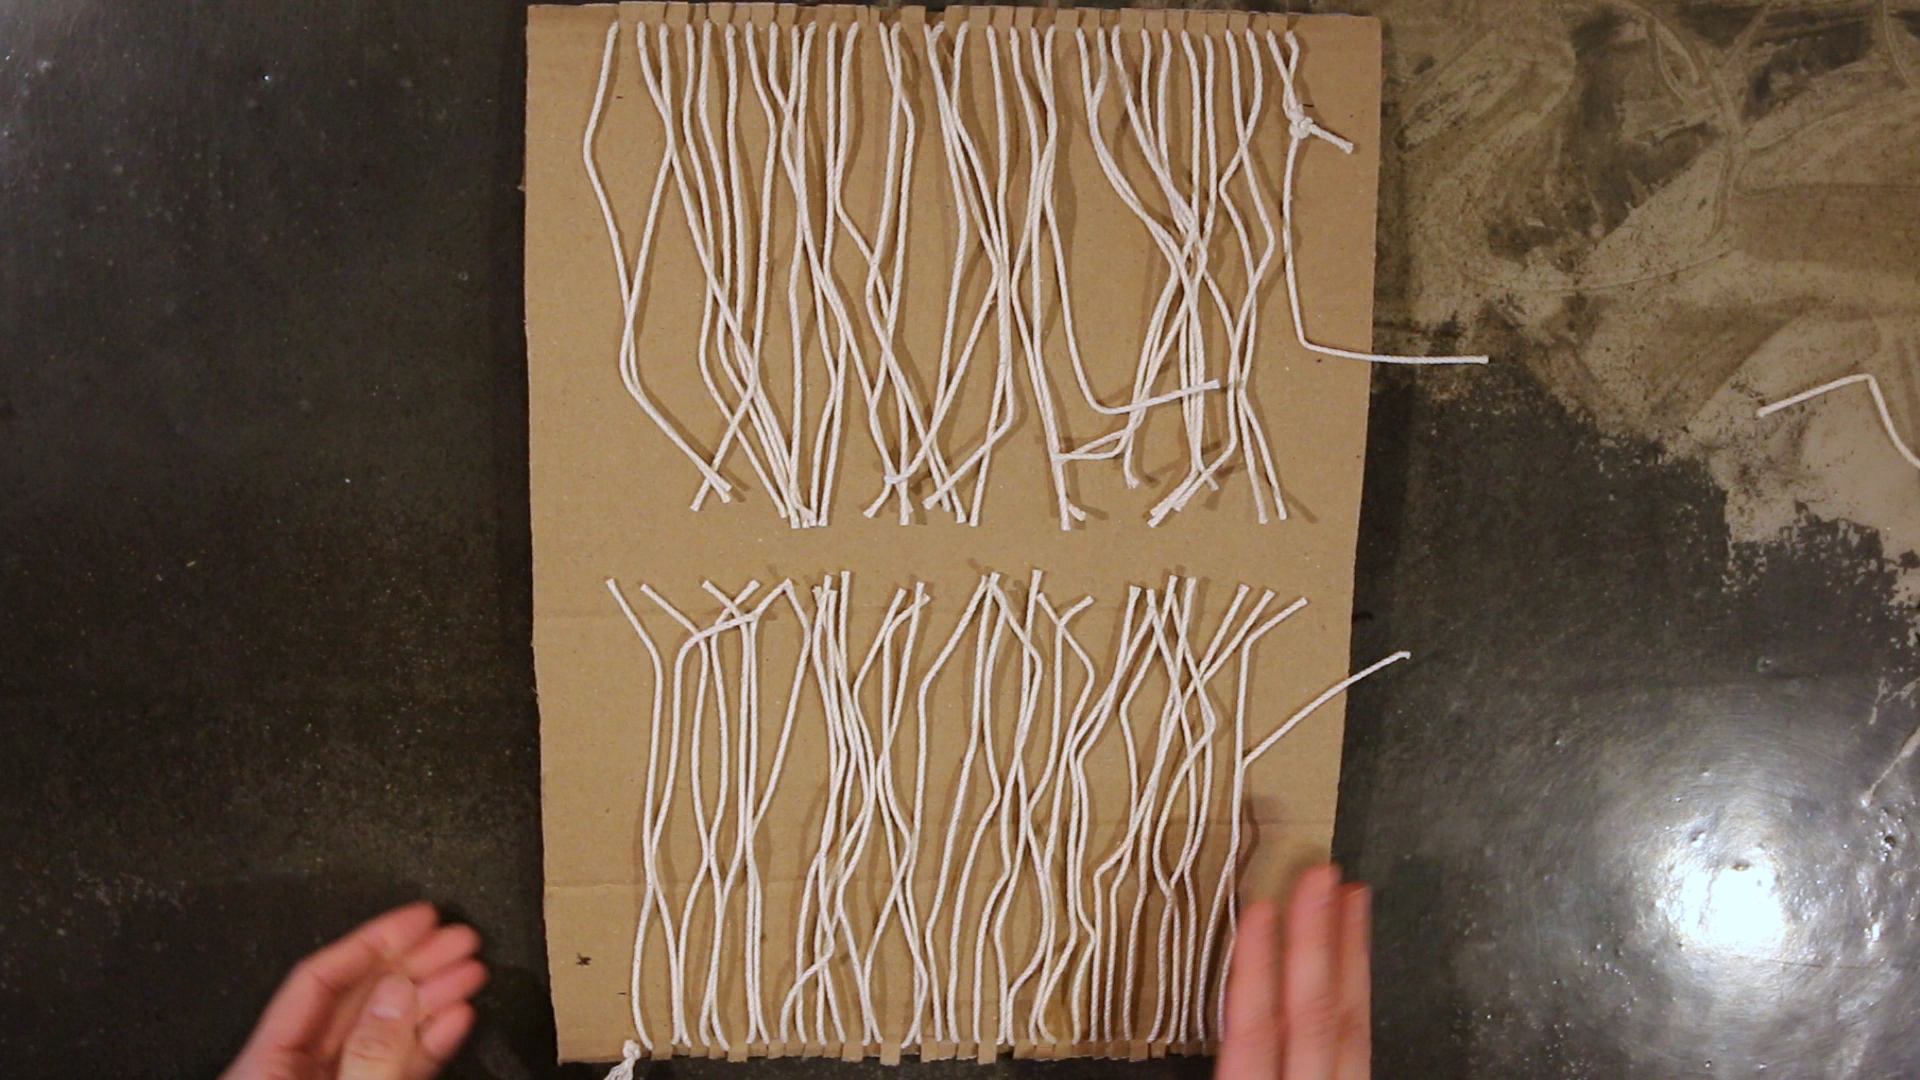
1. Grab your warp yarn, which should be a strong, un-dyed yarn (e.g. twine or baker’s twine). Tie a knot at one end, but do not cut a piece of yarn. Insert the yarn into the first slit on the bottom left-hand edge of your loom, with the knot sitting on the “backside” of the loom (the side without the attached rectangular cardboard pieces). Unravel the warp toward the top of the loom and insert the thread between the first slit on the top left-hand edge of your loom. This slit should be aligned with the bottom slit.
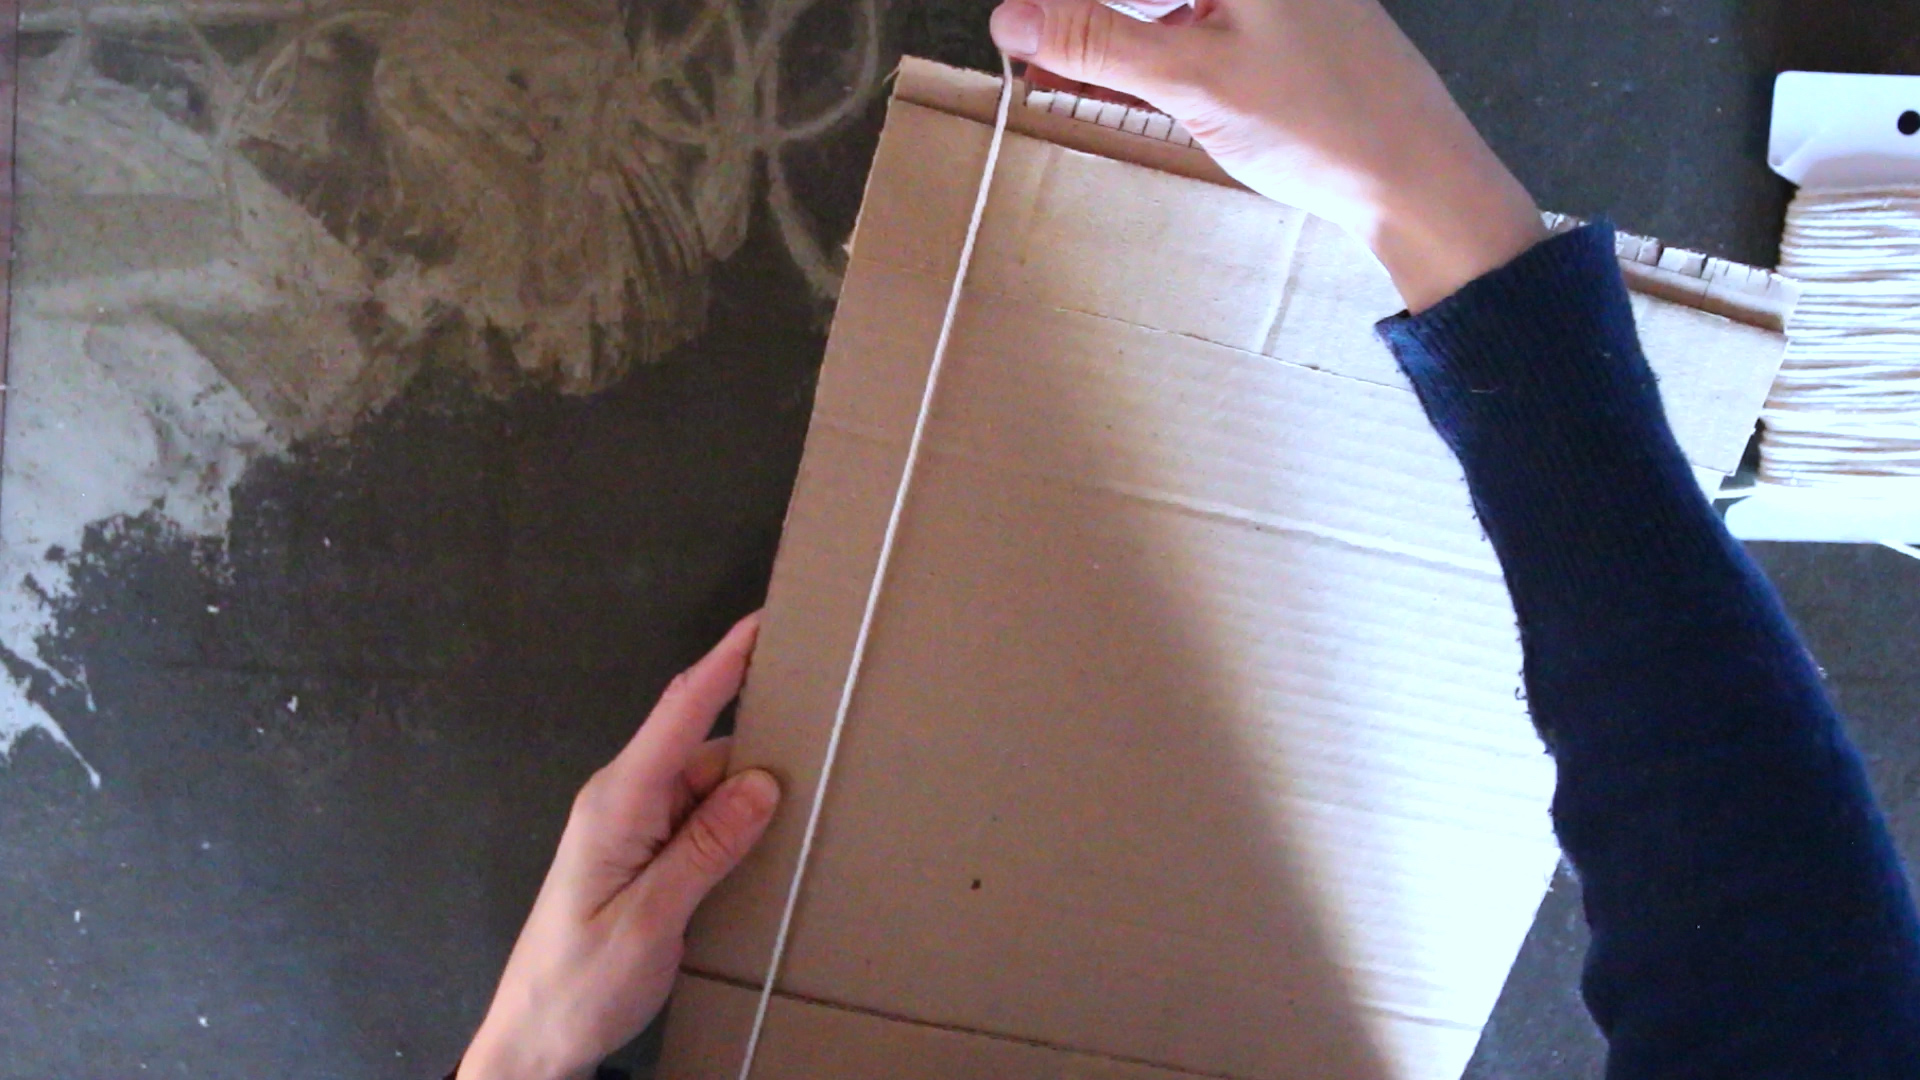
2. Wrap your warp along the backside of the loom, extending down towards the bottom. Bring the warp back through the second slit on the bottom edge, directly adjacent to the first. Unravel the warp thread up toward the top and insert through the second slit at the top edge, directly adjacent to the first. Again, this slit should align with the second slit on the bottom edge.
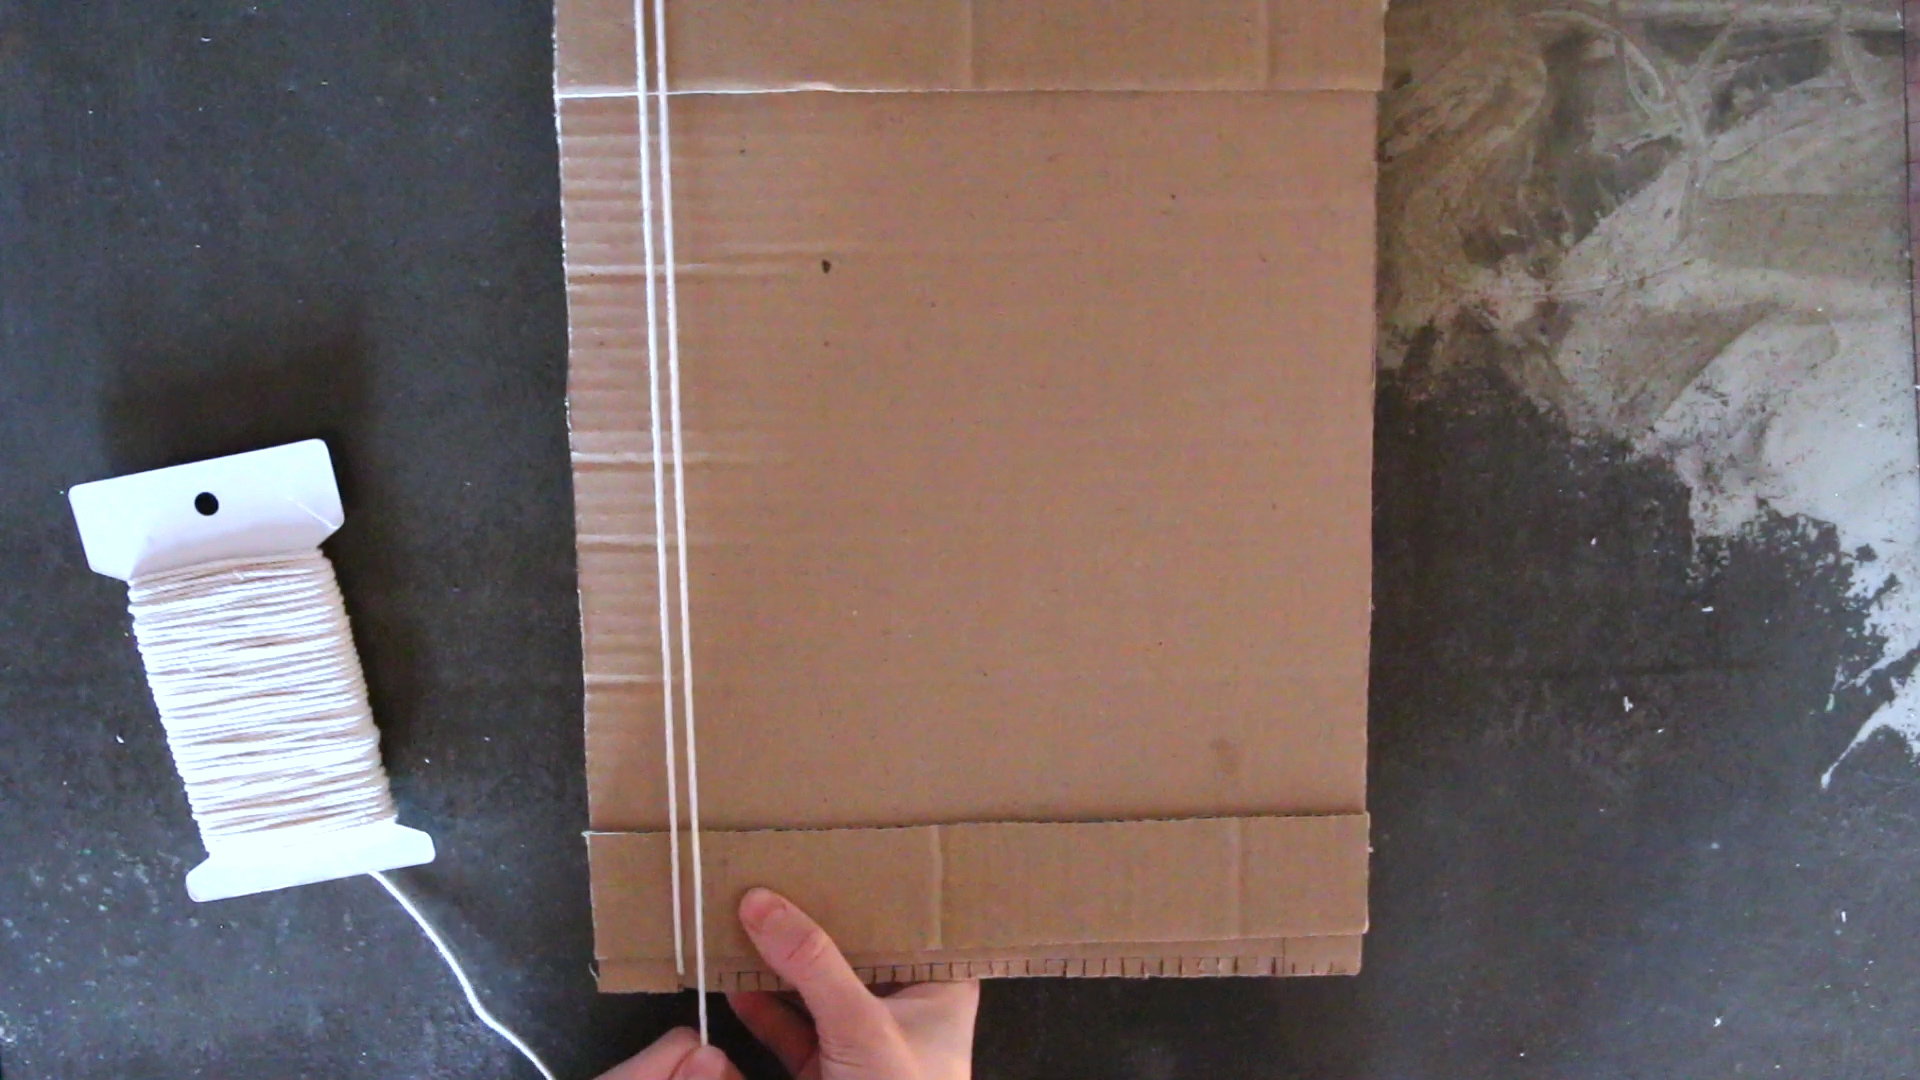
Continue this process until the warp threads have been fed through all slits at the top and bottom edges of the loom.
Warp Tip: This is another case where it is important to take your time and carefully check that your warp threads are all aligned and inserted into the correct slits. “Crossed” warp threads happen when the warp thread is not inserted into the correctly aligned slit. This can distort the final woven pattern later on.
Once you insert your warp yarn into the final slit on the bottom, right-hand edge, cut the warp yarn and tie a knot so that it is secured within your loom.
Now it’s time to start weaving!
Tapestry weaving is a great beginner's introduction to weaving! It is best to plan your pattern and the weaving techniques you would like to try before starting to weave. Our tapestry weaving will use an abstract pattern with basic, plain weave techniques. If you’re interested in planning a pattern or trying different techniques, check out this resource, here.
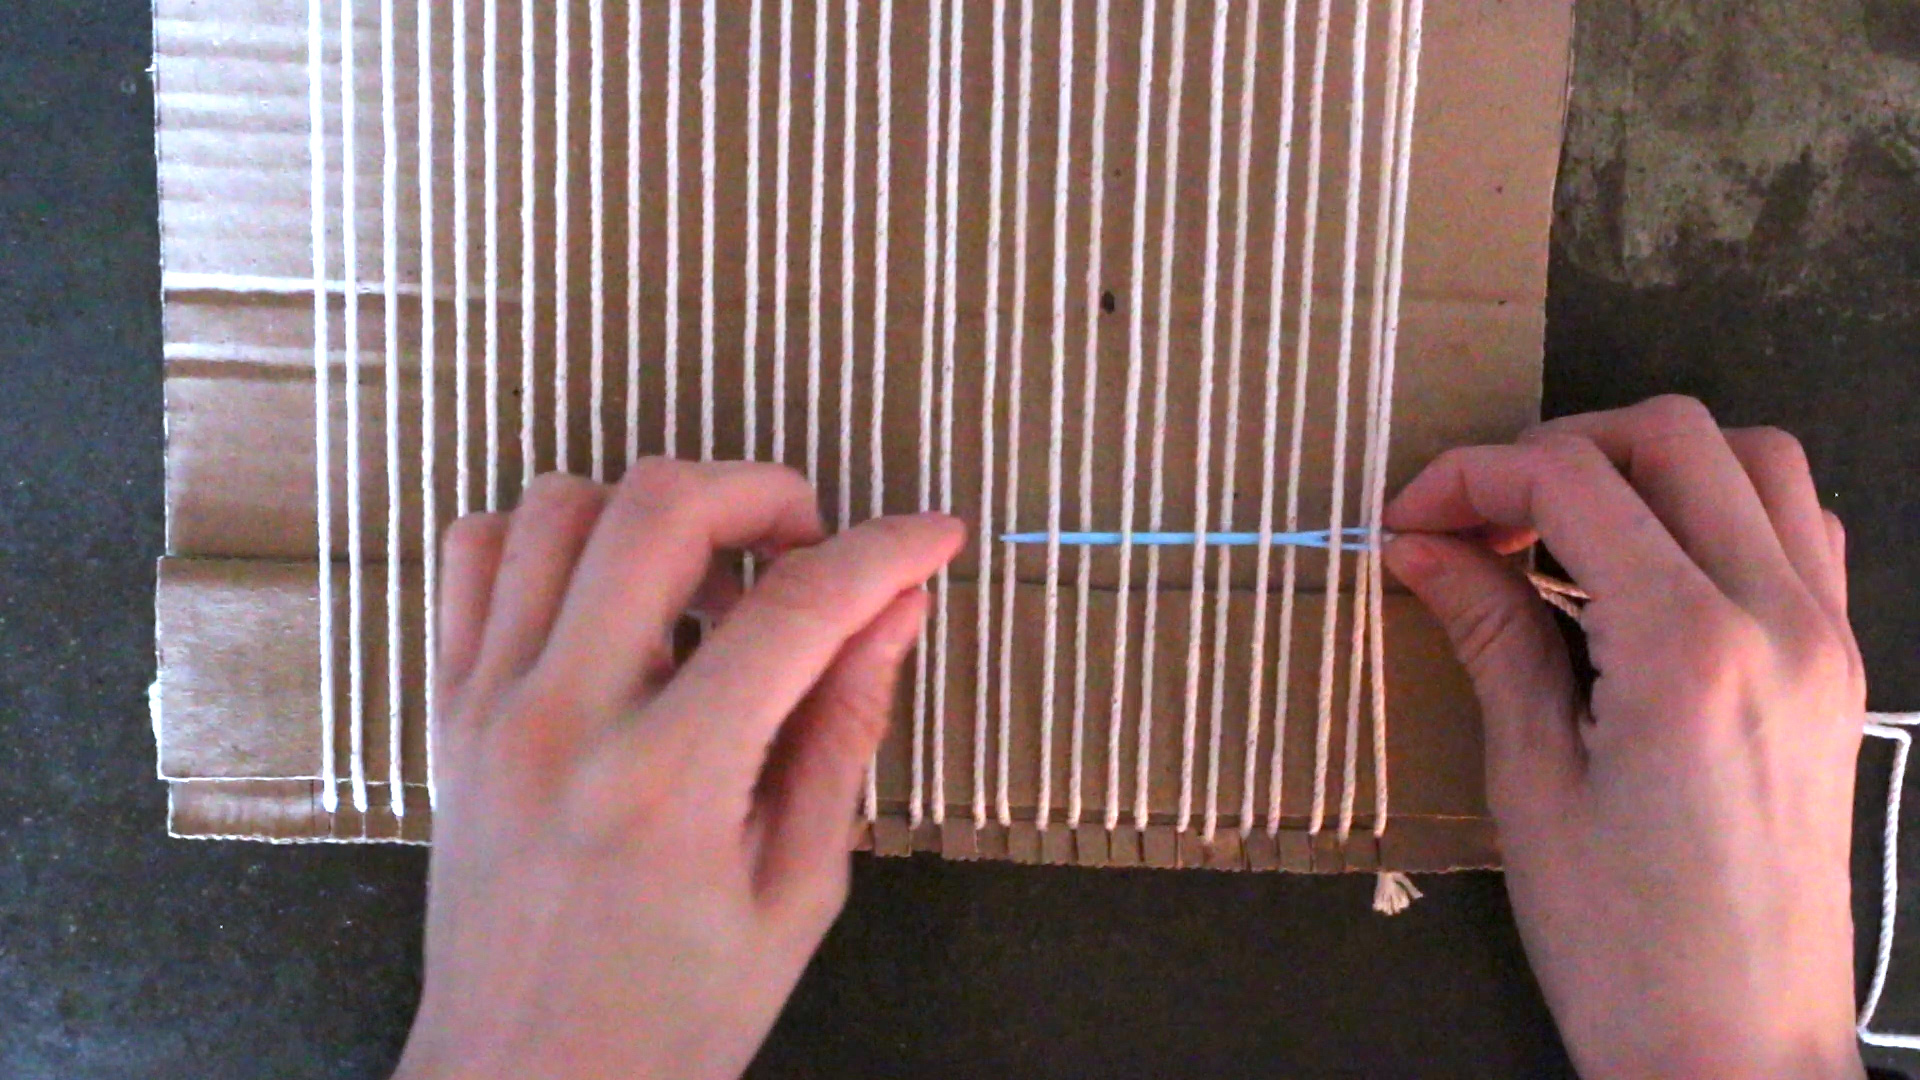
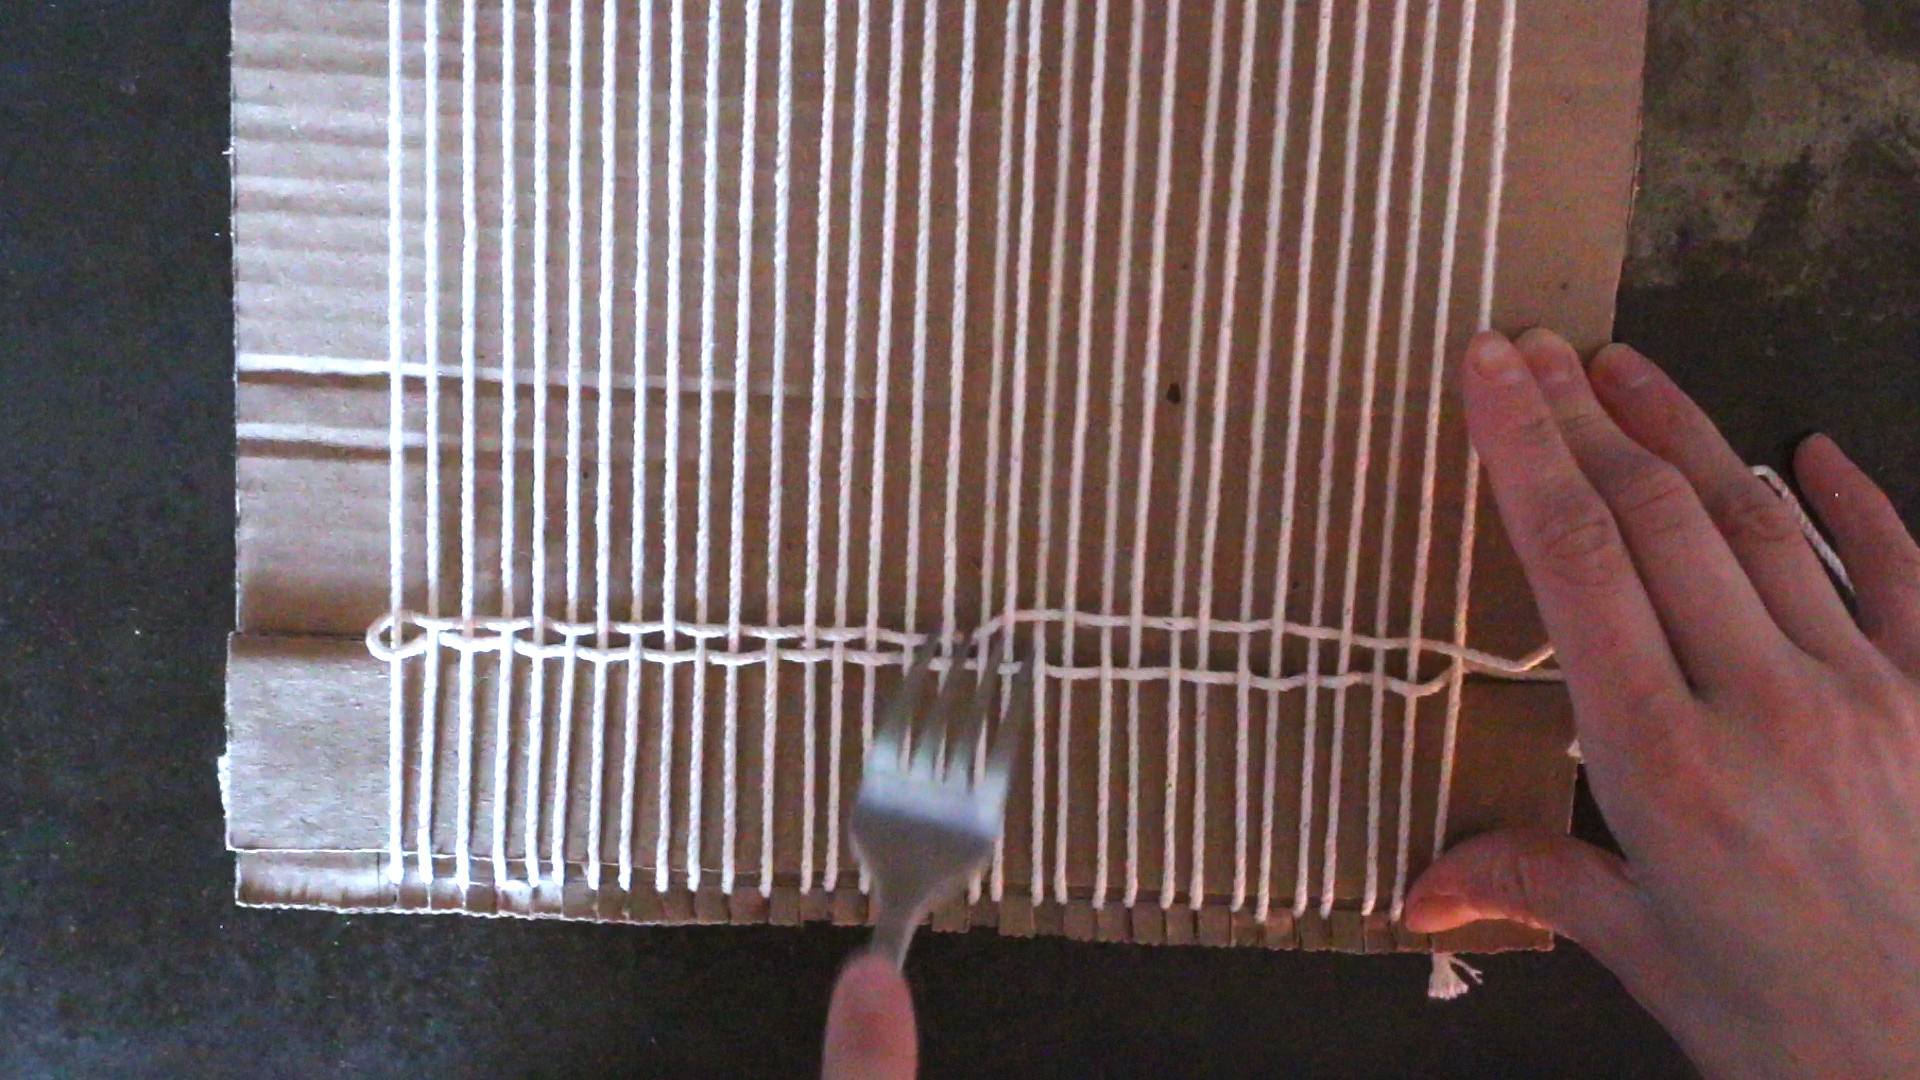
To begin weaving, start by creating a plain-weave header using our warp yarn (twine). A header serves a variety of purposes that are helpful when beginning a new weaving project. A header will help identify if there are any warp threading errors and it will secure your yarns when you are ready to remove your project from the loom.
1. Grab your yarn needle and warp thread (twine from previous steps). This will now be briefly used as our weft thread. Cut a length of twine that is about the length of your arm and then thread through the eye of the needle. Beginning on one side (you can choose, left or right) start weaving your needle up and down through the warp threads in an alternating pattern. Move over the first warp thread, under the second, and repeat until you reach the other side. Pull your thread almost all the way through your warp threads, leaving a short tail hanging out on the side you started.
Needle Tip: Yarn needles are large and thick, with wide eyes to accommodate thick yarns. They make tapestry weaving much easier! If you do not have a yarn needle, you can use an unsharpened pencil or ruler instead, wrapping your thread around the base several times before weaving.
Weaving your weft involves passing back and forth across the warp threads of your loom. Depending on if your yarn crossed over or under the last warp thread, take your yarn and cross it over or under the same warp thread in an opposite fashion. If you went under the final warp thread, to pass back across the loom you will cross over the same warp. Repeat the process of moving your yarn up and down through the warp yarns. Check to make sure that where your weft yarn went under the warp on the first pass, your weft yarn goes over the same warp yarn on the second pass.
Header Tip: This is the best point to correct any warp threading issues. If you find any, the best way to correct the issue is to rethread your warp completely.
Weaving Tip: If you’re having trouble navigating up and down through the warp yarns, try inserting a pencil or ruler at an angle at the top of your loom to create separation between your warp yarns (the yarns you need to pass under vs. the ones you need to pass over).
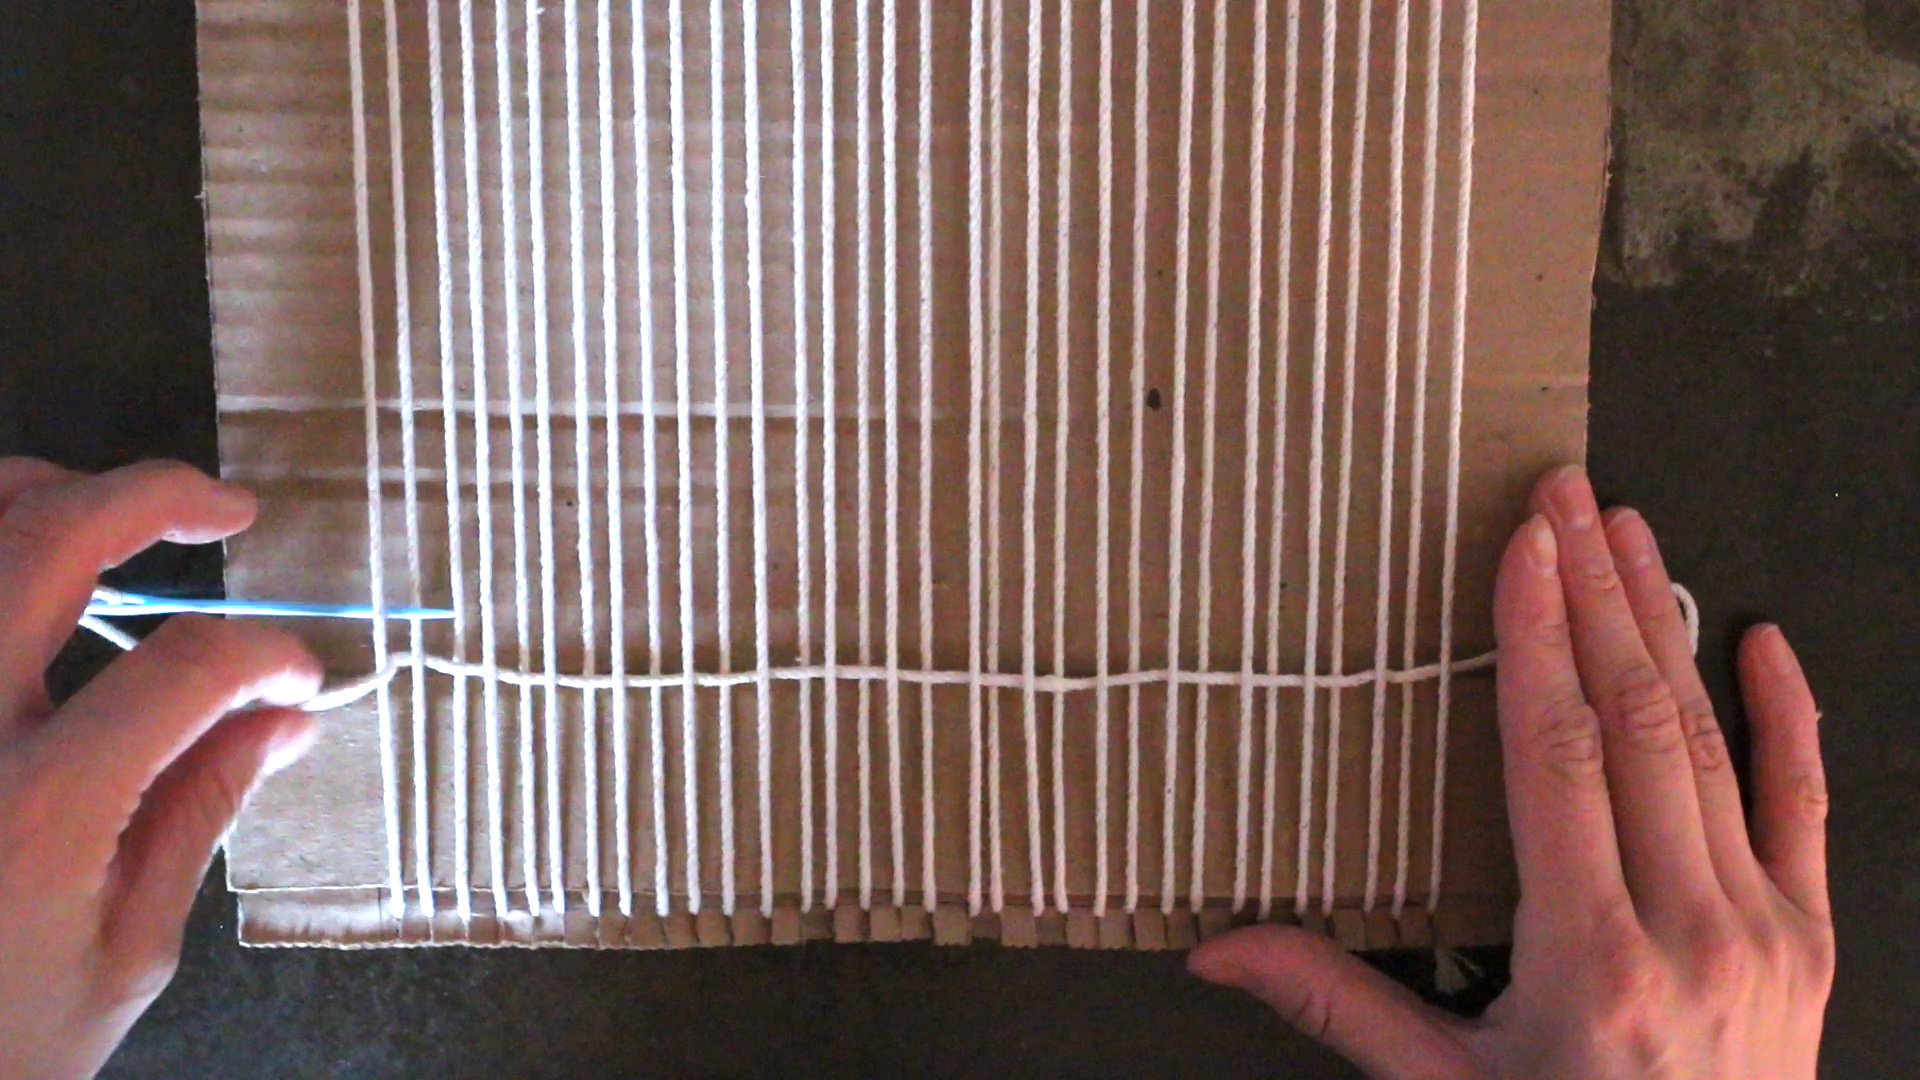
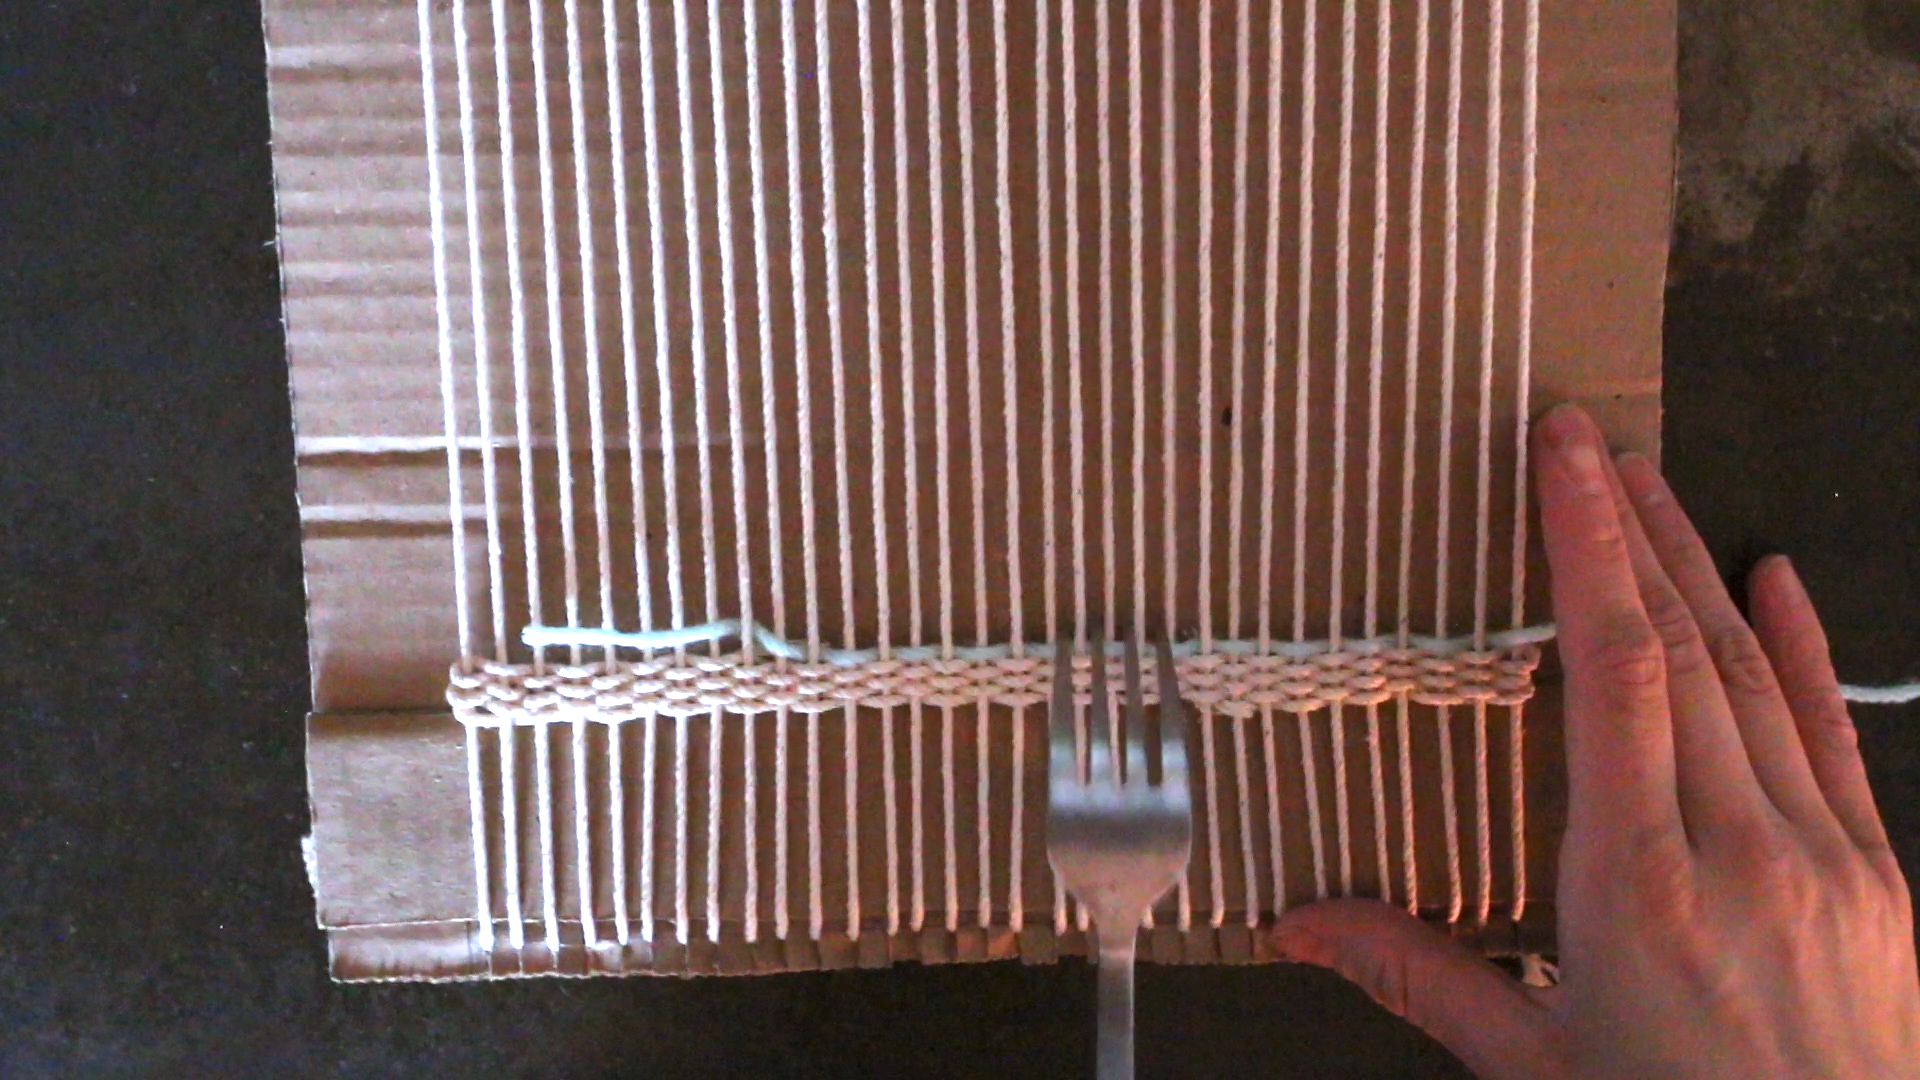
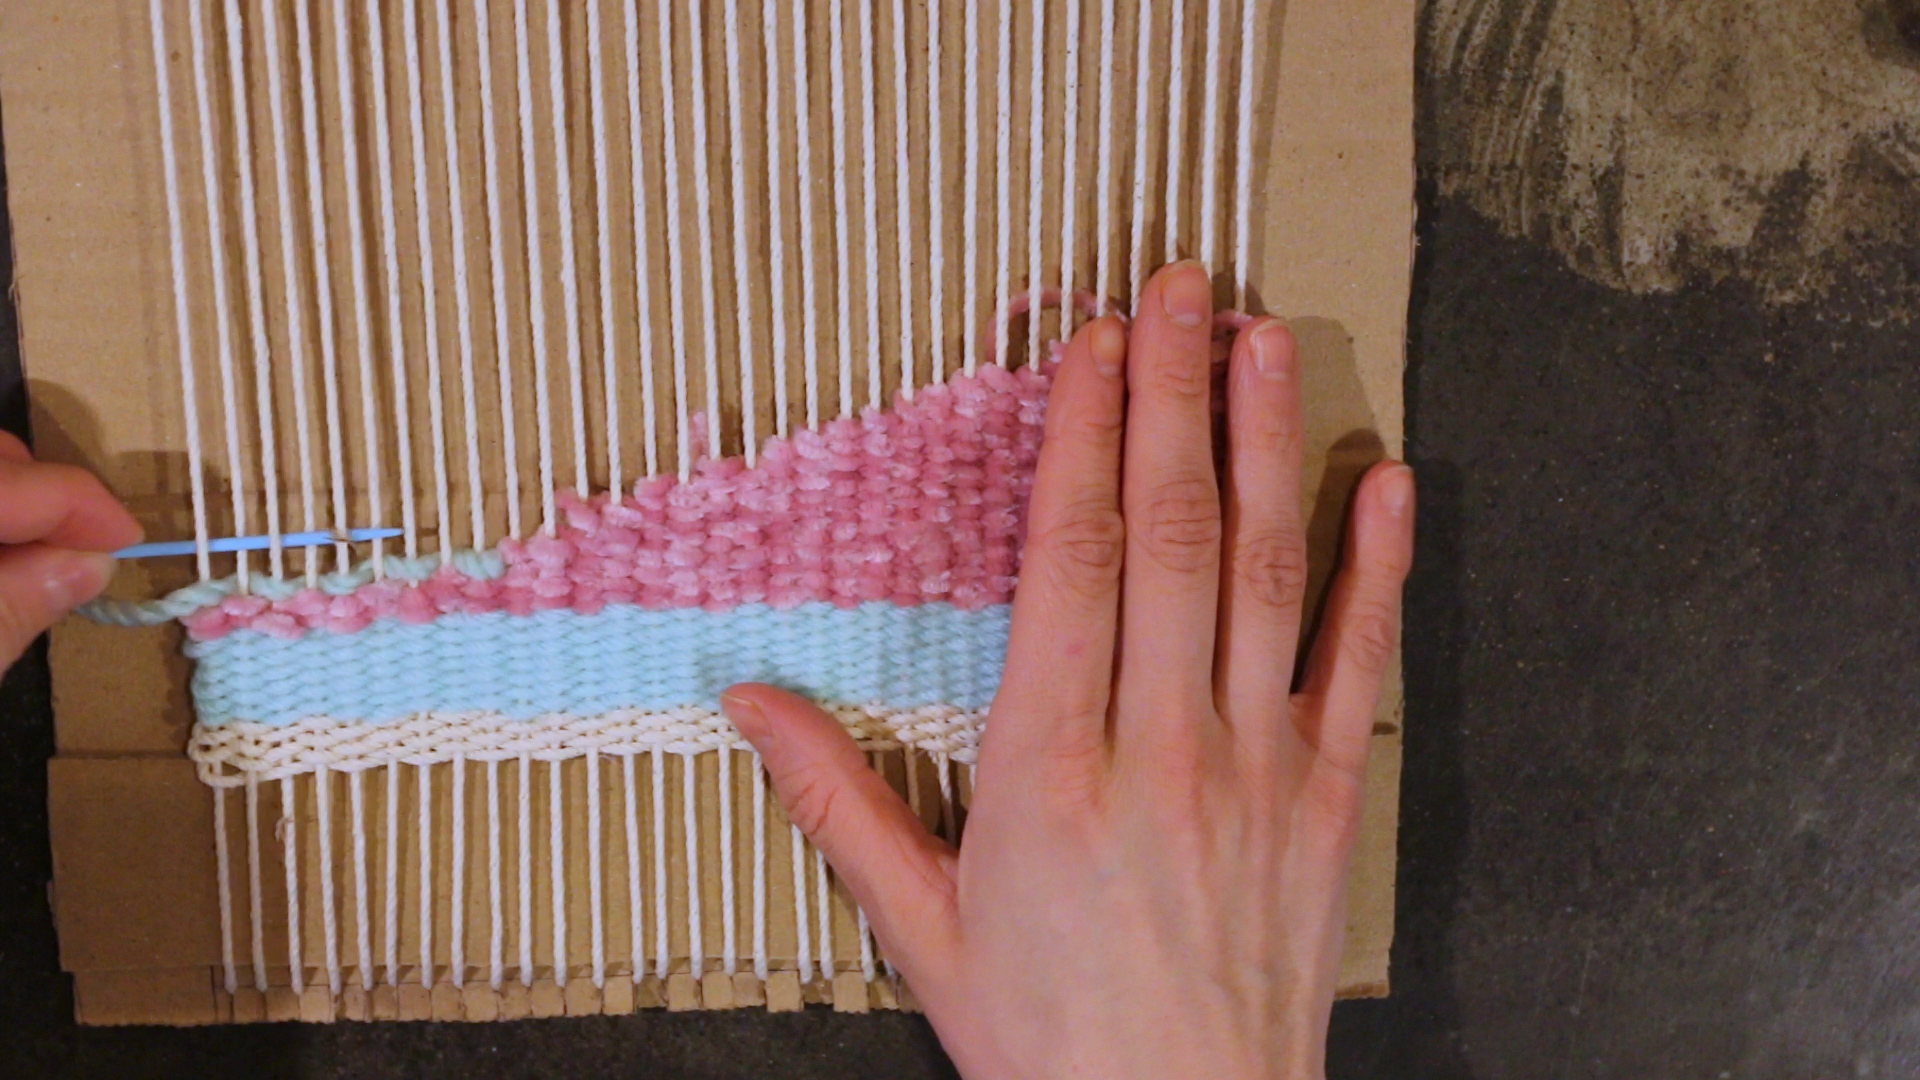
3. After completing your second pass, grab your fork. Using the prongs, gently push together the two passes of weft thread together. This process is referred to as “beating” to ensure your weft yarns sit close to one another. This step will be done after every pass is completed.
At this point, tuck your tail from starting into your weave by weaving it back into the structure until it disappears.
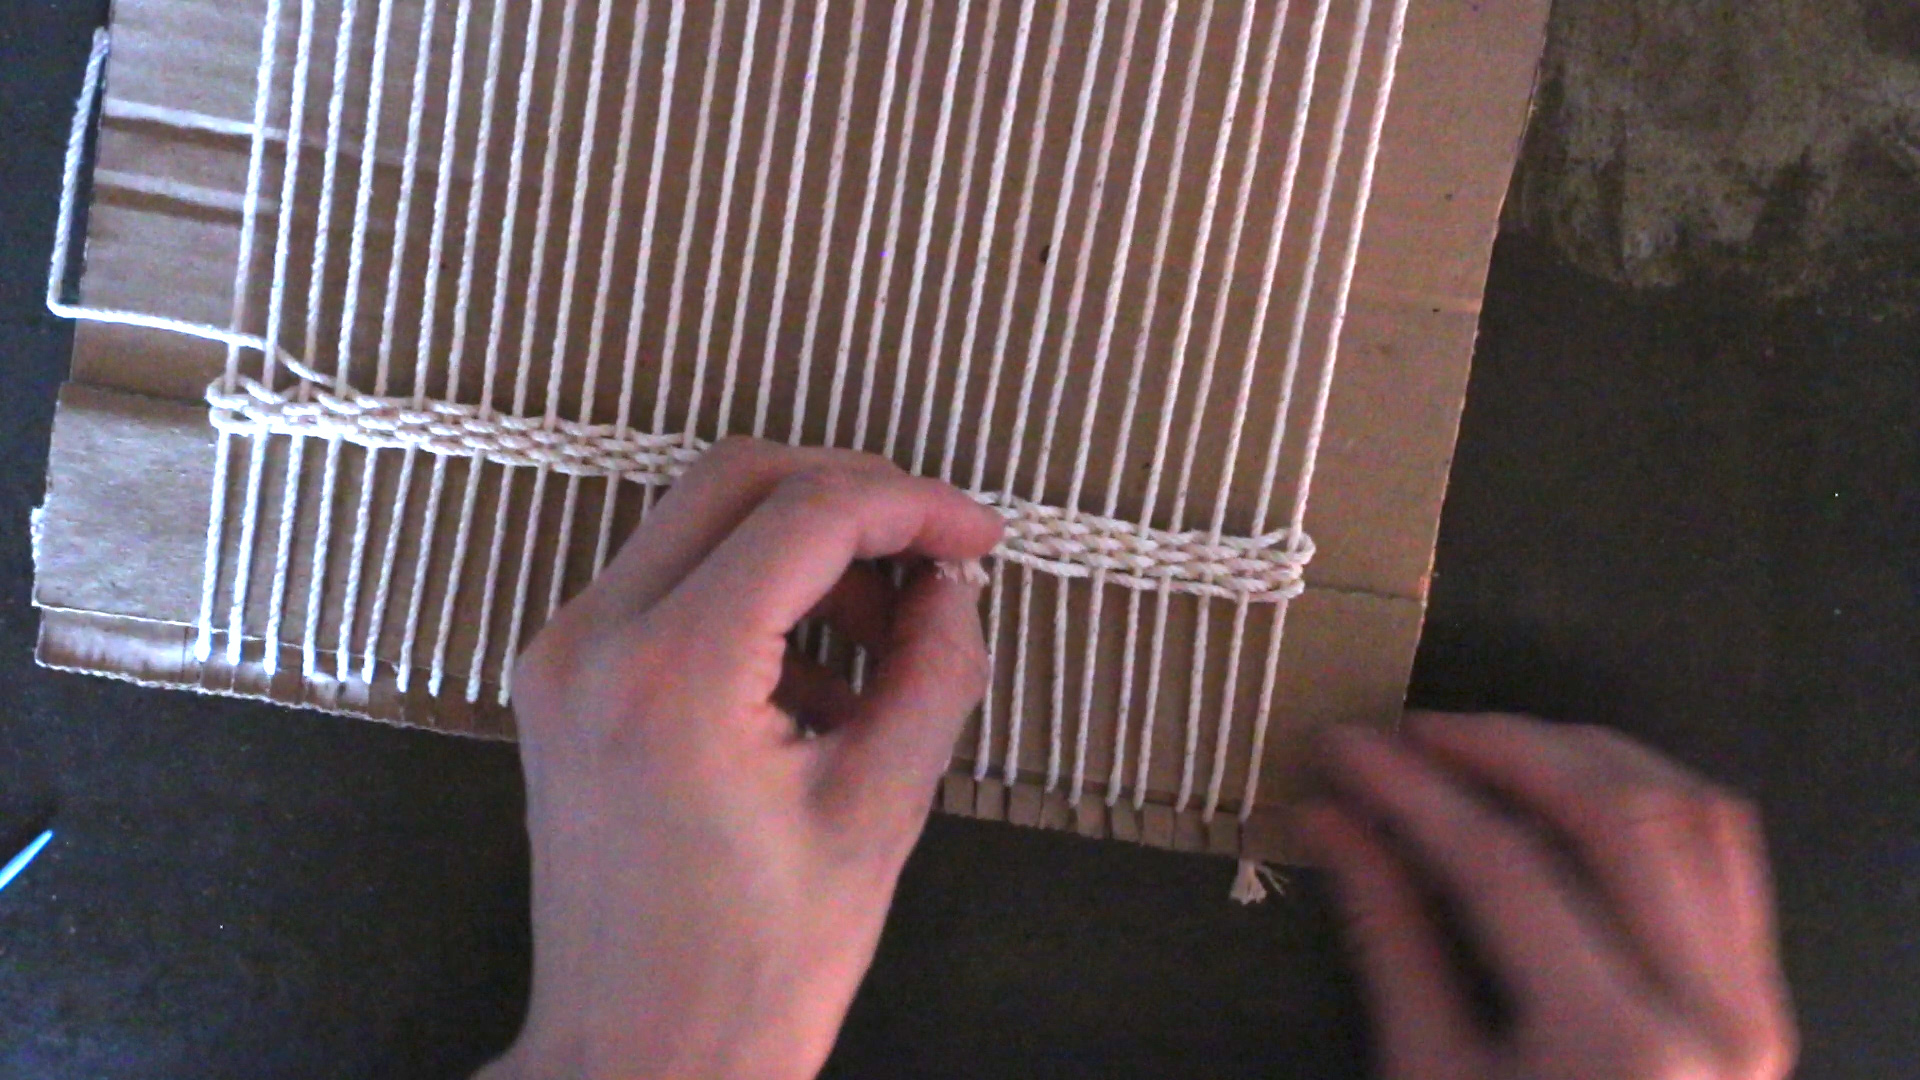
4. Finish your header by completing two more passes, so you have a header length of four rows. Weave your yarn into the fifth row with a few stitches. When it passes under a warp yarn, remove your needle, leave a short tail, and snip the rest of the yarn. We will return to the tails at a later step.
Now it’s time to get creative!
5. Grab a yarn of your desired thickness, colour, and texture to use as your weft. Measure and cut a length of thread depending on how much you want to work with it. Thread your needle and, beginning where your last thread left off, come back up through the following warp yarn that you must pass over. Continue weaving in the pattern and technique you desire.
Weaving Tip: The edges of your weaving are called the selvedge. When pulling too tightly on your yarn as you pass back and forth across the warp threads, this can draw-in the selvedge and create a “shrunken” or wavy appearance. To avoid this, give some extra slack to your selvedge when crossing back over. Too much will result in a giant loop, but extra slack will prevent your piece from becoming smaller and smaller as you weave towards the top of the loom.
 6. When switching colours, leave tails hanging out on the backside of your woven piece. These will be finished after your entire piece is woven.
7. If you catch an error in your weaving (which may be noticeable if the warp thread shows through or a weft yarn passes over/under the same warp thread twice on two back-to-back passes) the easiest way to correct this is to remove your weaving, fix your error, and continue.
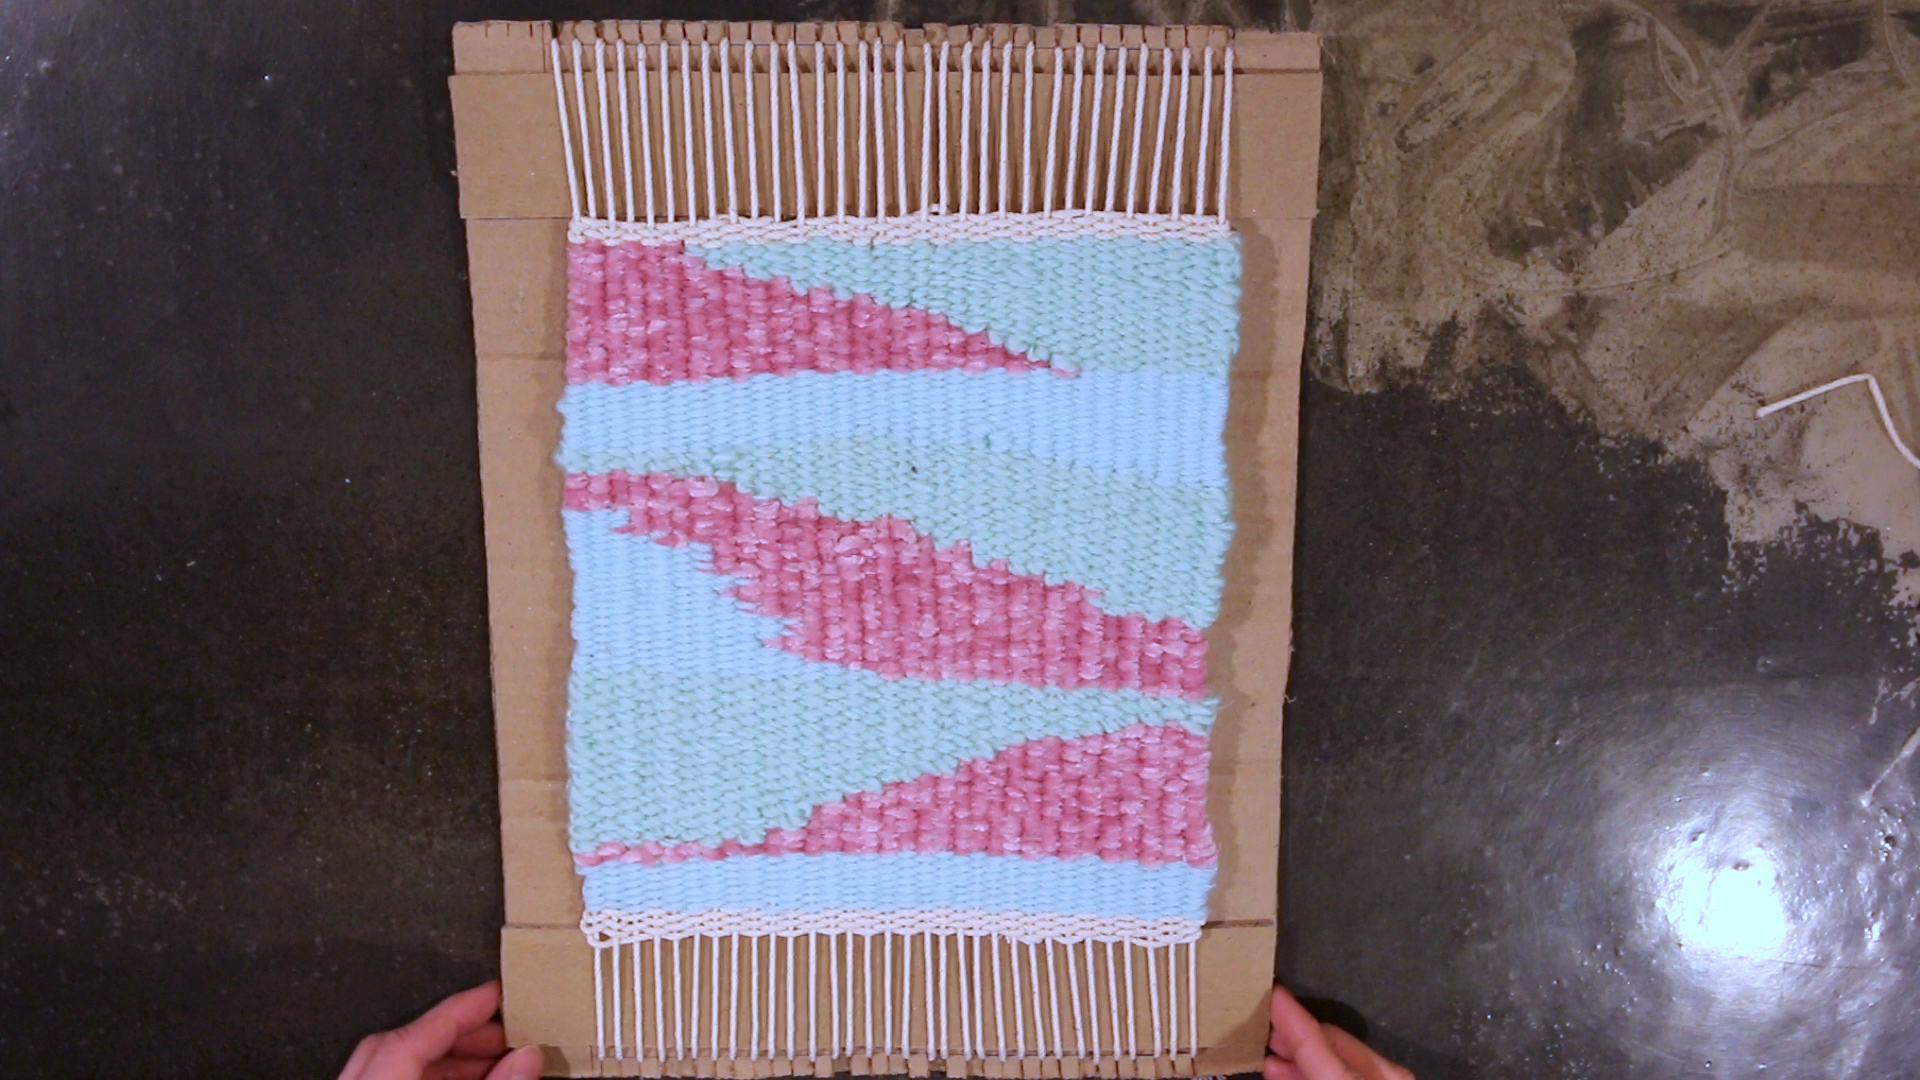
8. Continue weaving with your desired pattern and technique until you reach the top of the loom! Take the thread you used for your warp/header (uncoloured twine) and finish the weaving with another short header of 4 rows.
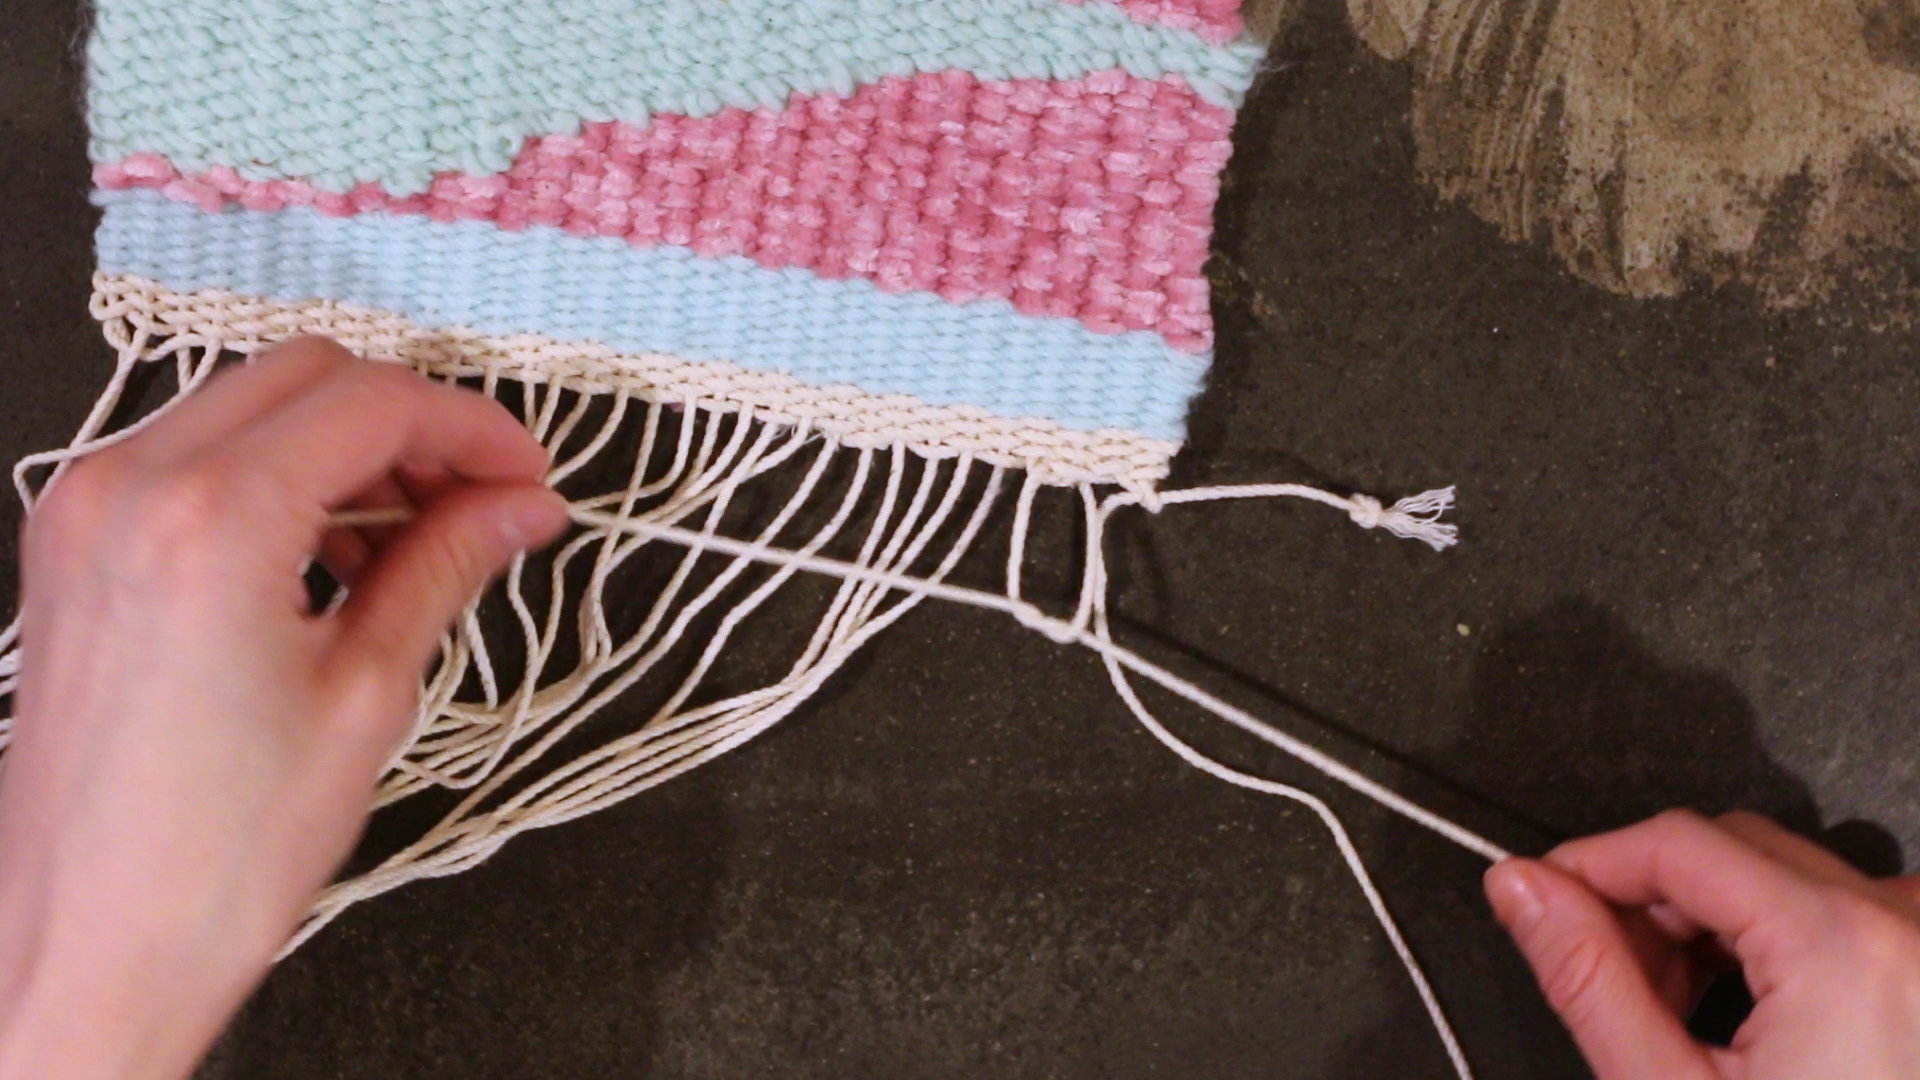
1. Once you finish your weaving and all of your weft rows are beat together, it is time to cut your weaving off the loom.
Flip the loom to its backside and cut the warp threads at the centre back. Remove from each slit at the top and bottom of the loom.
2. Tie your warp yarns together. This will prevent your weaving from sliding off and falling apart! Tie top and bottom yarns together in square knots.
1. Flip your woven piece over to tuck thread tails. Using your yarn needle, weave your tails back into the woven structure so they are invisible. Snip off short remains (if your weave structure is dense, they remain secure without having to tie knots).
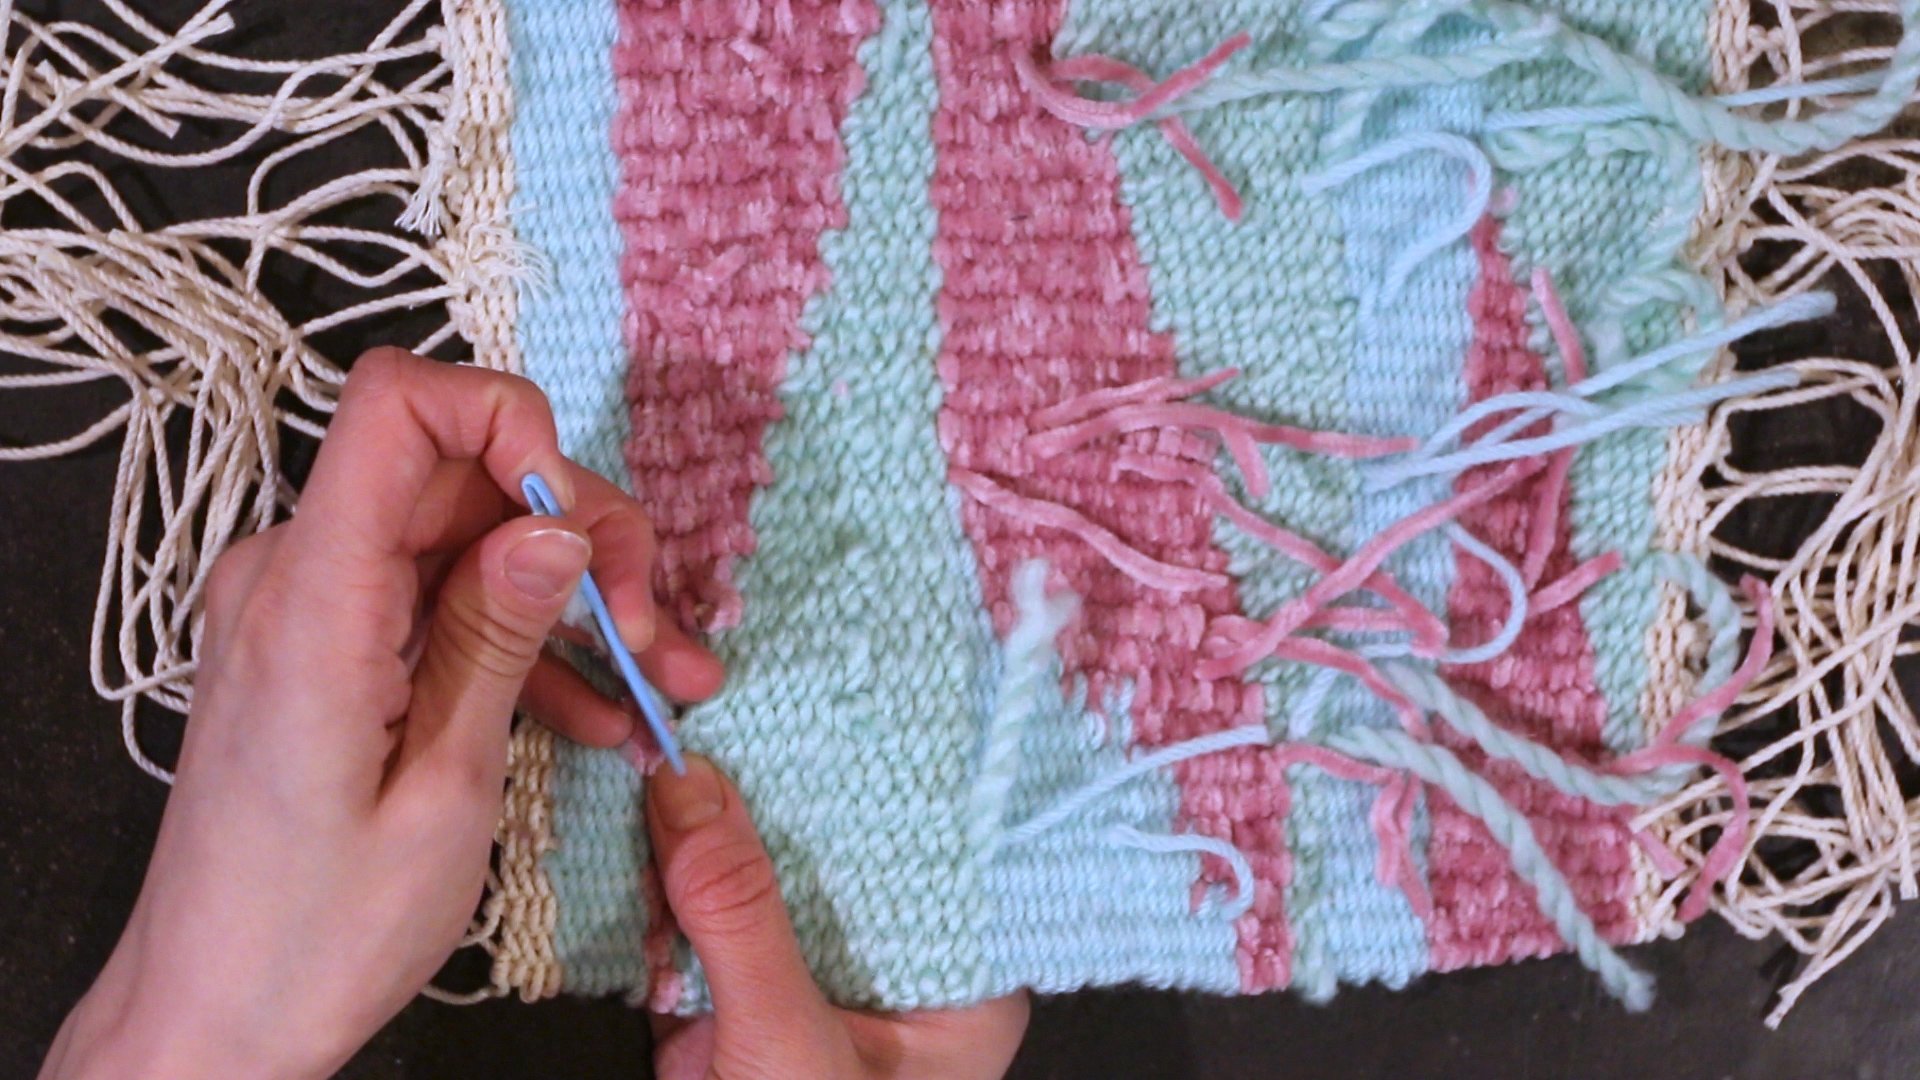
2. Take your wooden dowel and position it with the top, fringe warp threads. Tie your threads around the dowel in knots. From here, you can use your yarn needle to weave those tails back into the fabric structure or snip them off for a cut look. We opted to snip ours off.
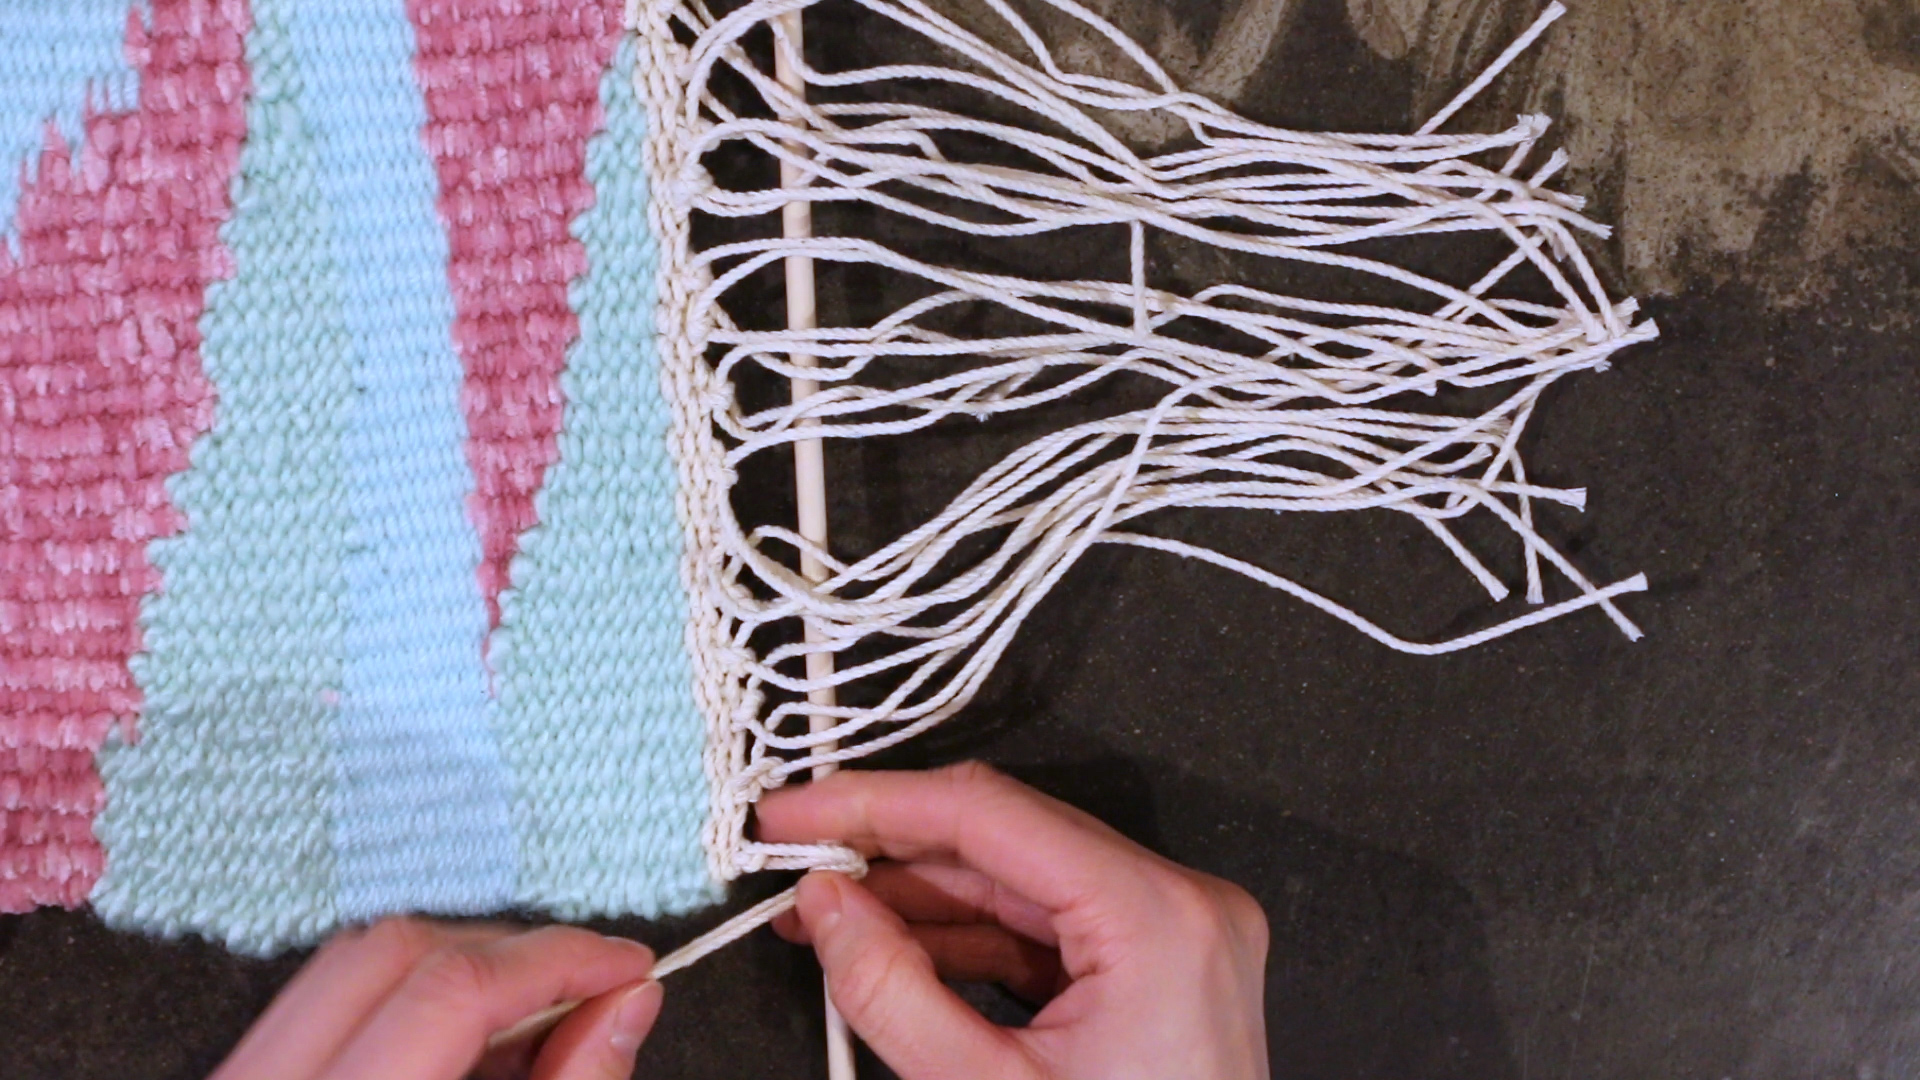 3. Grab an extra length of warp yarn. Tie one end to one side of the dowel and tie the other end to the opposite side to create a mechanism for hanging. If you are worried about the thread slipping off, dab a small spot of hot glue next to the knot to ensure it is secure.
4. You’re finished! Hang your new wall-hanging on a hook or tack!
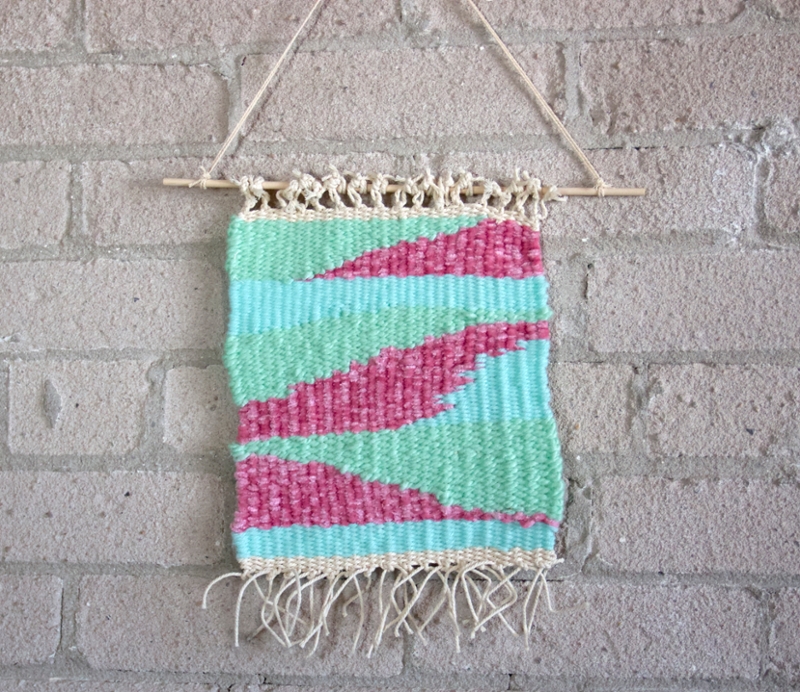
Tapestry Weaving in Dragons on the Tibetan Plateau

Curious to explore more examples of tapestry woven textiles in the exhibition? Keep an eye out for these textiles in the exhibition, or take a closer look at detailed photos through the UAlberta Museums Search Site!
- Silk Tapestry Weave Tibetan Chuba for a Man” (2005.5.16)
- Gold Ground Silk Tapestry Weave Tibetan Chuba” (2005.5.96)
- Silk Tibetan Dancer’s Robe” (2005.5.17)