Student Registration Experience Guide
On this page:
Important - preparation for registration
Access to Bear Tracks, including the “My Schedule Builder” tile, on enrolment appointment dates will only be available between 6AM to 8AM to students who are eligible to register on that day. All other students will be able to log in to their Bear Tracks account after 8AM. My Schedule Builder also has a “Doorman” function which manages system traffic in order to support and maintain performance during high volume activity.
You can build your schedule and complete your registration using the “My Schedule Builder” or “Manage Classes” tile in Bear tracks, but the following steps are encouraged.
Before your enrolment date
- Build a draft schedule in Bear Tracks using the “My Schedule Builder” tile.
- You can also build alternative schedules in My Schedule Builder and save them as favorites. You may want to print/save pdf copies of your alternate schedule for reference on your enrolment date if needed.
- Add your classes to your cart and validate them in advance of your enrolment date. This step ensures you meet any course restrictions and avoids any surprises when it’s time to enrol.
On your enrolment date
- Log into Bear Tracks > Manage Classes > Shopping Cart and Watch List. The courses that you previously added to your shopping cart and validated will still be in your shopping cart so you can finalize your registration.
- If you are unable to register in your desired courses and need to select new ones, this can be done directly in “Manage Classes” if you do not want to re-route to My Schedule Builder.
- See the Enrolment, Watch List, Course Planner in “Manage Classes” for instructions.
IMPORTANT: do not open “My Schedule Builder” and “Manage Classes” at the same time in order to process registrations through both tiles.
How to register
Starting in 2024, all U of A students can access the My Schedule Builder tool in Bear Tracks to create a schedule, validate courses and enrol in classes.
This video is available to help you build your schedule. You can also review the step-by-step instructions on this page for additional information and details.
Where do I start?
Log into Bear Tracks using your CCID. After logging in, you’ll note the three tiles, “Manage Classes,” “My Schedule Builder” and “My Schedule & Exams,” you can select. Each of these tiles have specific features to support you in the student registration experience.
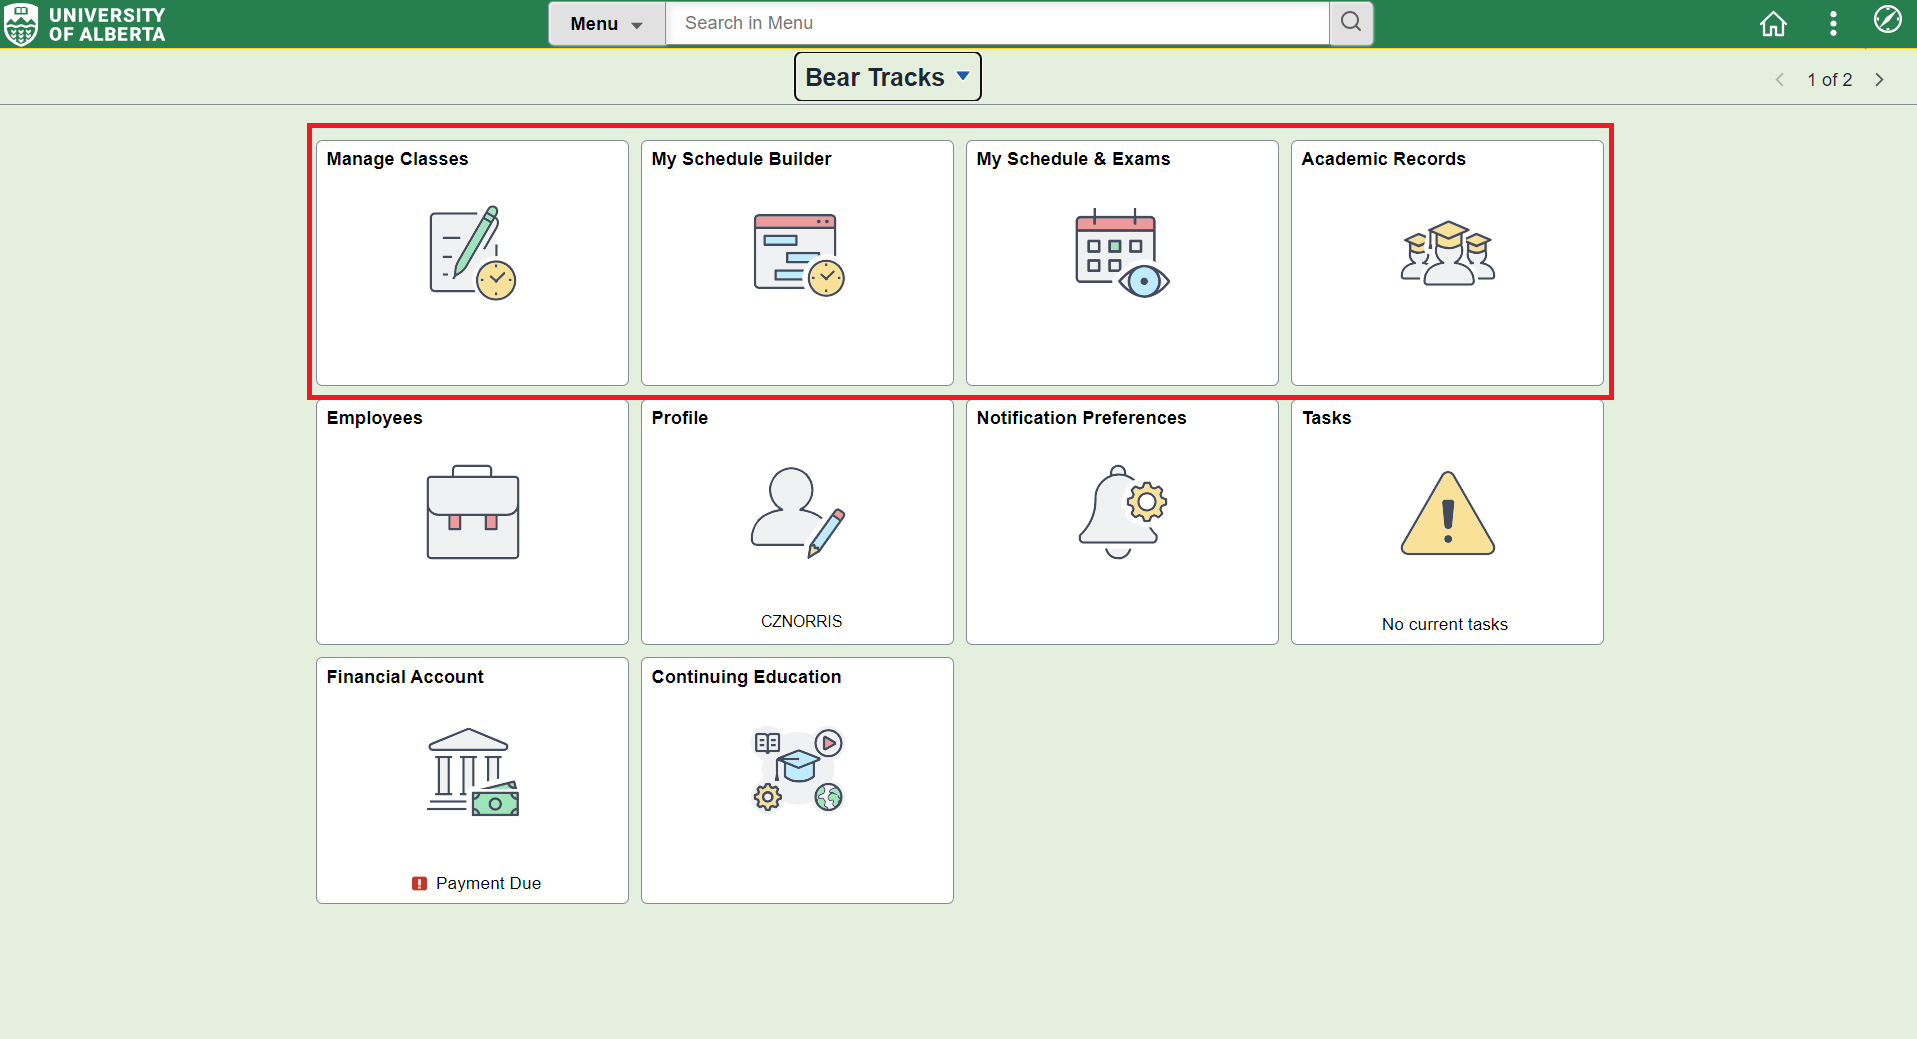
The table below provides an overview of the different actions available in each tile, as well as important recommendations for additional actions that can be performed across more than one tile.
| Action | My Schedule Builder | Manage Classes | My Schedule & Exams |
|---|---|---|---|
| Change Program | X | ||
| Browse Course Catalog | X - recommended | X | |
| Build a Schedule | X - recommended |
X |
|
| Class Search & Enroll | X |
X |
|
| My Enrollment Dates | X |
X |
|
| Shopping Cart | X |
X |
|
| Watch List |
X |
|
|
| Drop Classes |
X |
X | |
| Withdraw from Classes | X | ||
| Swap Classes |
X |
X - recommended | |
| My Schedule - Calendar | X | X | |
| Planner | X | ||
| View My Classes - List | X | X | |
| Tentative Exam Schedule | X | ||
| Final Exam Schedule | X | ||
| My Textbooks | X |
You can build your schedule and enrol in classes in “My Schedule Builder” or “Manage Classes”. Classes that you add to your cart and enrol in will display in both tiles.
The guide below provides step-by-step instructions for users primarily using “My Schedule Builder”. See the Enrolment, Watch List, Course Planner in “Manage Classes” for the comparable “Manage Classes” instructions.
Create your schedule
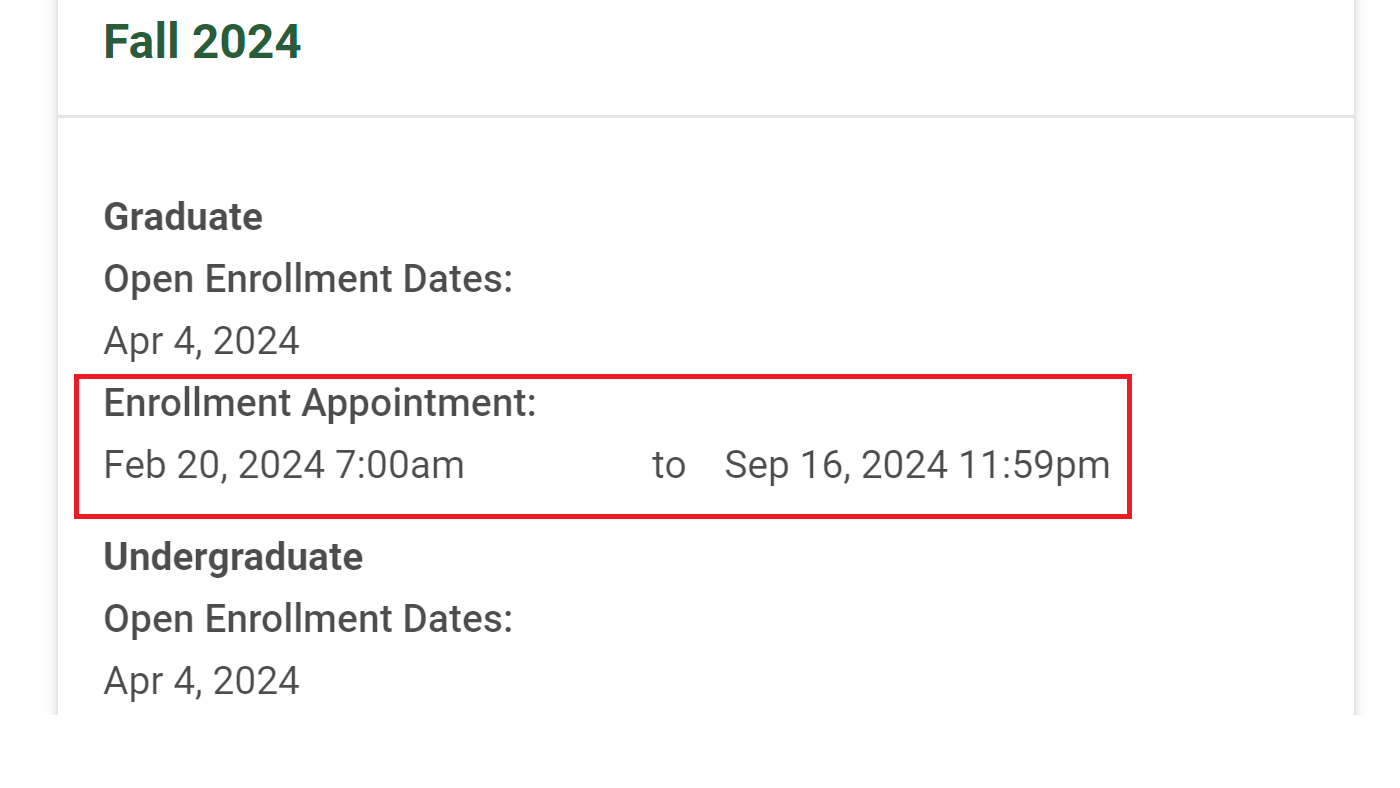
Check your enrolment appointment time and review your program information.
To find out when you can enrol, go to the “Manage Classes” tile in Bear Tracks and select “My Enrollment Dates.” Select the term for which you want to view the enrolment date.
Alternatively, enrolment dates are available in the “My Schedule Builder” tile in Bear Tracks. Your “Enrollment Appointment” date will display under each term, and details the specific date and time you can start registering in your classes. The “Open Enrollment Dates” reflect when open access to registration begins for all programs and years of study.
For more information about Enrolment Appointment times, visit Course Registration.
Review academic program and plan
First, be sure you are enrolled in the correct program before you begin registering in courses.
If you wish to change programs as a continuing undergraduate student, follow these steps. Graduate students should consult the Graduate Program Manual to learn more about changing programs.
- Apply to a new undergraduate program and receive an admission offer.
- Once you receive an admission offer to your new program, you will need to accept your offer in U of A Launchpad so that you are enrolled in your new program.
- Important note: When you accept your offer, it can take up to 24 hours for your program status to be updated in Bear Tracks. You will not be able to change your program until it has been updated in Bear Tracks.
- After you accept your offer, log in to Bear Tracks.
- Go to Manage Classes > Change Program (Note: you won't be able to do this until course registration opens).
- Select the appropriate term and program. Remember to change your program for each applicable term (i.e., Fall and Winter).
- Register for courses in your new program.
- If you are already enrolled in classes for that term in your current program, you will need to drop and/or re-add courses so that you can register for courses in your new program. When you change your program, you will be prompted to select one of the following options:
- "Drop All Classes and Re-Add Eligible Classes": Select this option if you would like to move any eligible classes from your old program to your new program (courses that aren't eligible to be transferred will be dropped).
- "Drop All Classes": Select this option if you do not want any of the classes moved to your new program.
- Confirm your classes were retained or dropped as expected based upon the options you specified when changing your program (Manage Classes > My Schedule > Calendar or Manage Classes > View My Classes > List).
- If you are already enrolled in classes for that term in your current program, you will need to drop and/or re-add courses so that you can register for courses in your new program. When you change your program, you will be prompted to select one of the following options:
Check your requirements
It is recommended to first find out which courses you are required to take for your degree before you register in courses. These requirements are listed in the University Calendar, under the program descriptions ("Undergraduate Programs" and “Graduate Programs”).
For more help with academic advising specific to your program, please contact an advisor in your faculty.
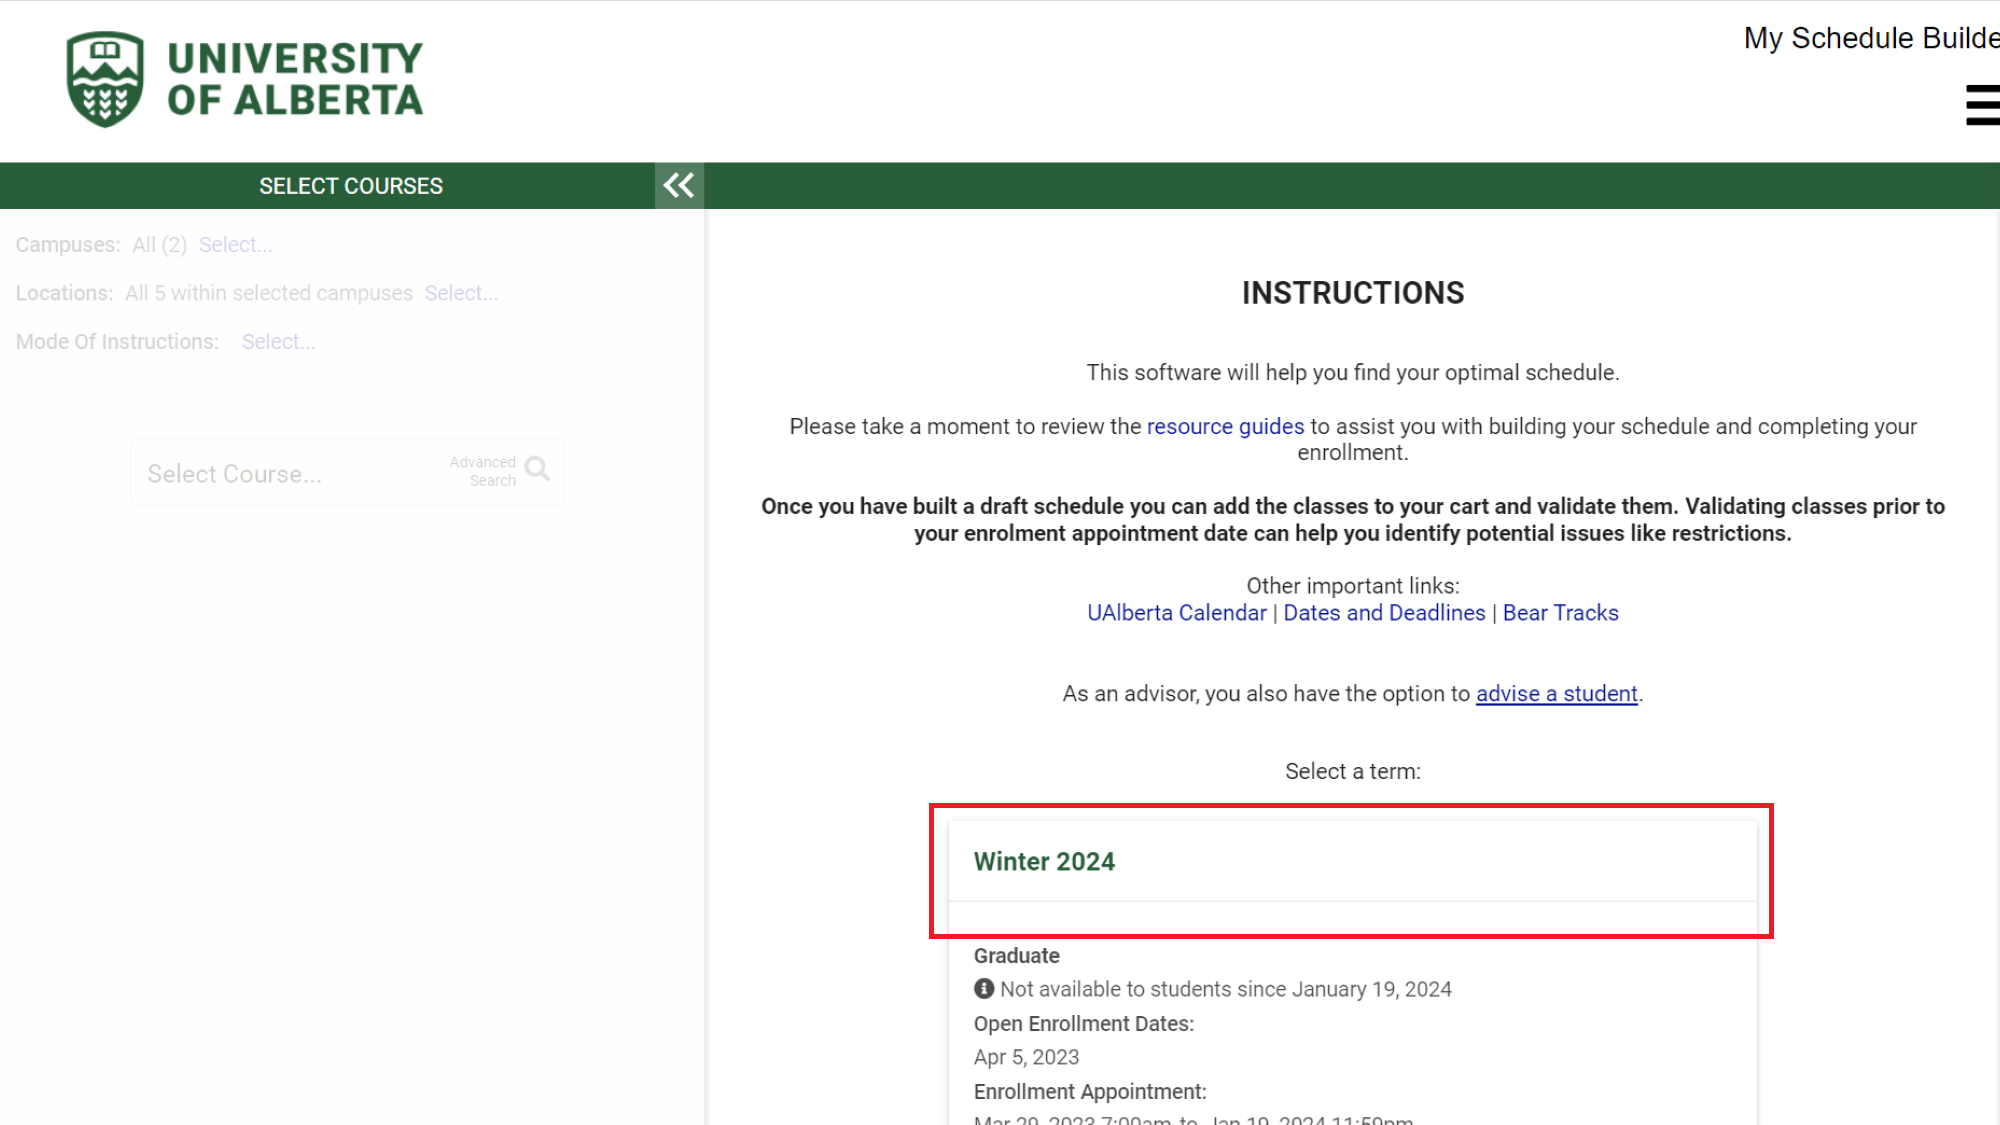
Select Term
- Choose a term to schedule (i.e., Fall 2024).
- View your " Enrolment Appointment" date for the term.
Search for courses
- Set filters:
- For in-person courses, ensure the “Location” filter corresponds to your class location (i.e., Augustana).
- Use “Advanced Search” to further filter results.
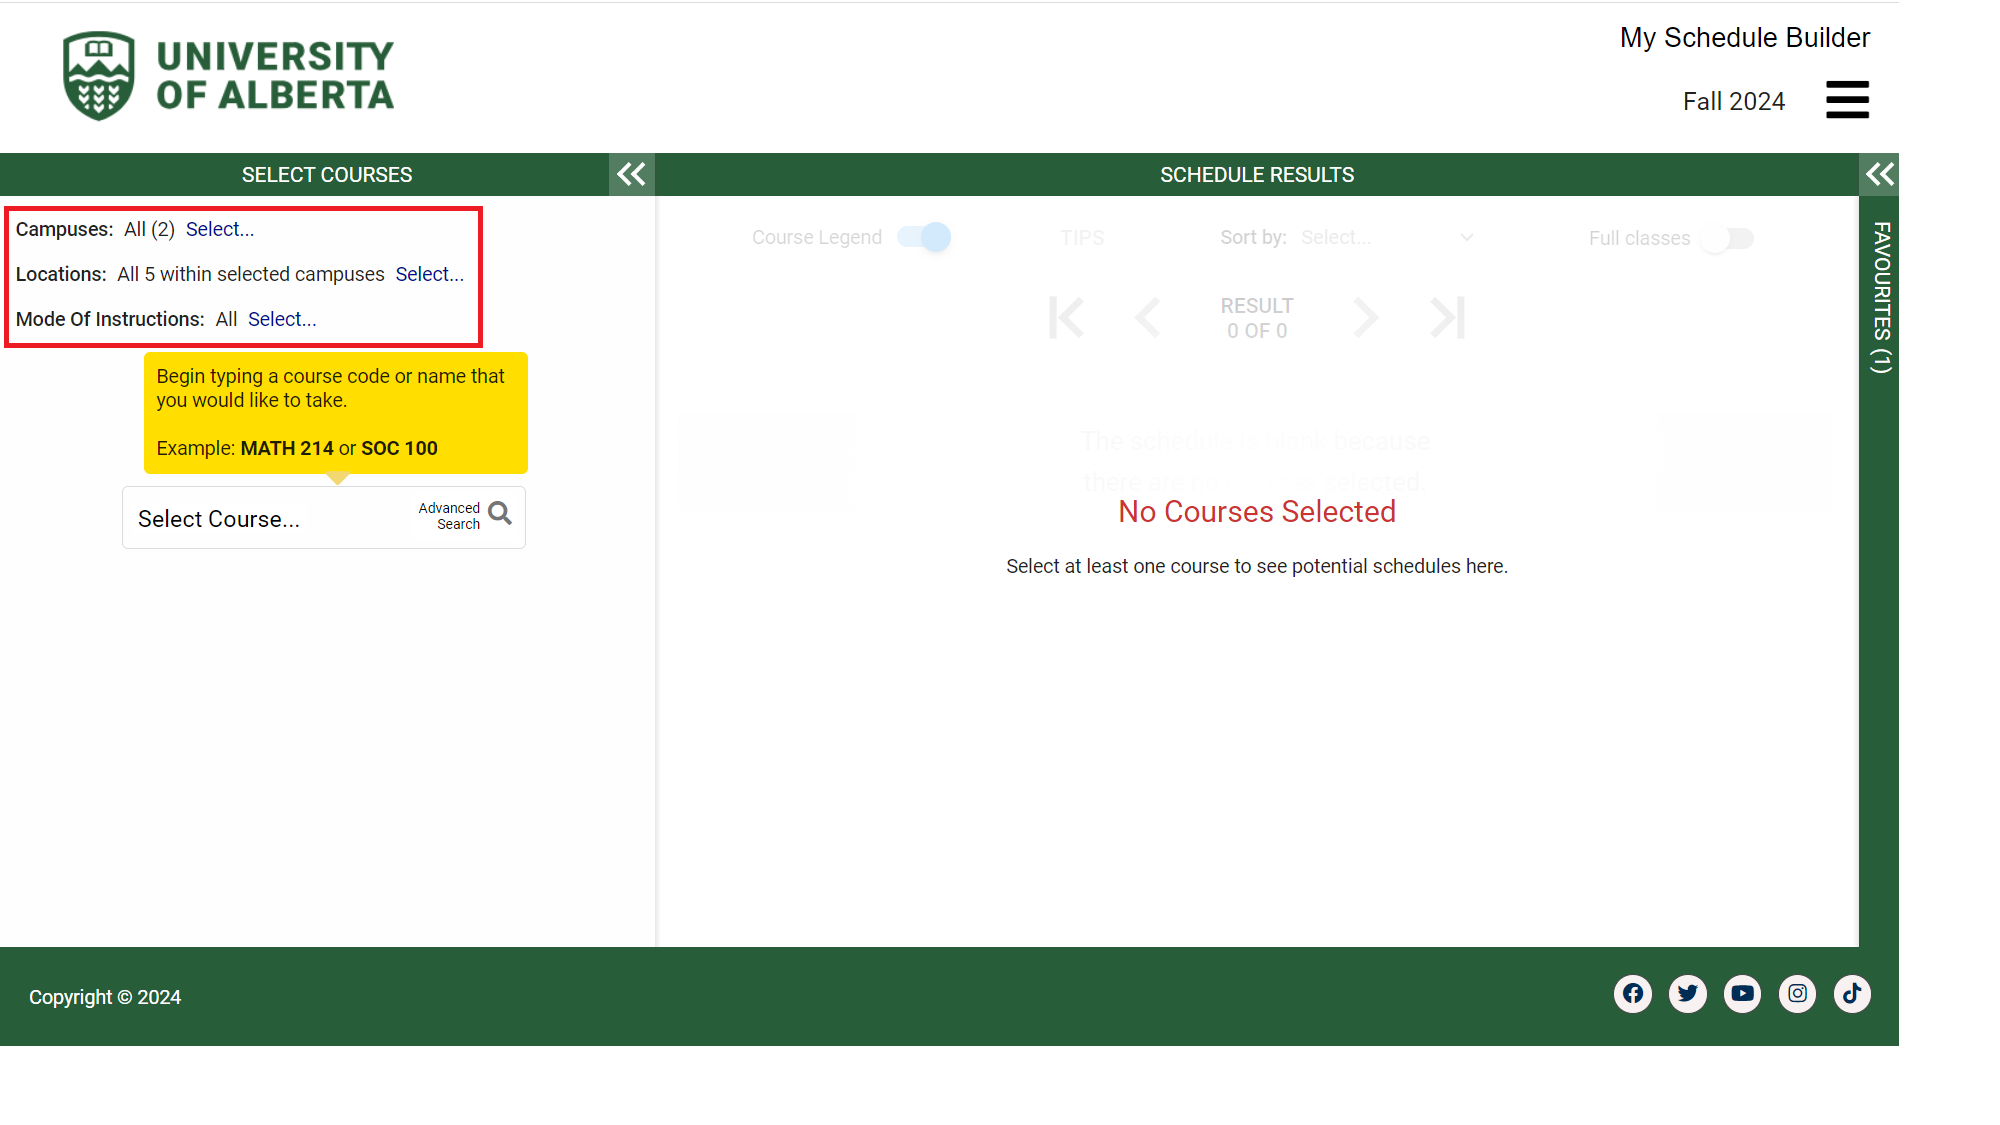
- Search for classes:
- Enter a class code, course name or instructor name in the search bar.
- Select your course from the search results.

- Select courses:
- Choose courses based on your degree requirements.
- Courses selected will appear in your visual schedule.
- Click on the arrow beside the course title to show or hide additional information about the course such as:
- course descriptions
- requirements, prerequisites and restriction information
- campus and class section toggles (which will focus your schedule results further)
- You can also select/pin a specific class section by clicking on the arrow beside “Try all classes” and selecting your desired section.
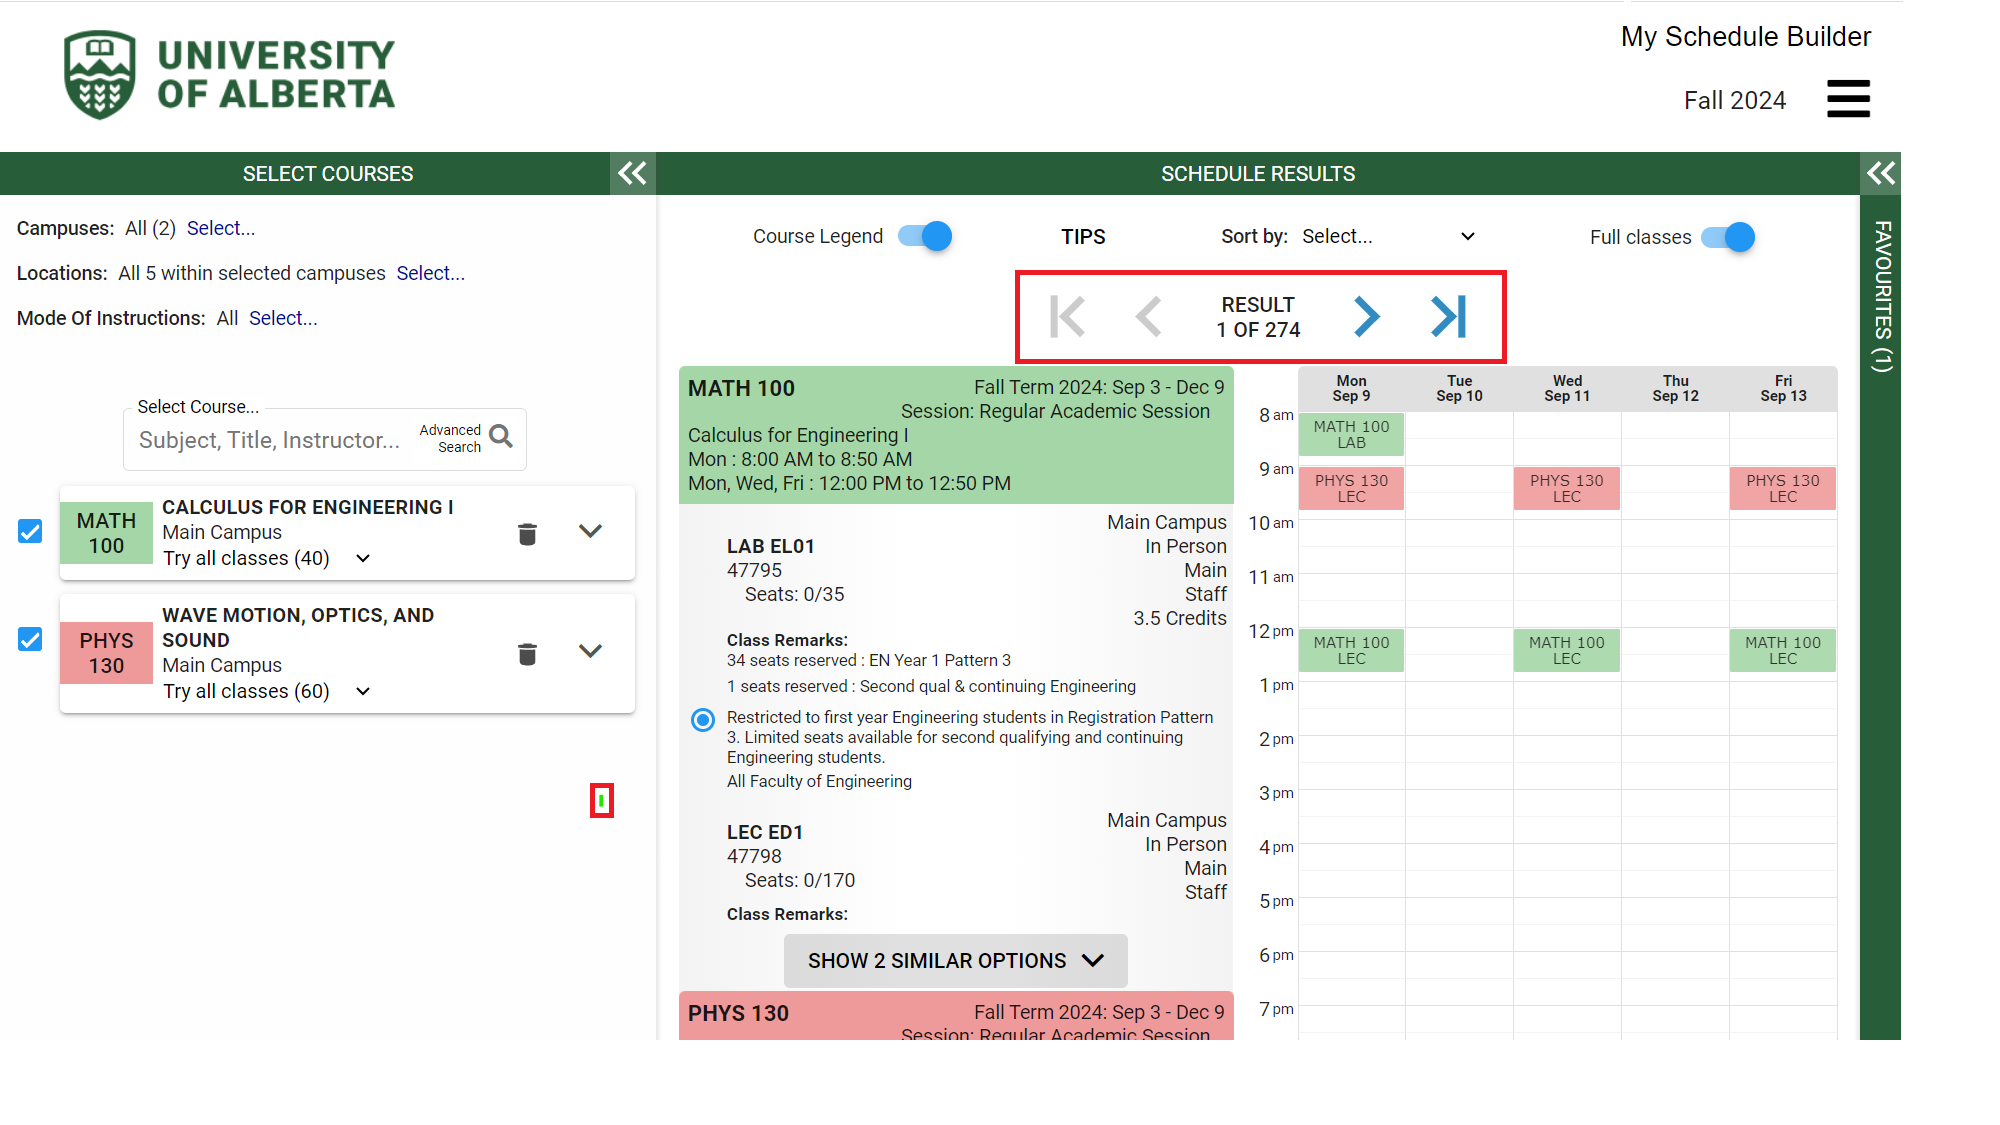
- Click on the arrow beside the course title to show or hide additional information about the course such as:
- Navigate schedule options:
- Use the right and left arrows to view different schedule options (i.e., Results 1 to 30).
- Important note: Some online courses are asynchronous without scheduled class times.
- Manage courses:
- If courses conflict, the visual schedule will show “No results.” Toggle courses on/off using the checkboxes to see your schedule options.
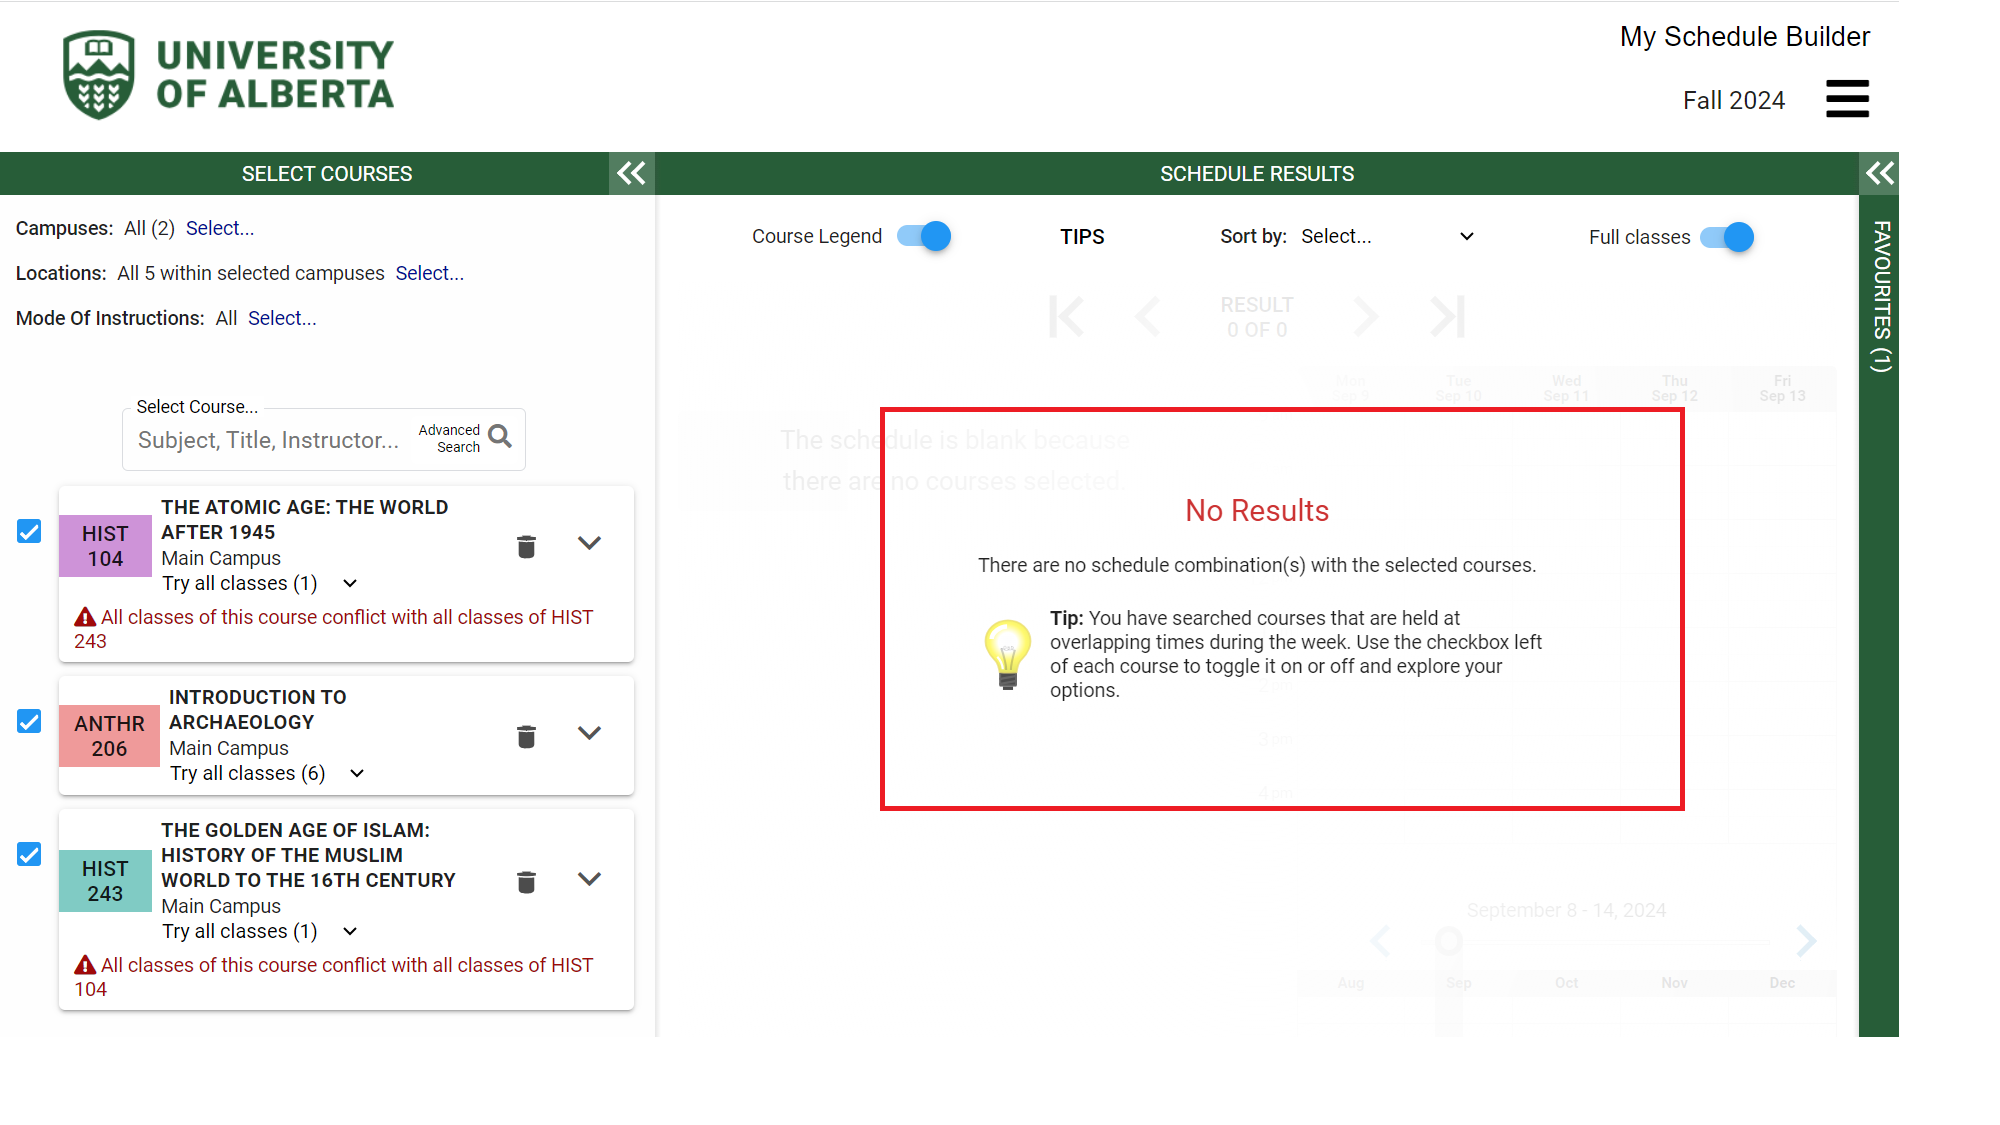
- If courses conflict, the visual schedule will show “No results.” Toggle courses on/off using the checkboxes to see your schedule options.
See the Enrolment, Watch List, Course Planner in “Manage Classes” for instructions on building your schedule through “Manage Classes.”
- Note which courses have the fewest sections (and/or are required for your degree), and build those into your timetable first.
- Register for both Fall and Winter term courses as early as possible as classes fill up quickly.
- Remember that some courses are two-term (six-credit) courses. Ensure you register for both sections together (which will consist of a Part A and Part B).
- Log into Bear Tracks as a guest user to review seat availability before paying tuition deposit (applicable to students who are in Open Studies).
- Consider courses that include labs by taking lectures early in the day and labs later in the day, or vice-versa.
- Familiarize yourself with instruction mode and course component details to help identify classes that will work for your learning style and schedule.
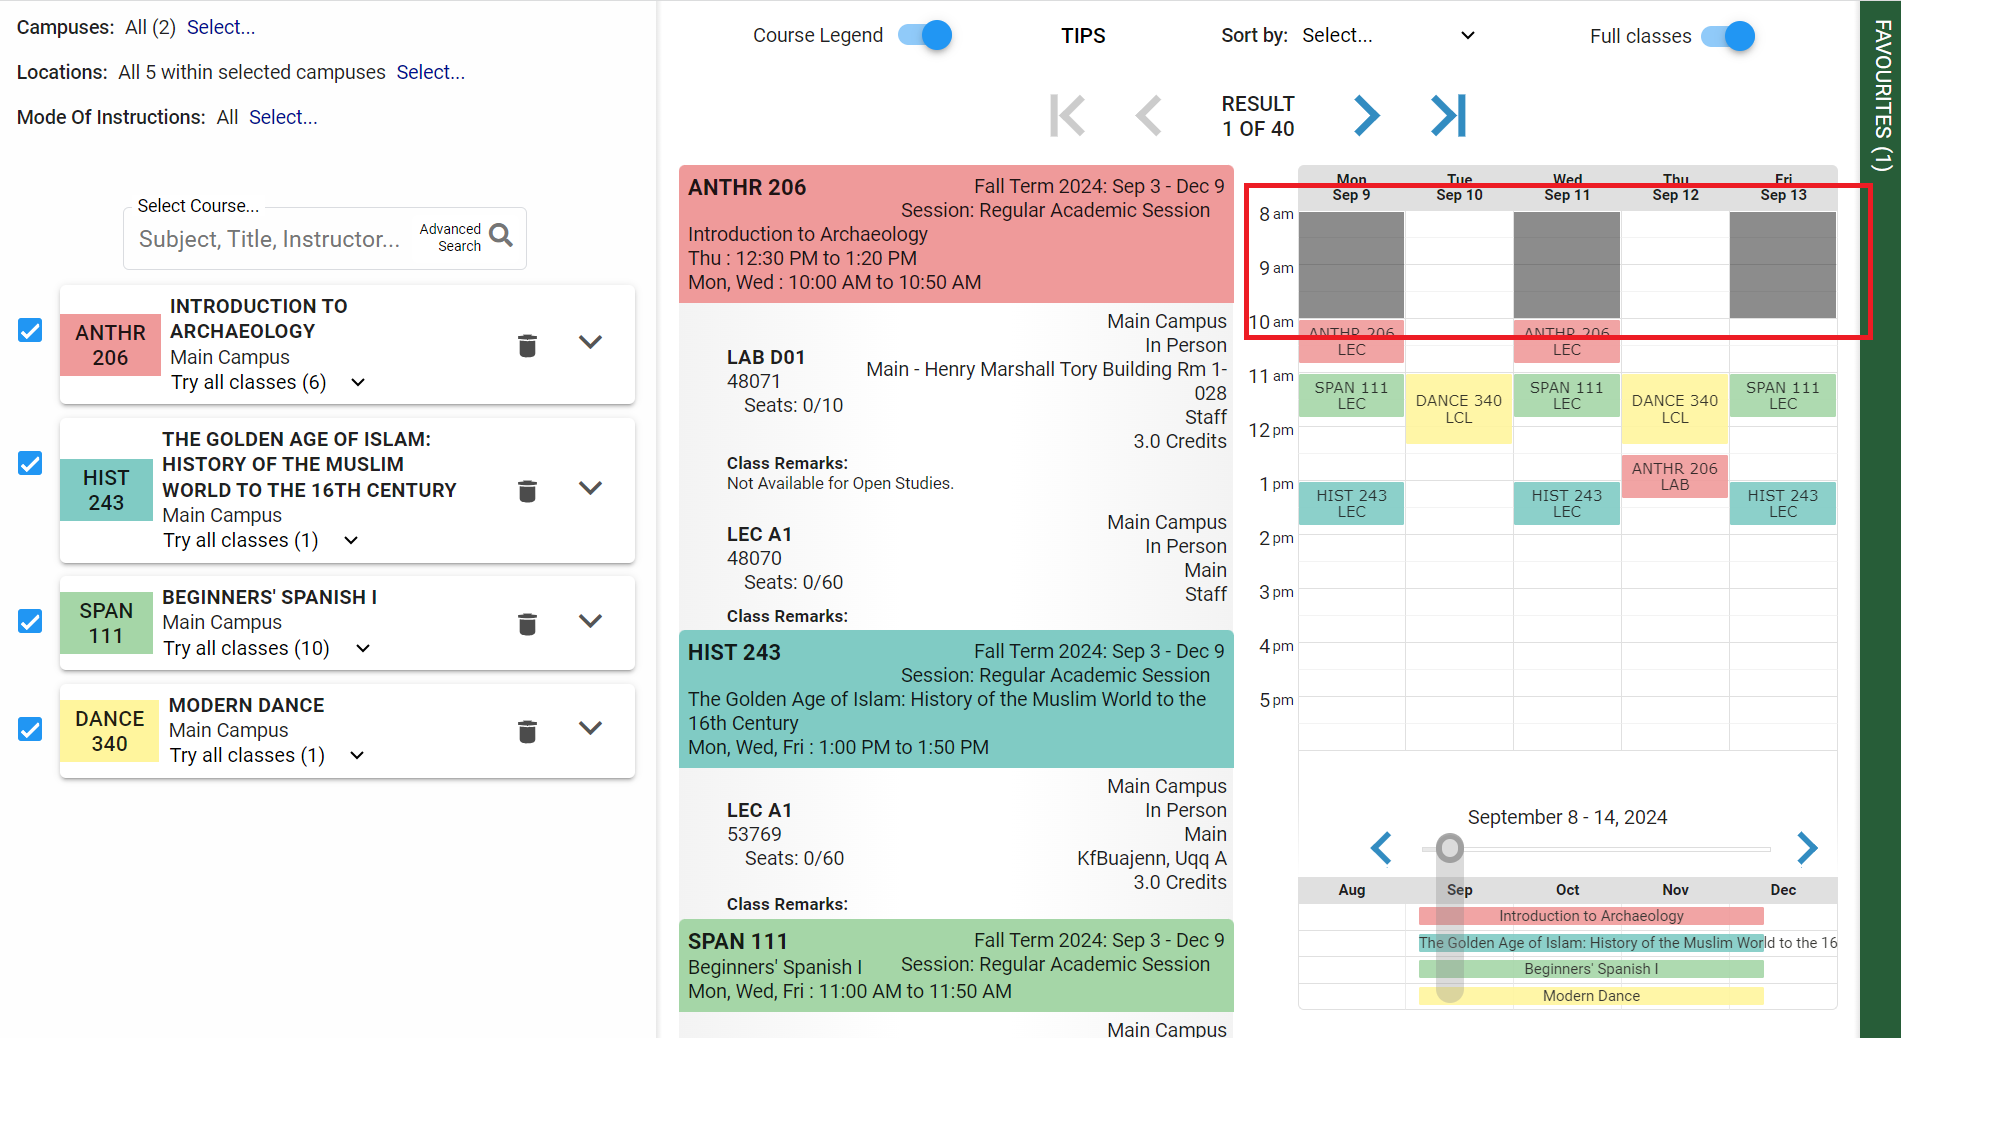
- Personal times:
- Click and drag on the schedule to add personal time or manually add personal times at the bottom using the “Personal Time” input bar.
- If all results overlap with personal time, the first result will have the least overlap.
- Pinning a class:
- Click on a class section to pin it in your schedule. This will help narrow down search results.
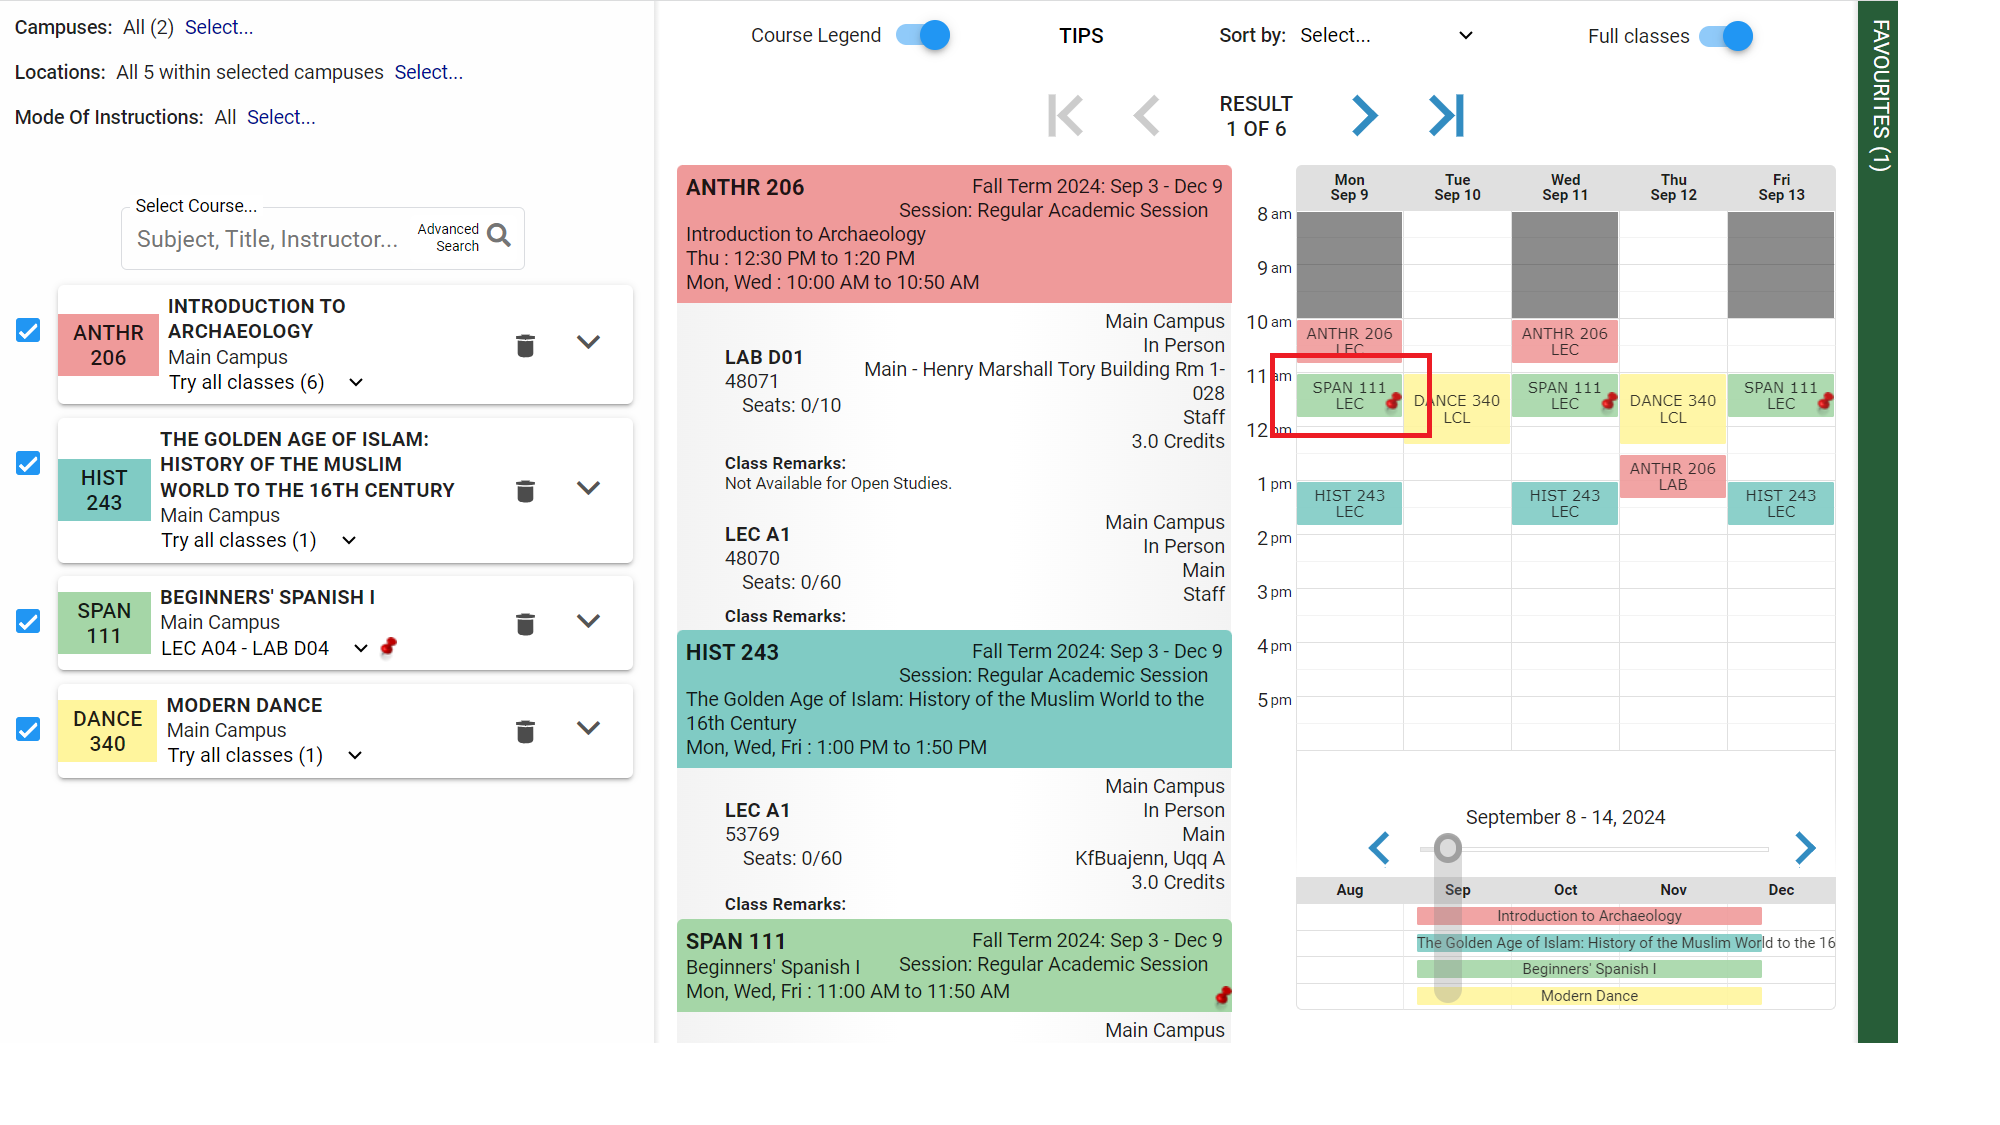
- Click on a class section to pin it in your schedule. This will help narrow down search results.
- Sorting:
- Use the “Sort By” drop-down menu to sort schedule options based on criteria like 'mornings' or 'most time off-campus.'
- Toggle a course off of the visual schedule:
- You can toggle the checkbox on or off of the courses you chose as part of your schedule.
- If you toggle a course off, it will hide it from your schedule but will not remove it.
- Save as favourite:
- Save your preferred schedule by selecting "Save as Favourite."
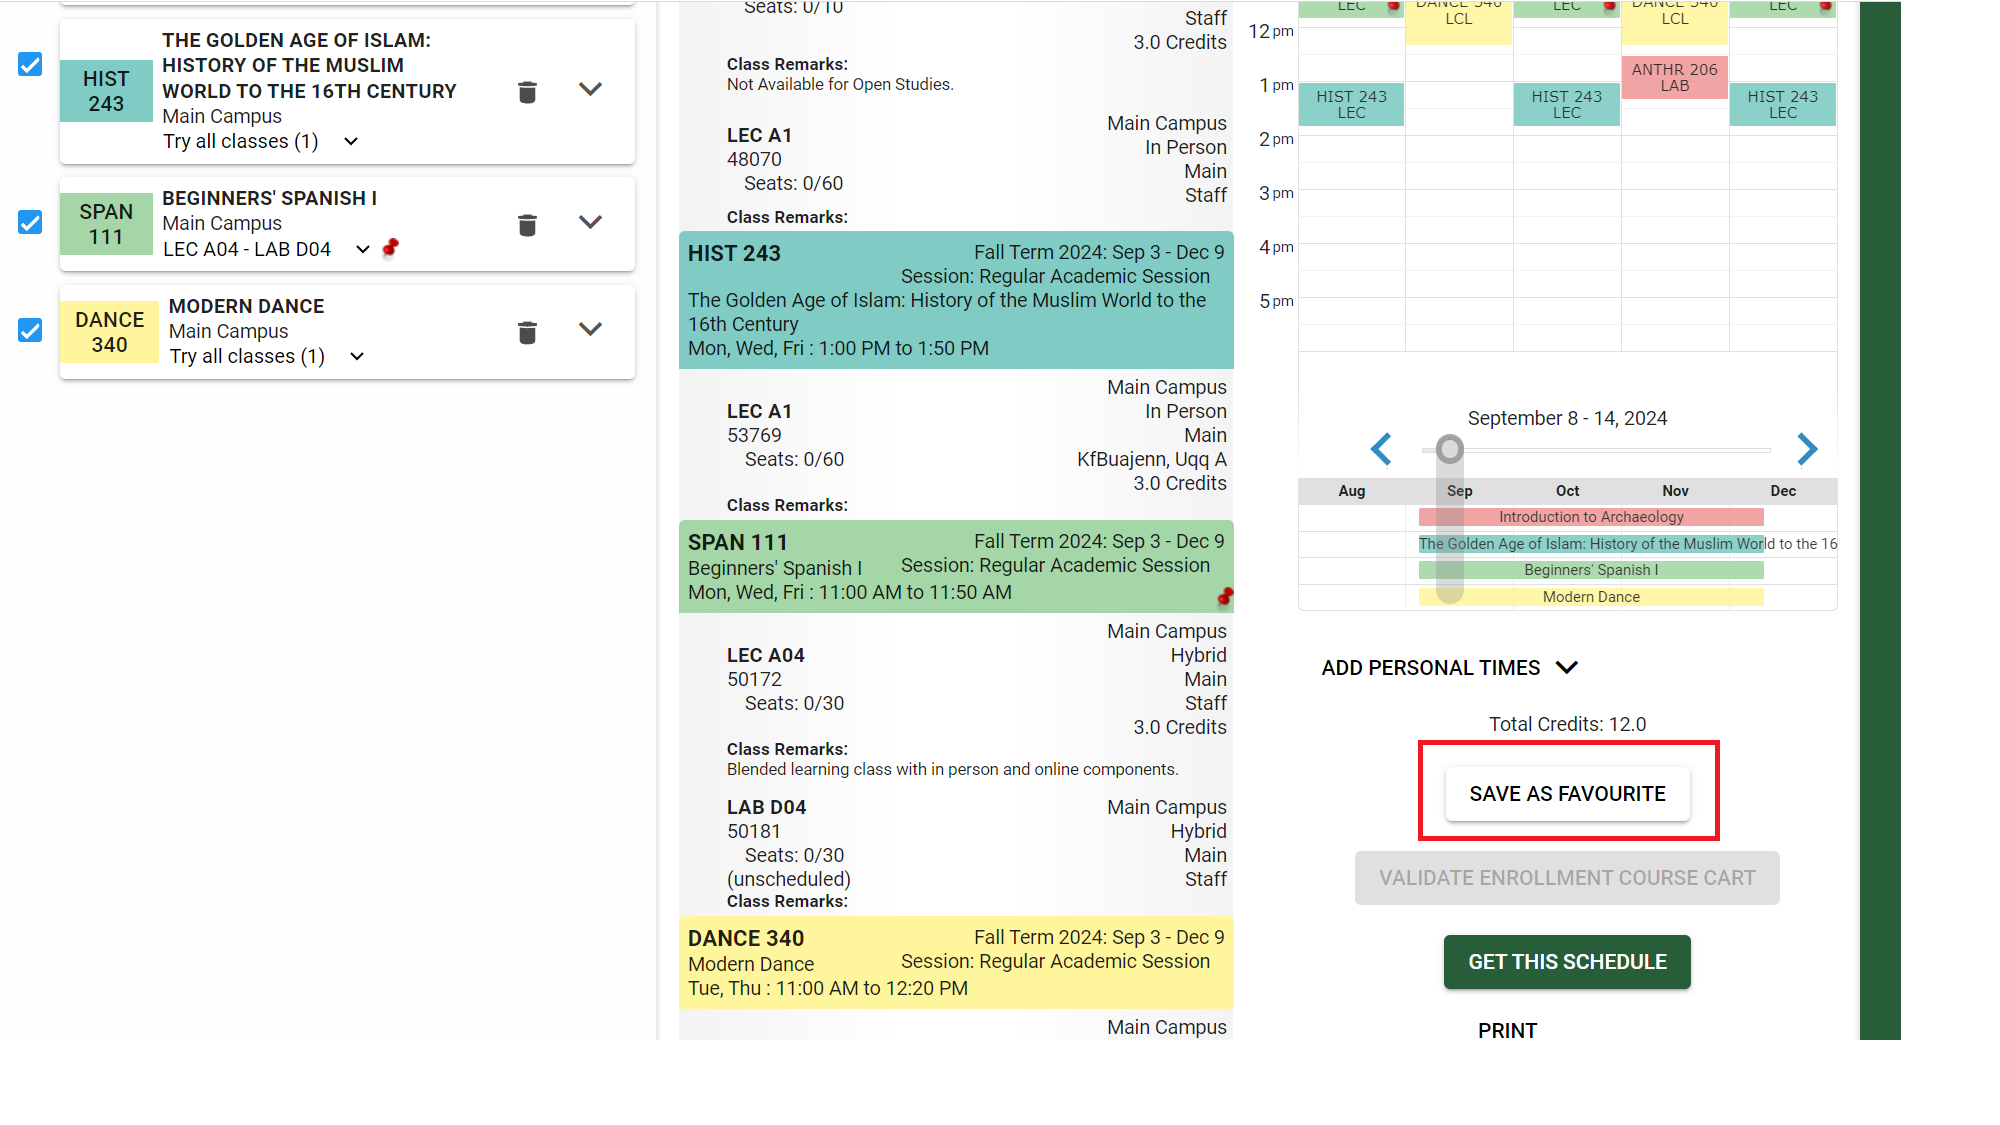
- Favourites are stored on the right-side panel.
- Save more than one schedule option in case your preferred class is full at registration. You can save up to 15 schedules and can title each schedule to help you keep track.
- You may want to print/save pdf copies of your favourite schedule for reference if needed.
- To retrieve a favorite schedule, expand the right-side panel by clicking on the double arrows at the top of the panel. Select the schedule you wish to retrieve and then click on “Load.” The schedule will display in your schedule results.'
- Save your preferred schedule by selecting "Save as Favourite."
- Variable Topics
Courses with different sections offering variable topics can often be taken more than once within the same term as long as you register in different topics.
To add more than one section of the same course to your schedule:
- look for the course using the “Select Course” search bar and go through the different sections to find your desired topic.
- The topic descriptions are displayed in the course legend area.
- Type the same course number again in the search bar and proceed with selecting the additional section(s)/topic(s).
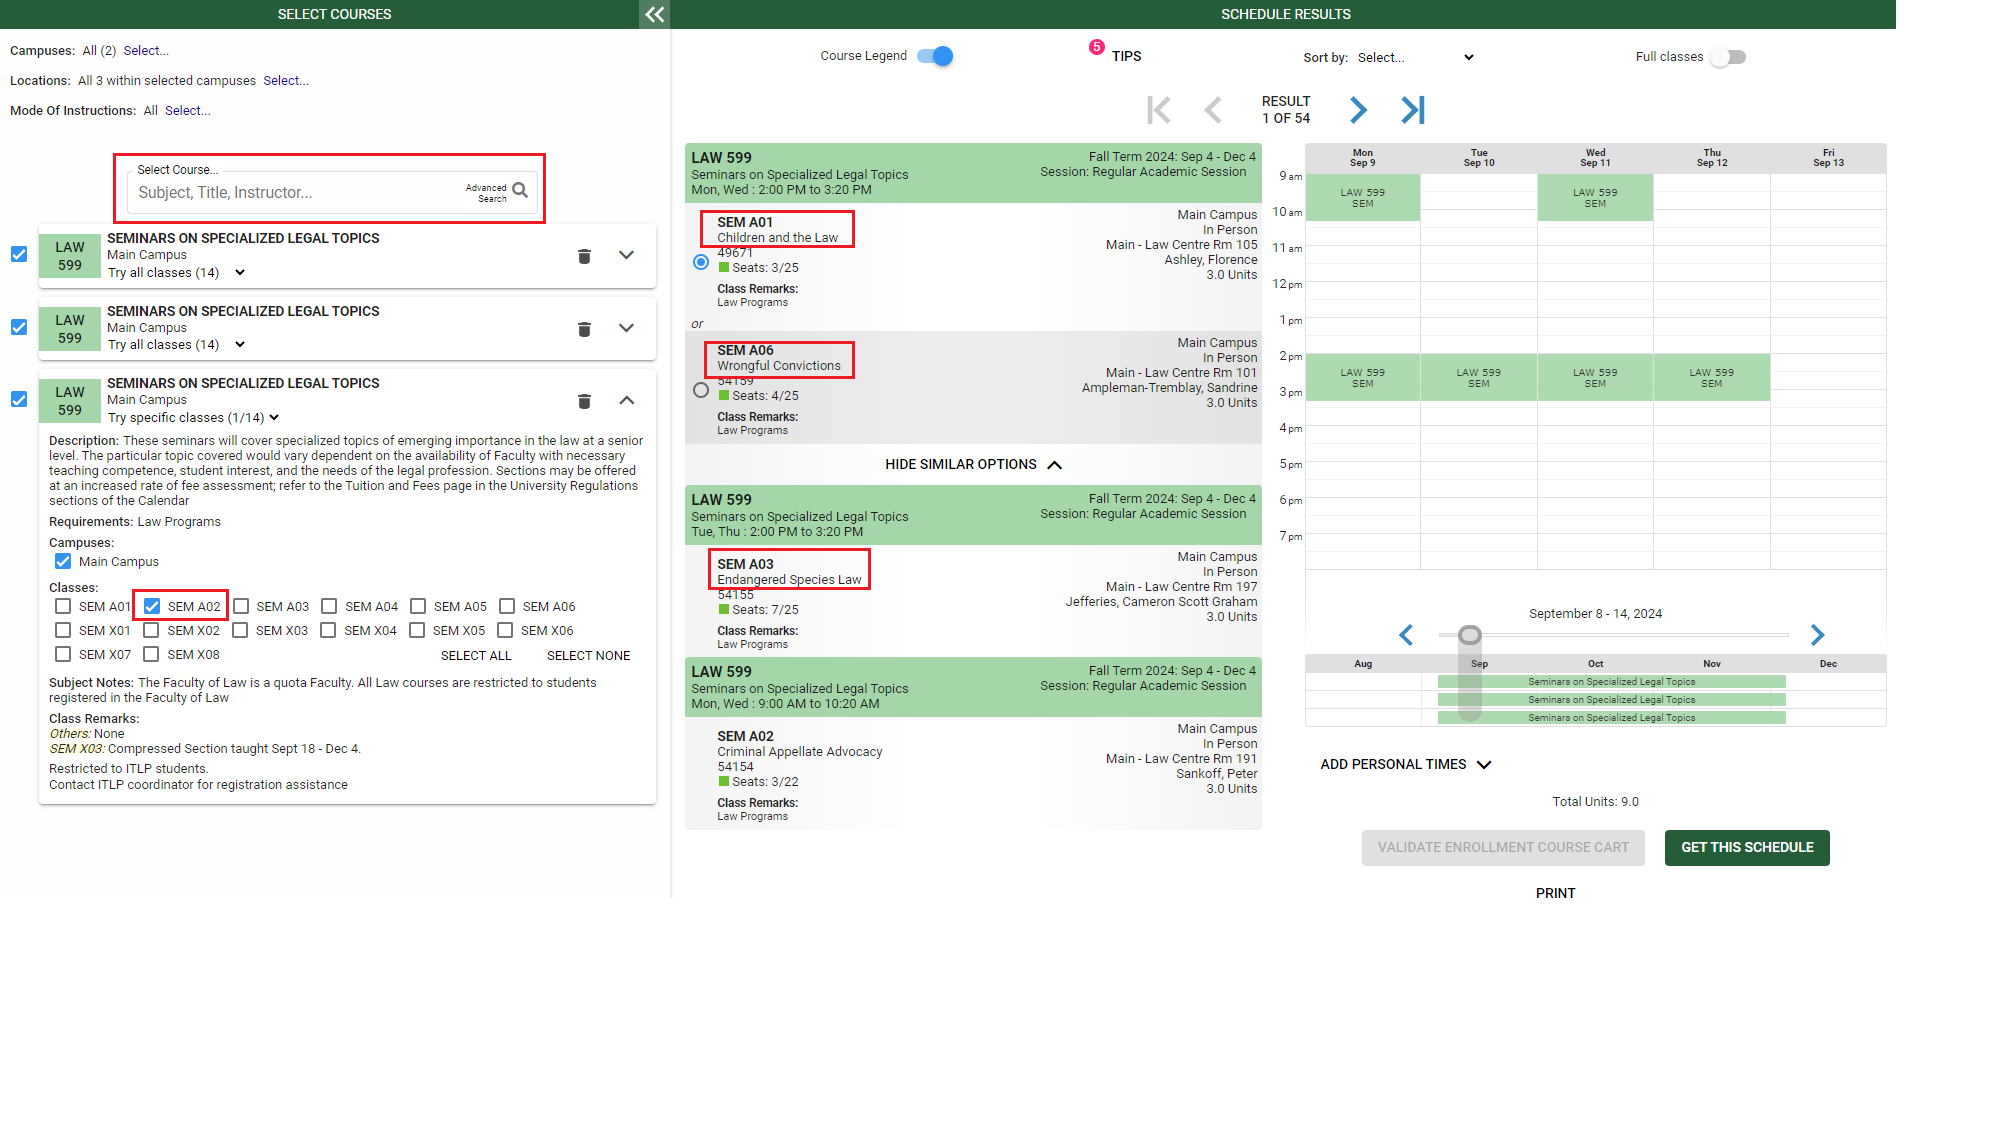
- look for the course using the “Select Course” search bar and go through the different sections to find your desired topic.
- Print
- Print your schedule using the options at the bottom of your screen.
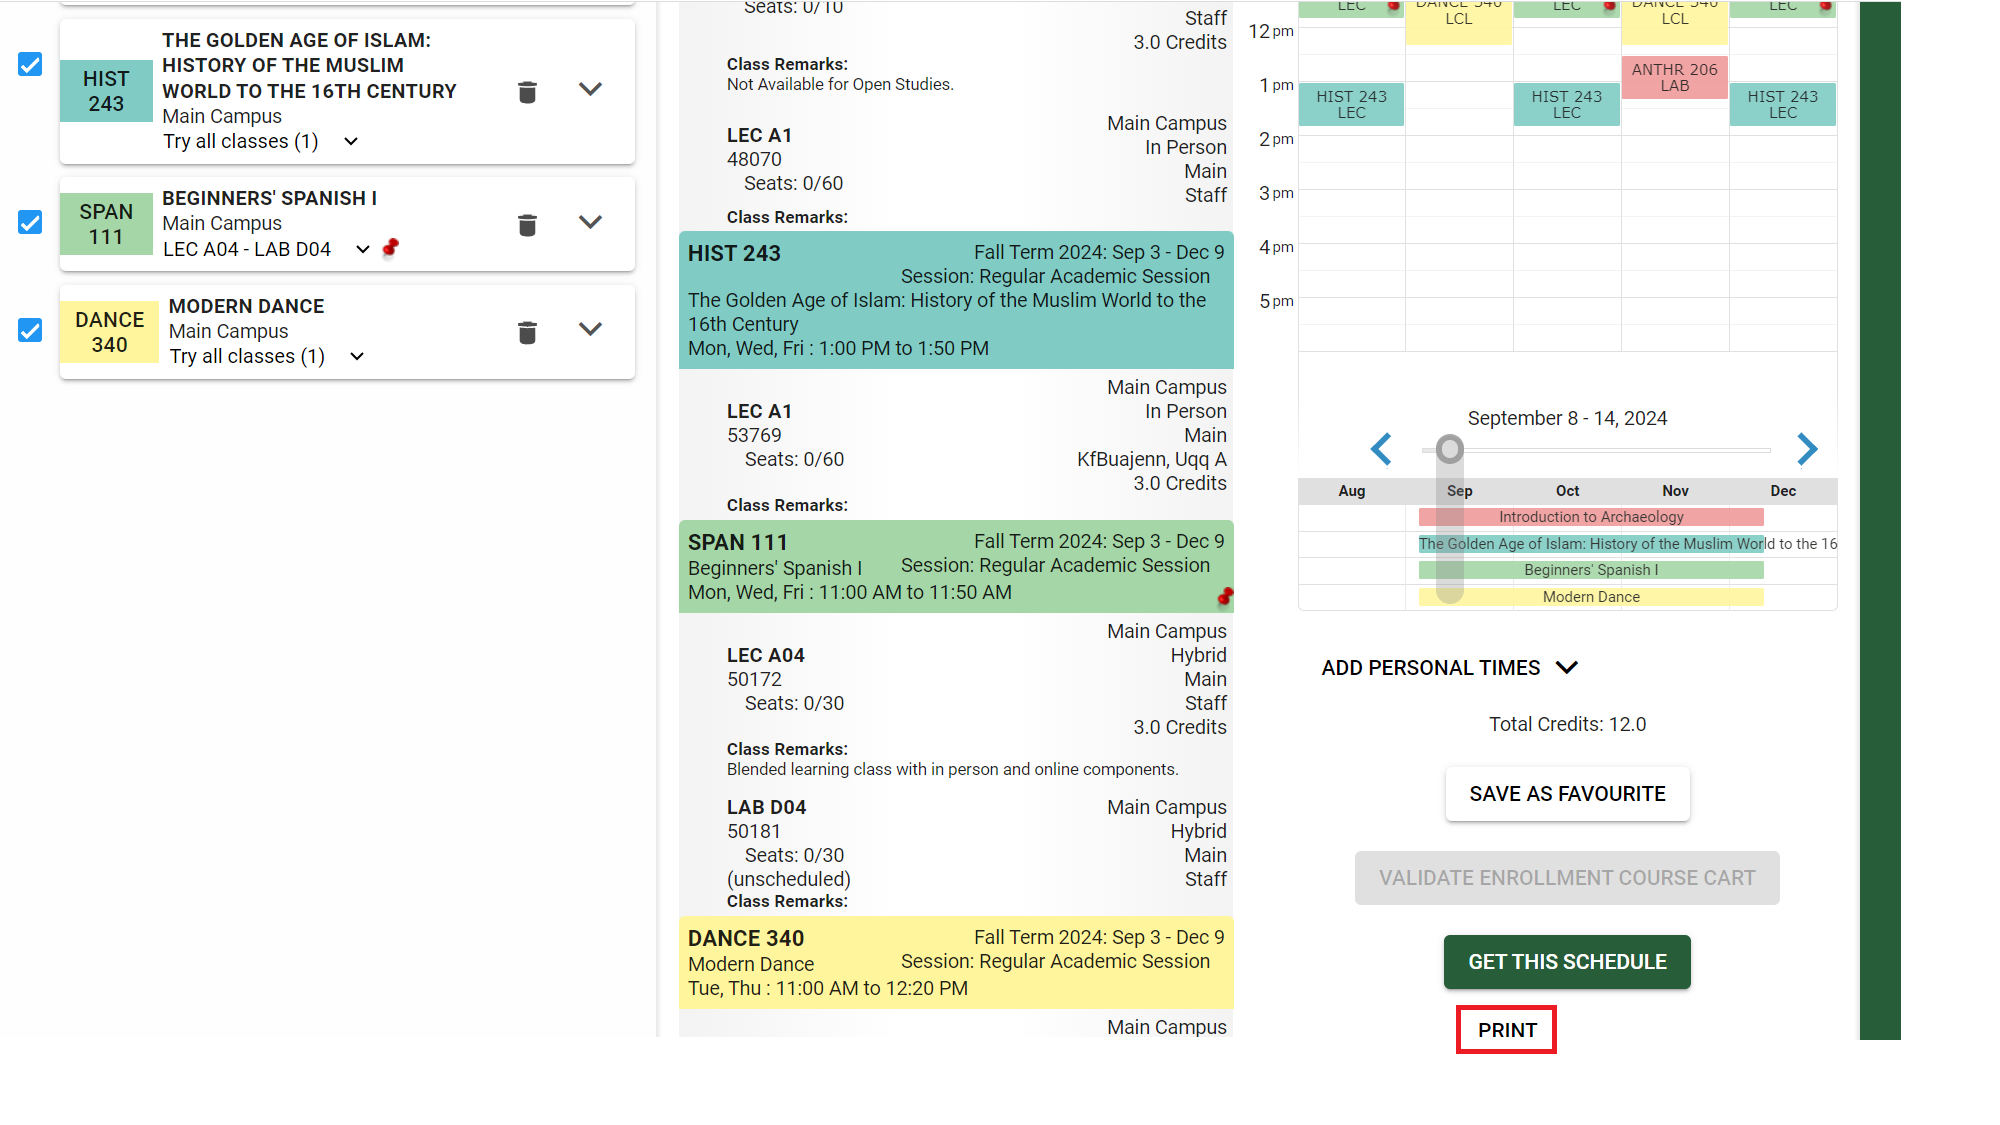
- Print your schedule using the options at the bottom of your screen.
Validate Your Cart
Validating your schedule checks for course restrictions and ensures you meet the requirements for each of the classes you selected. You can perform this step before your enrolment appointment date, helping to speed up the registration process and create a more seamless experience on your enrolment day.
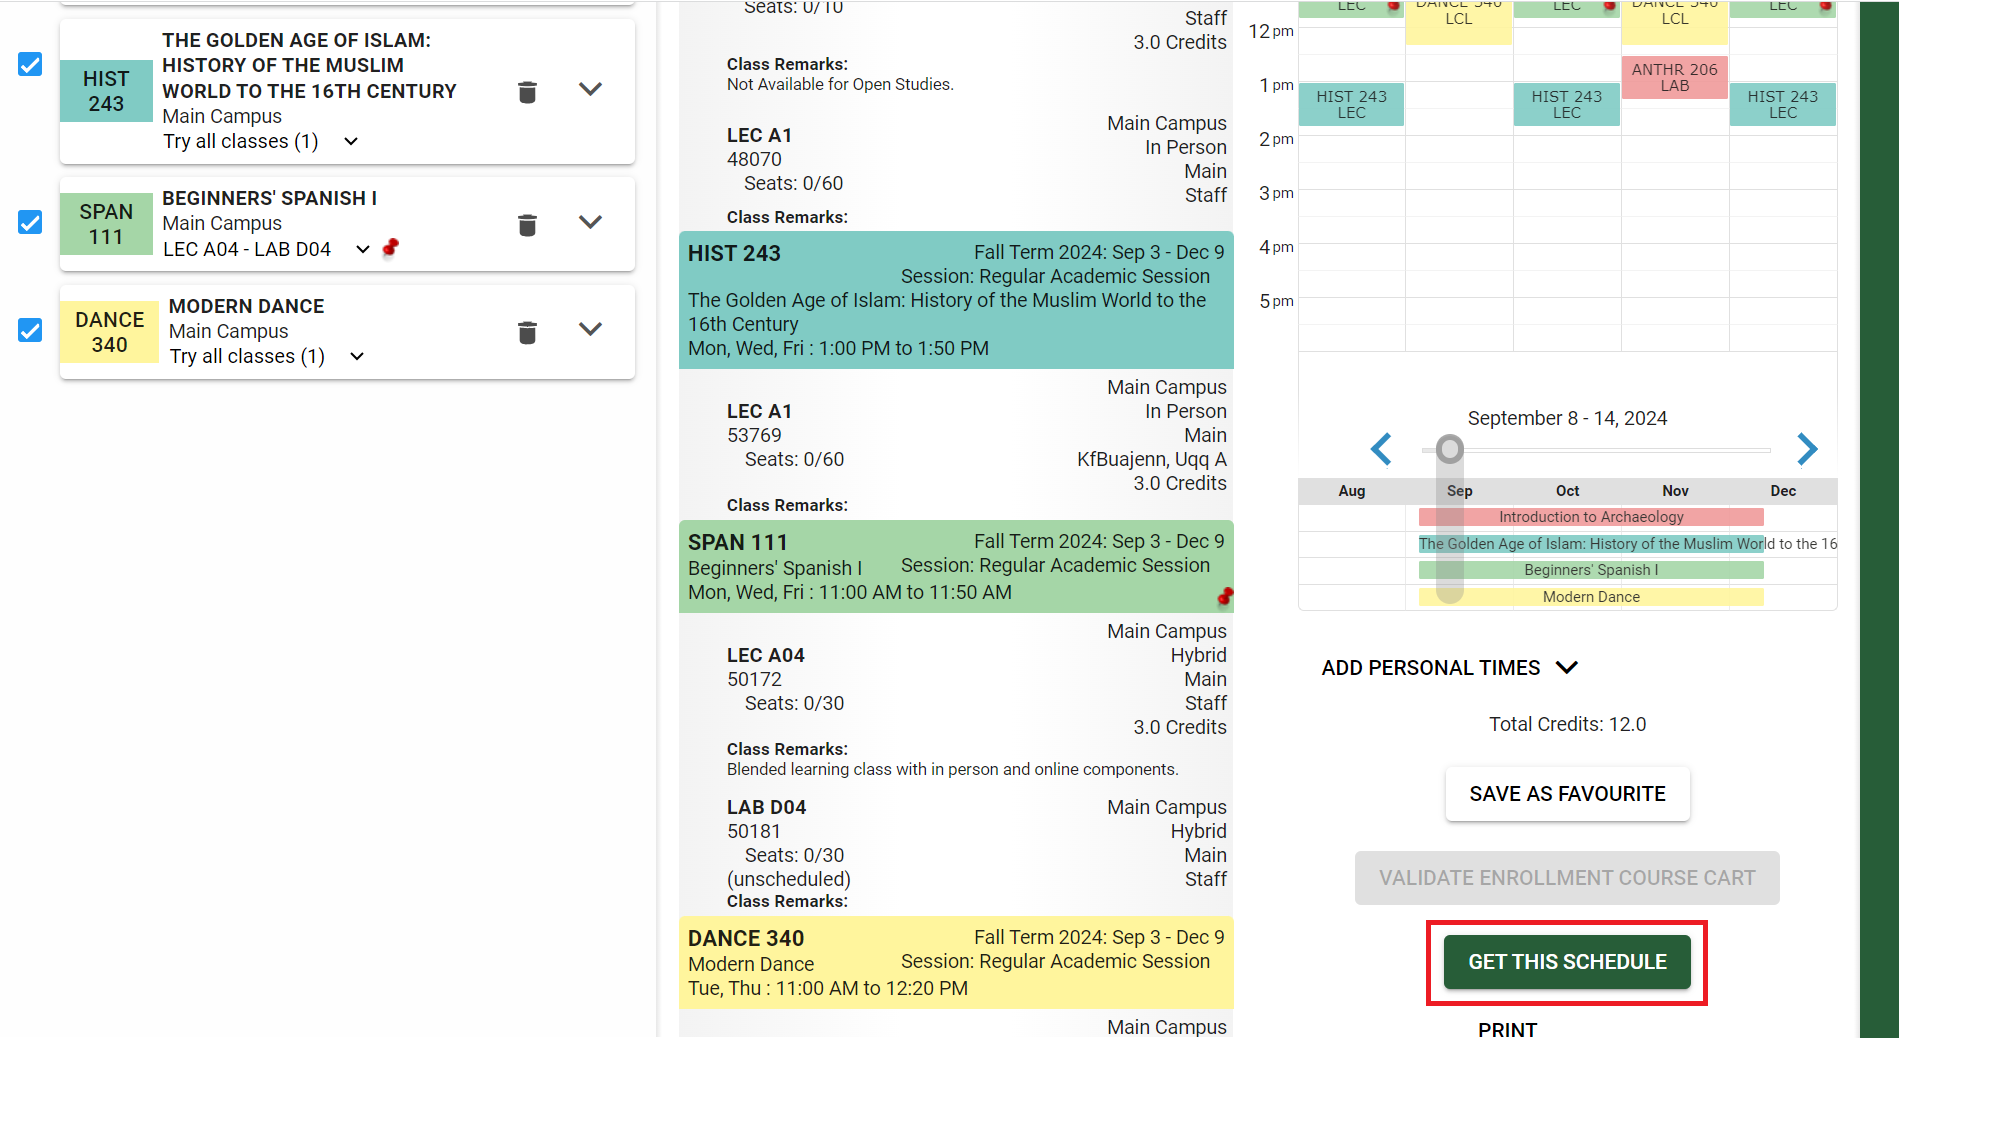
Add to the enrolment cart
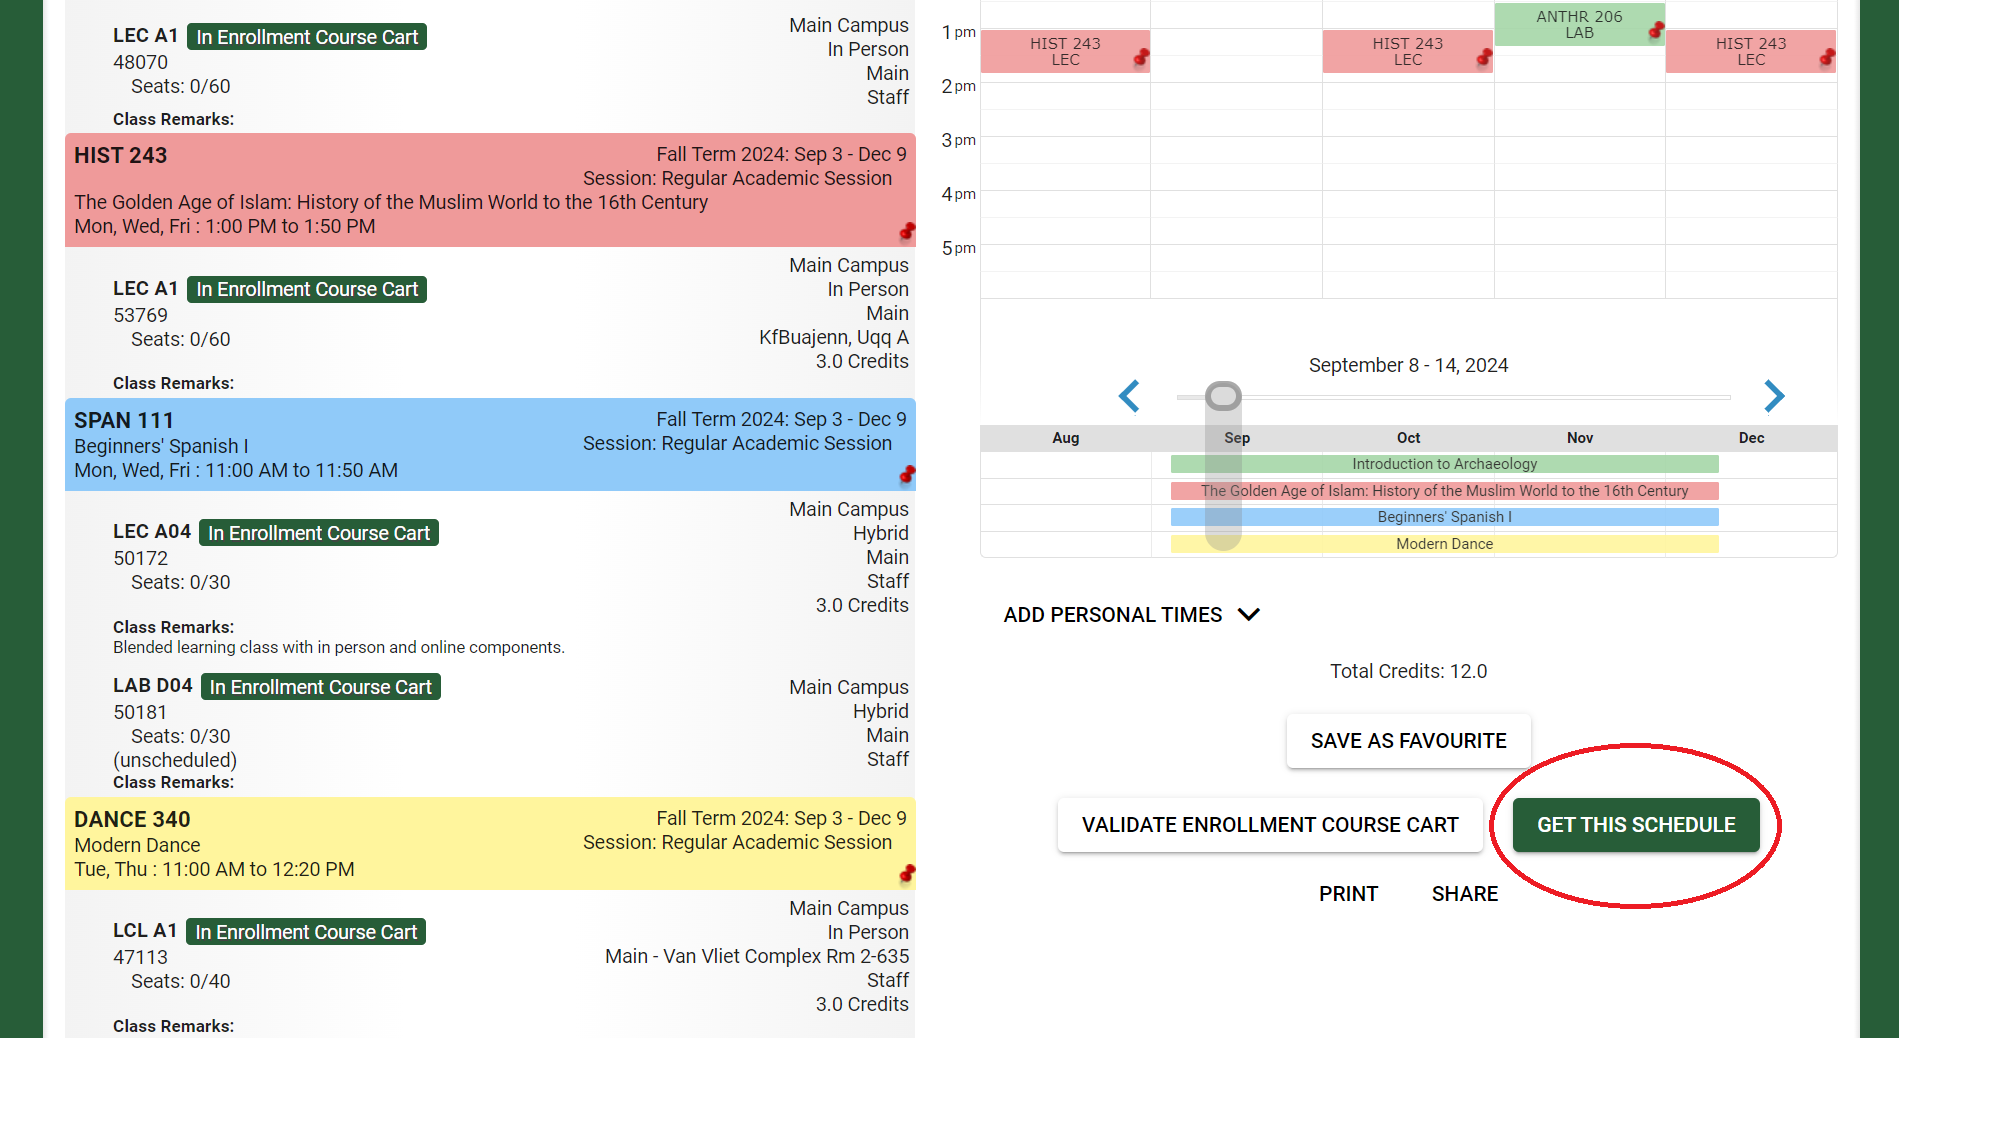
- Select “Get this Schedule” from the bottom of the screen.
- In the “Actions” column, choose “Add to Cart” from the drop-down menu for each course.
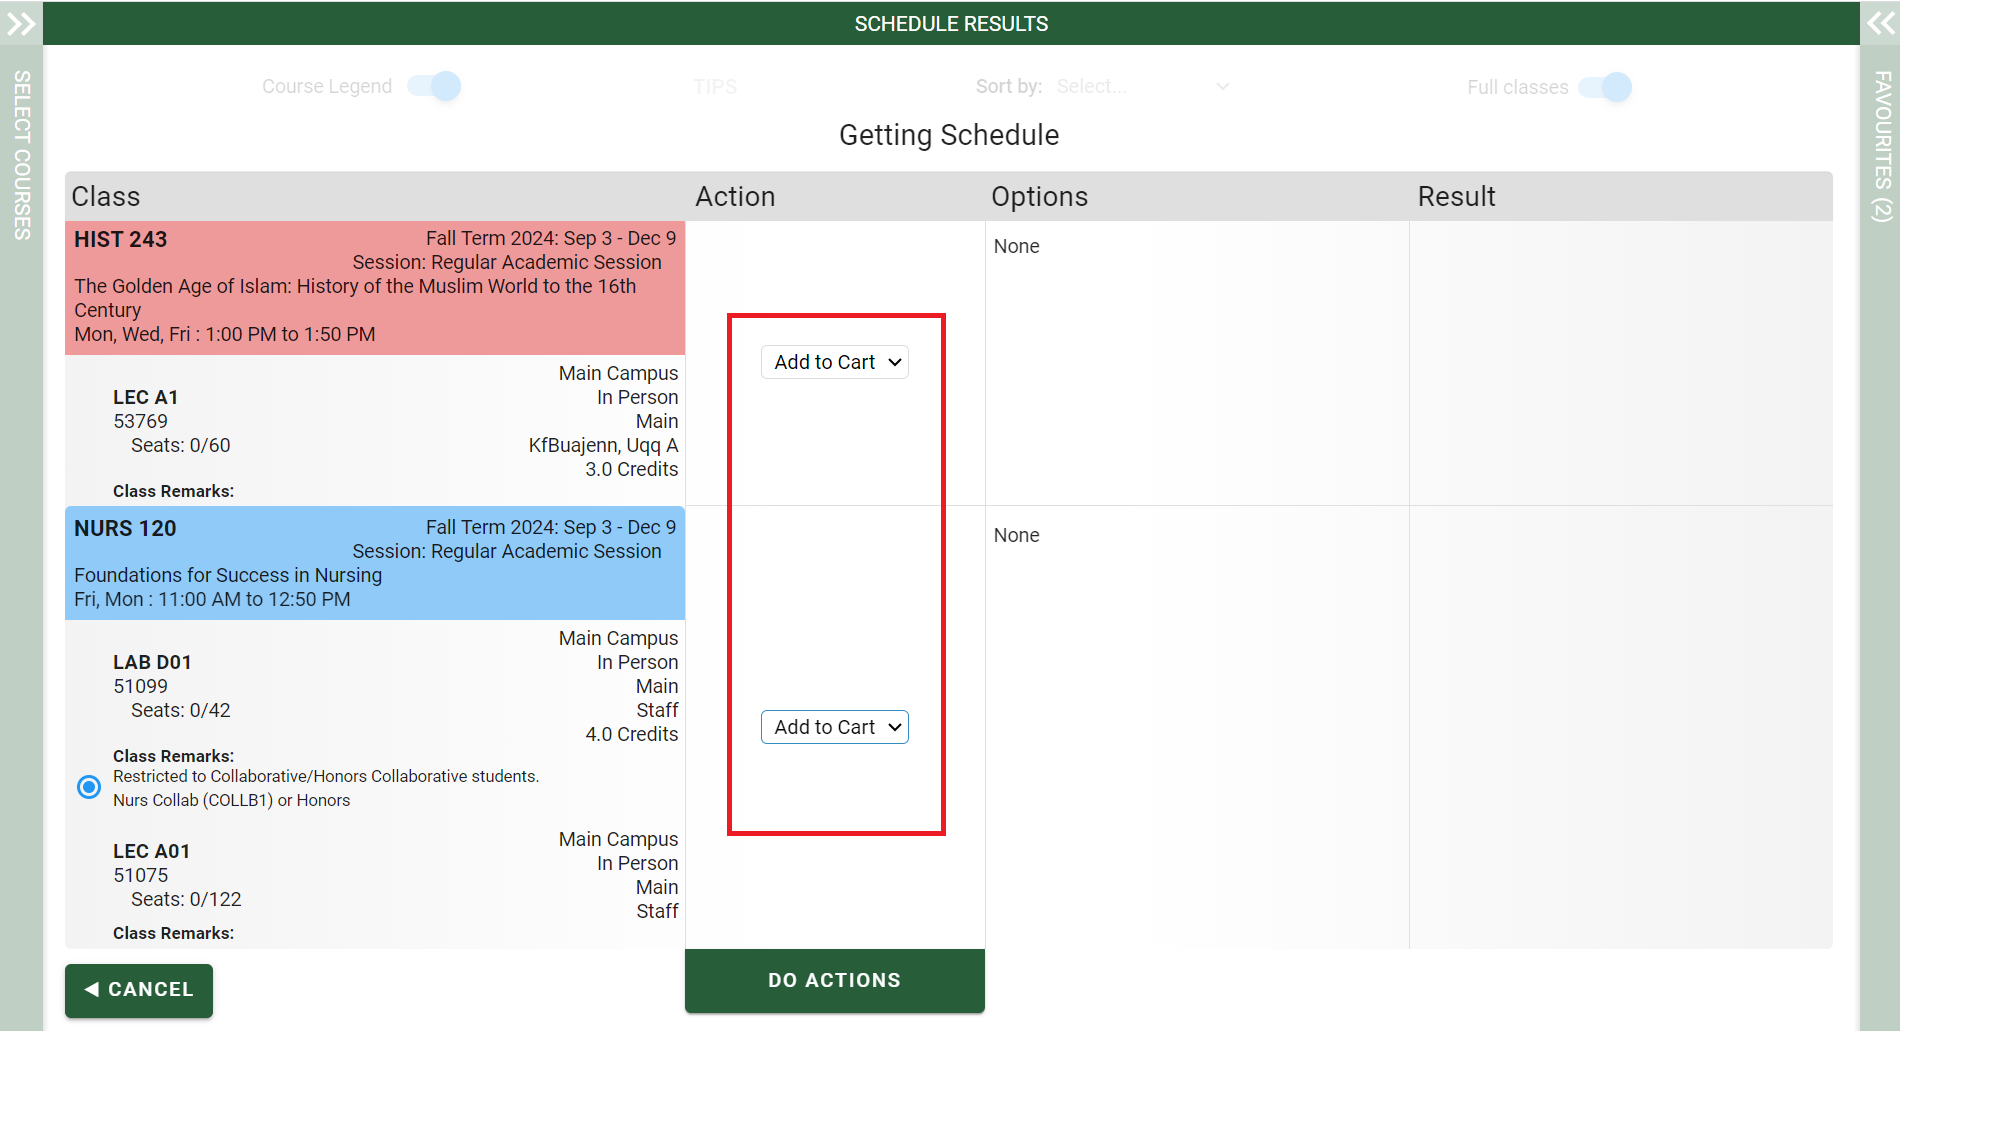
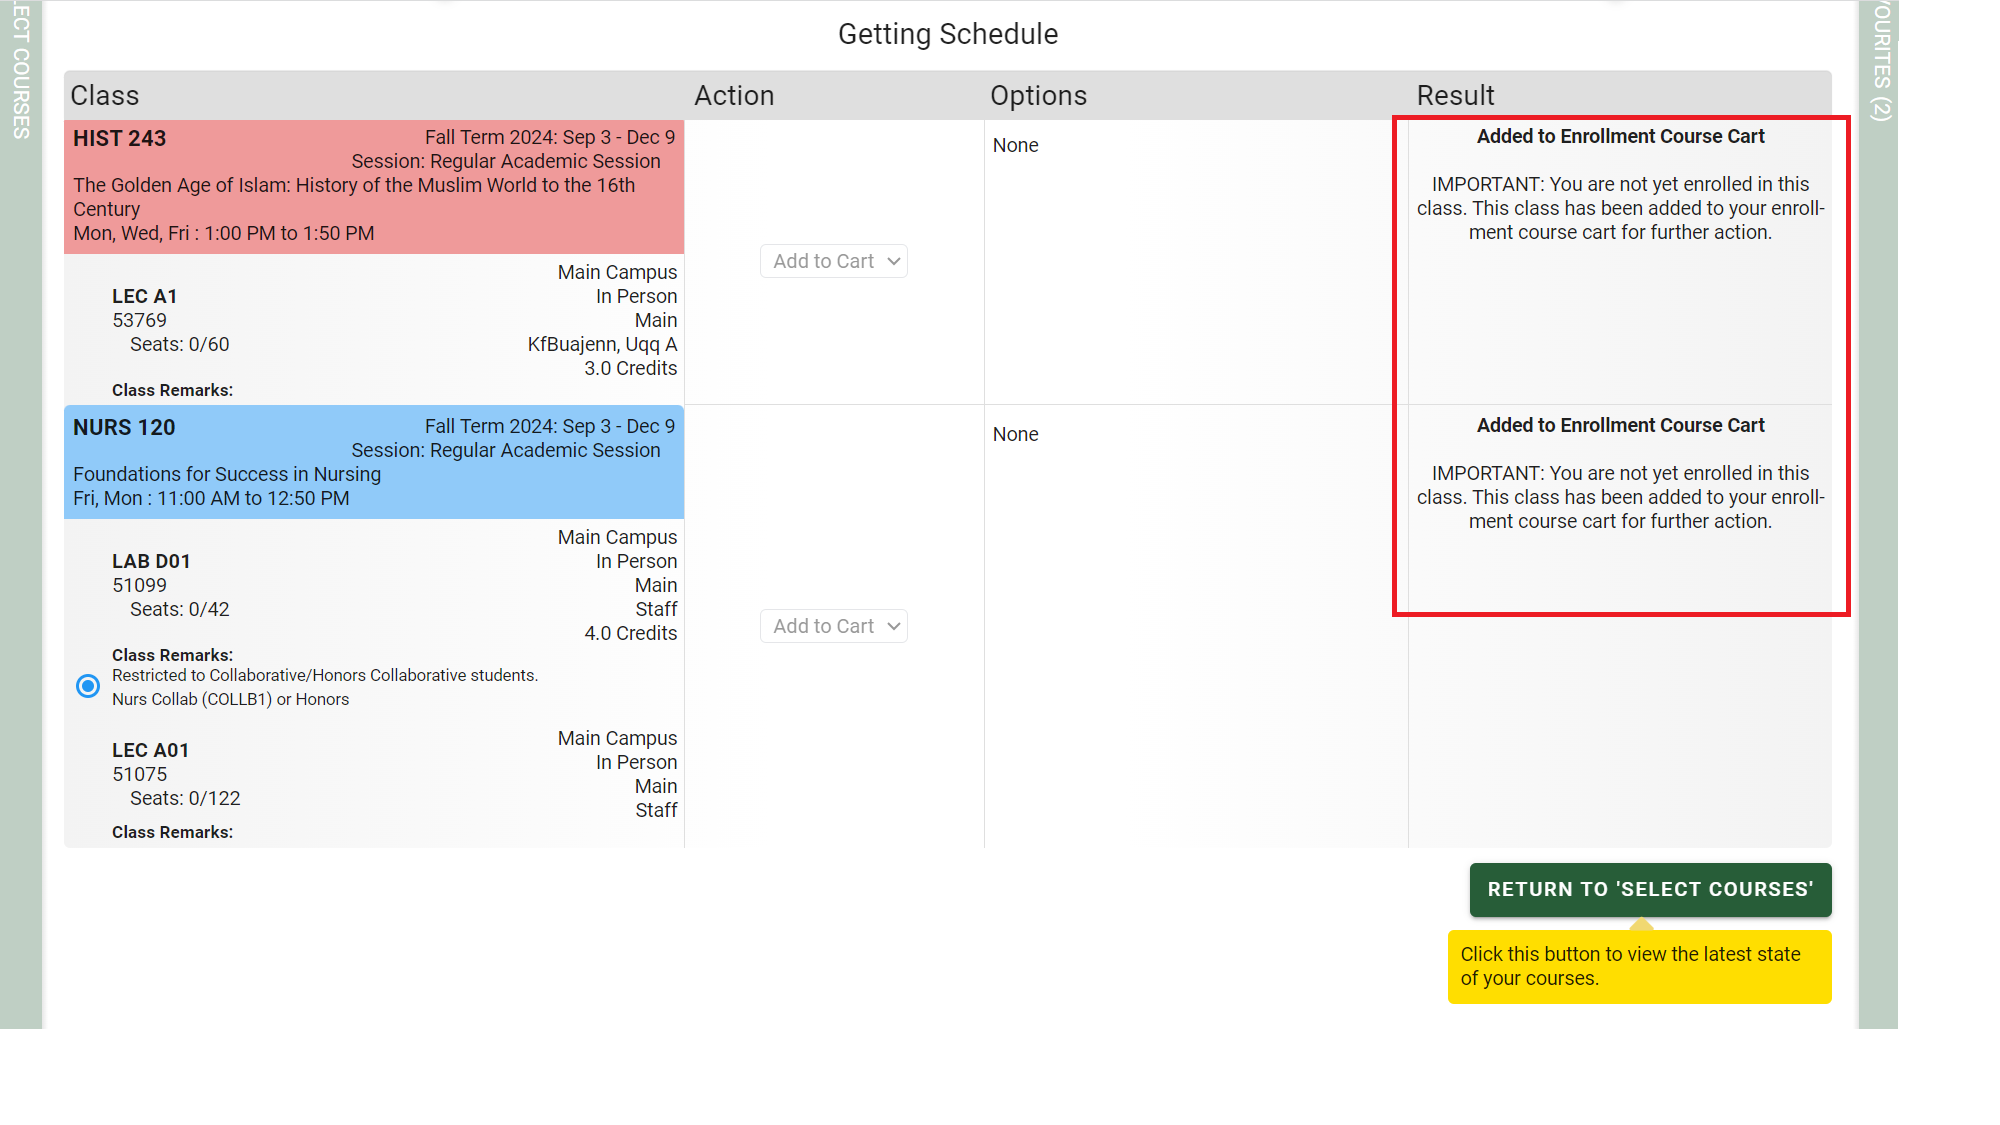
- Select "Do Actions." If successful, you'll see "Added to Enrollment Course Cart" in the results column.
- Note you are not registered at this point.
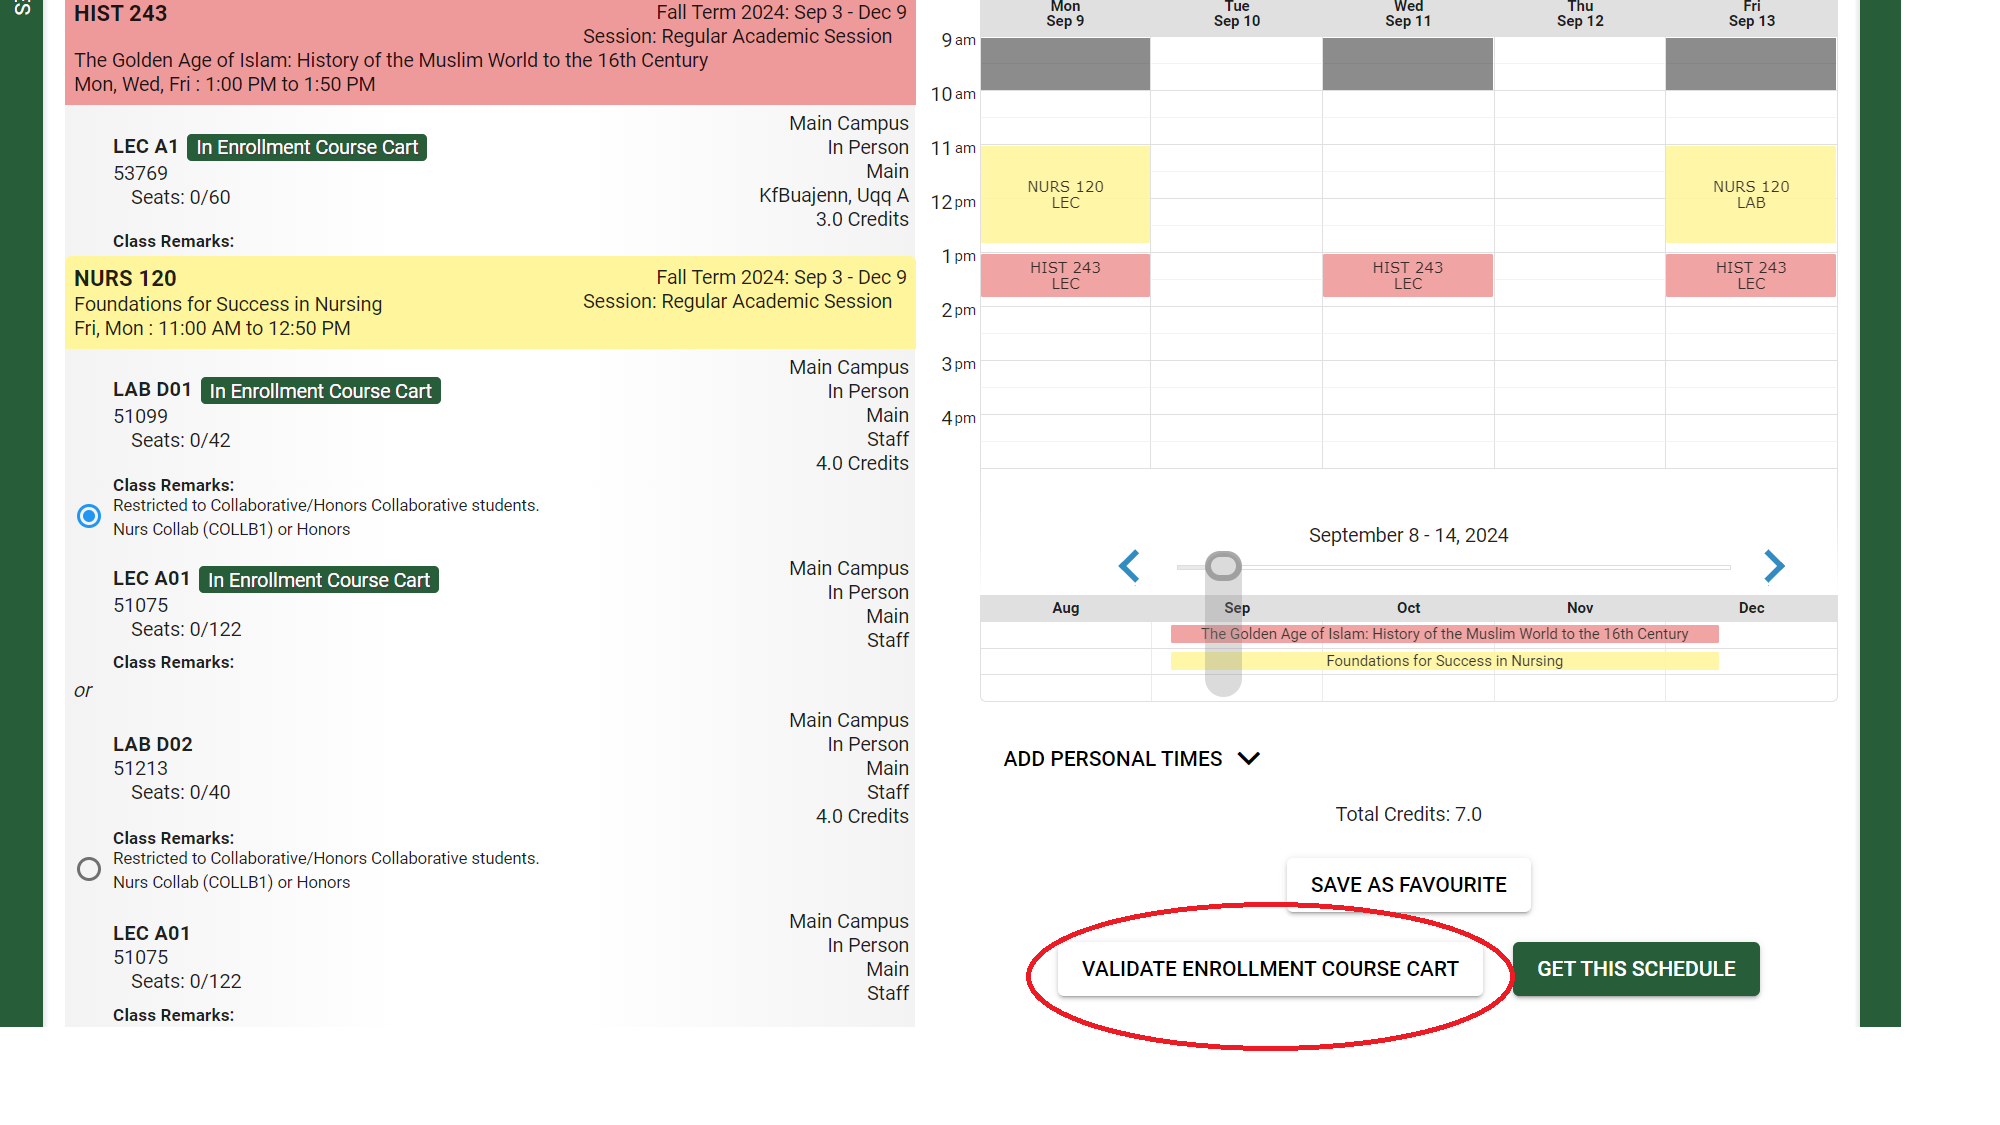
Validate enrolment cart
- Return to schedule results and select “Validate Enrollment Course Cart.”
- Validating your schedule will alert you to any restrictions in your course selections such as unmet prerequisites or department permission needed to register.
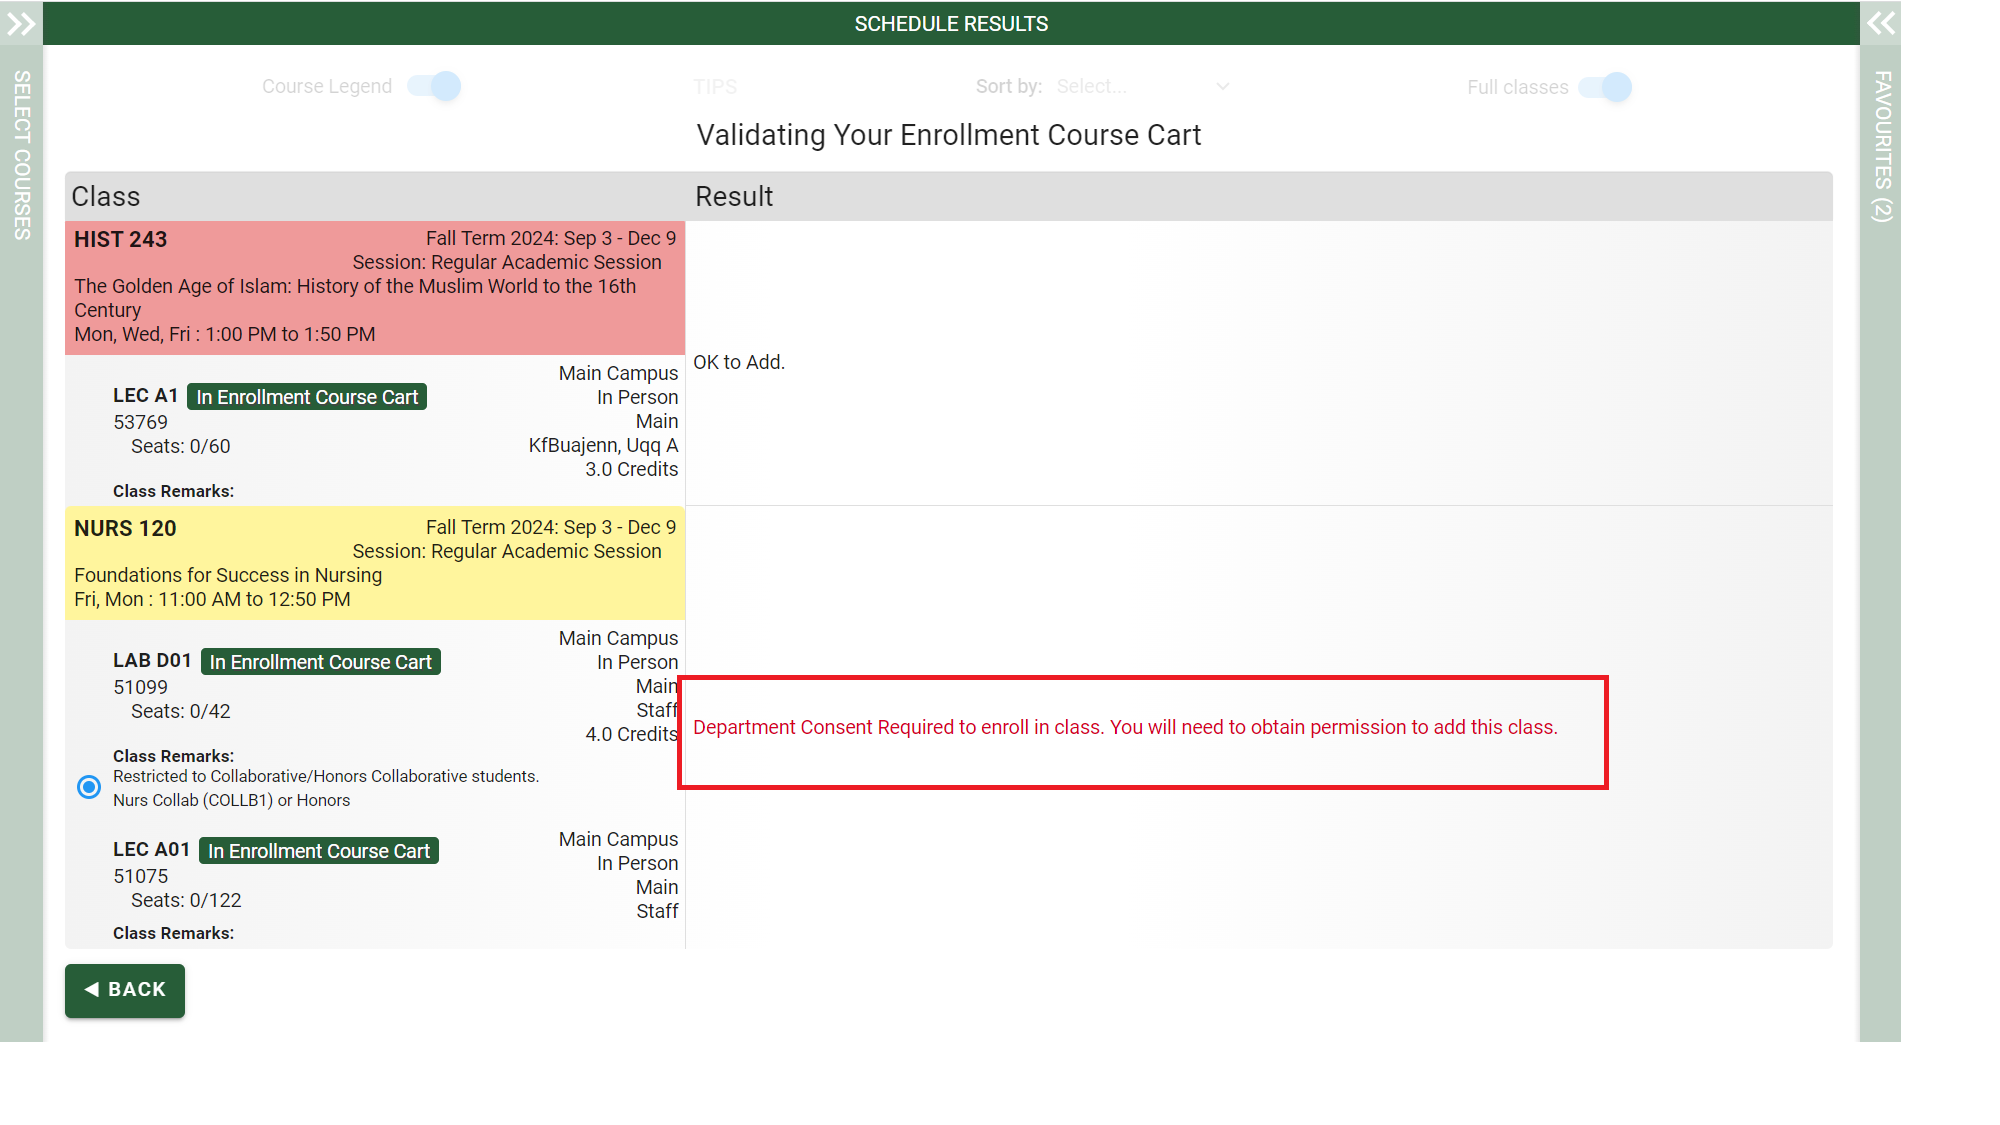
- If successful, you will see the message “OK to Add” in the result column.
- If restrictions are not met, you will see a message in the result column with details.
- Revise your schedule and continue validating new classes until you have drafted a schedule that no longer includes registration errors.
- Once you build your schedule and add your courses to your enrolment cart, you are ready to register on your enrolment appointment date!
See the Enrolment, Watch List, Course Planner in “Manage Classes” for instructions on validating your cart through “Manage Classes.”
Complete your registration
When your enrolment appointment date arrives you can proceed with registration. Note: it is recommended that you finalize your registration in “Manage Classes” on your enrolment date.
- Log into Bear Tracks > Manage Classes > Shopping Cart and Watch List. The courses that you previously added to your shopping cart and validated will still be in your shopping cart so you can finalize your registration.
- If you are unable to register in your desired courses and need to select new ones, this can be done directly in “Manage Classes” or “My Schedule Builder”.
- See the Enrolment, Watch List, Course Planner in “Manage Classes”for instructions.
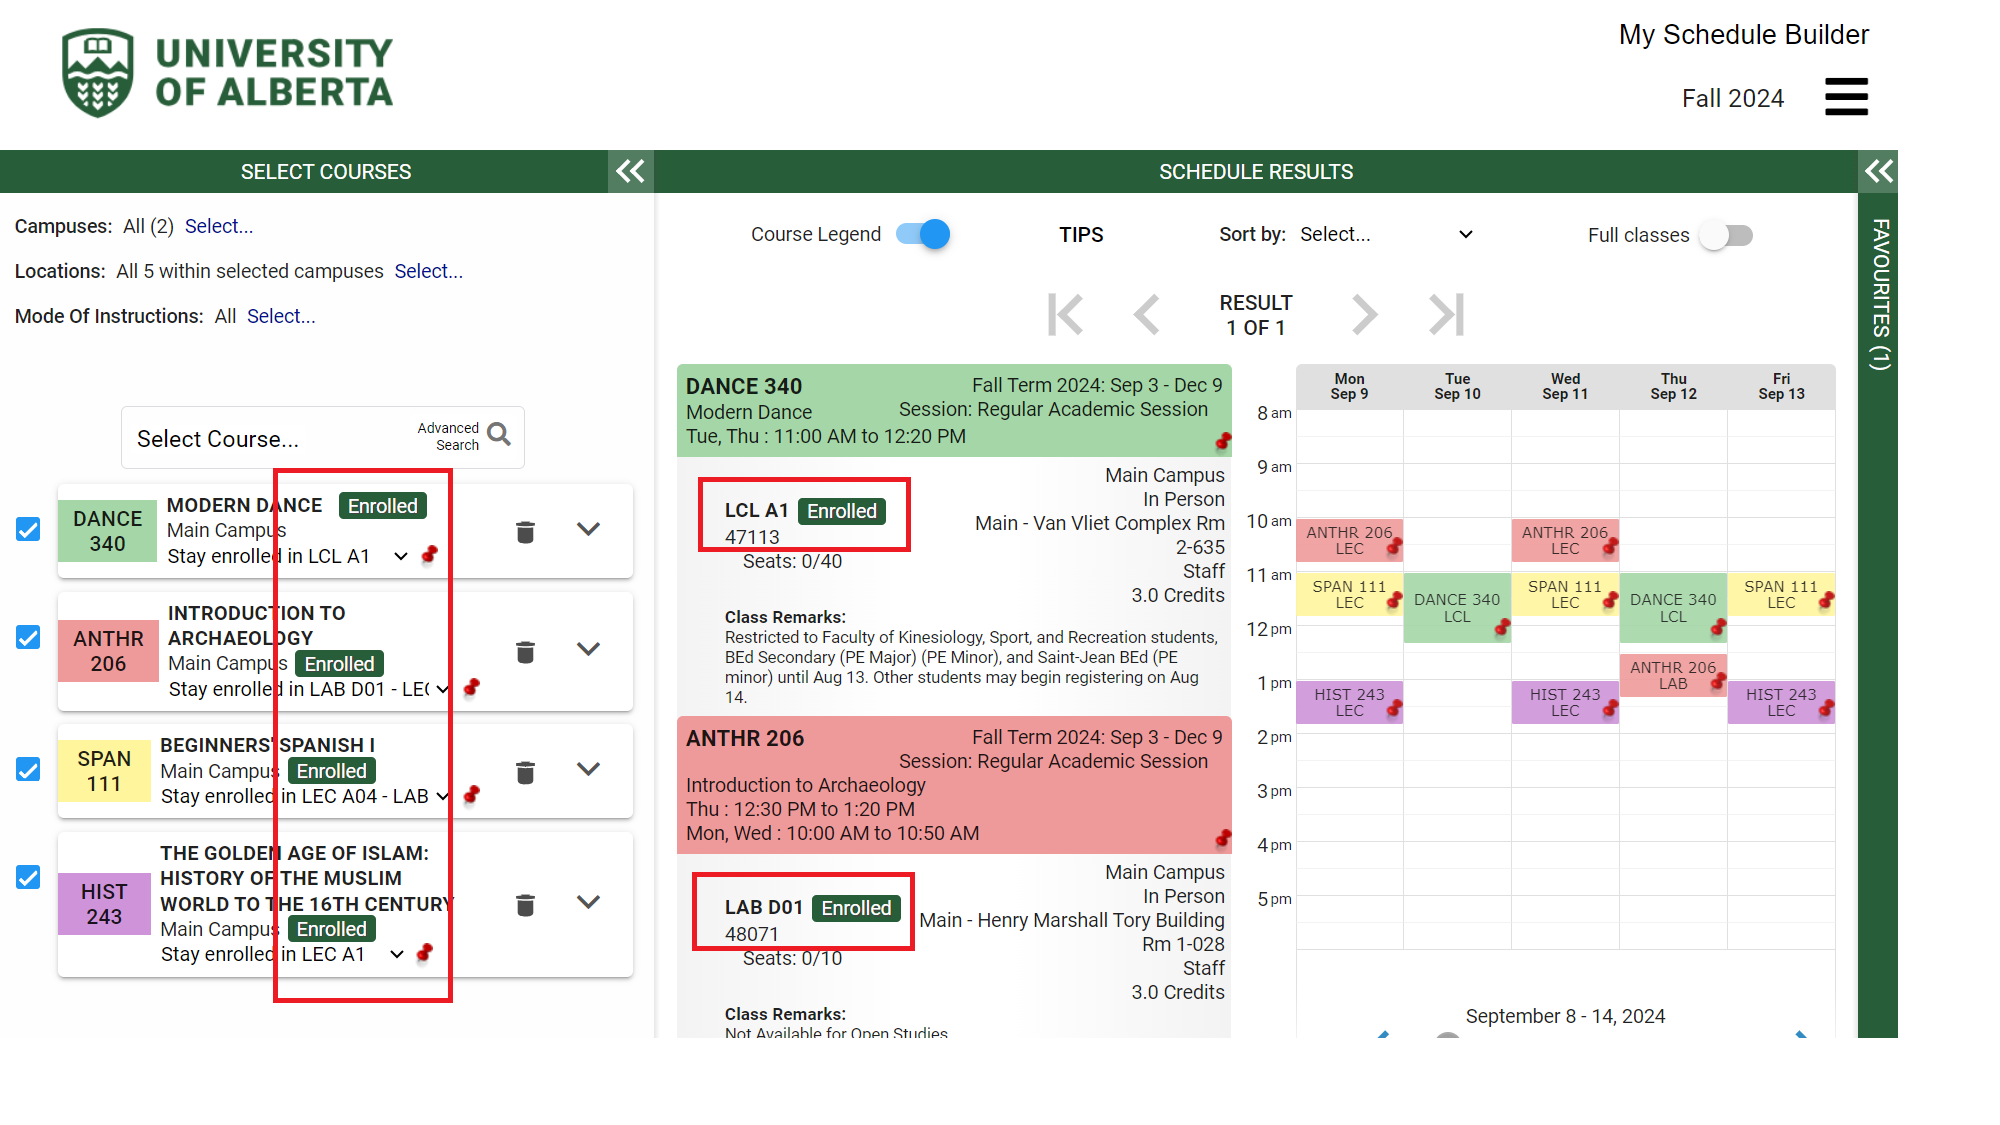
- You will see that your selected courses are displaying as “In Enrolment Course Cart.”
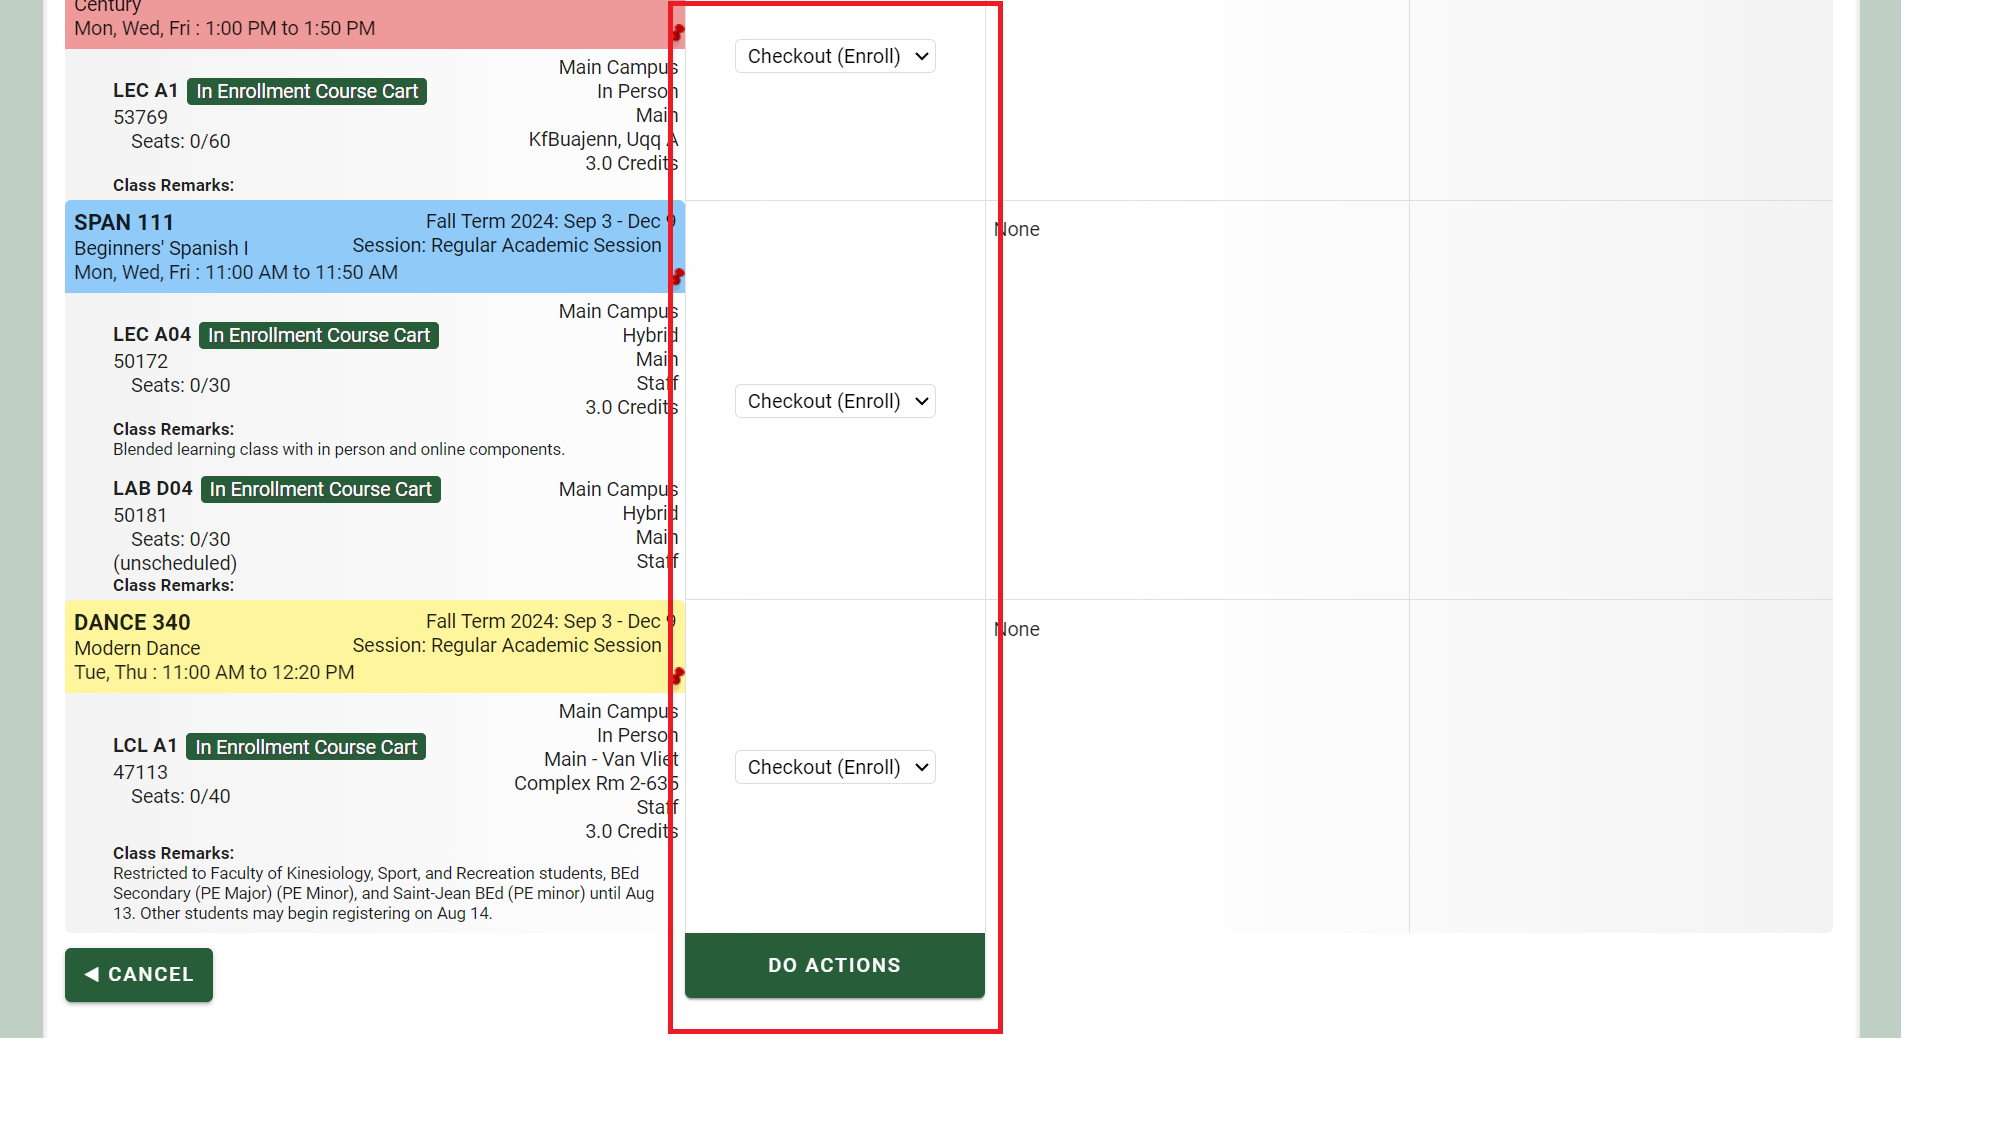
- Select “Get this Schedule” from the bottom of the screen.
- In the “Actions” column, each of your courses will display an action of “Checkout (Enrol)” from the drop-down menu.
- Select "Do Actions."
- If successful, you will see the message “Added - This class has been added to your schedule” in the result column.
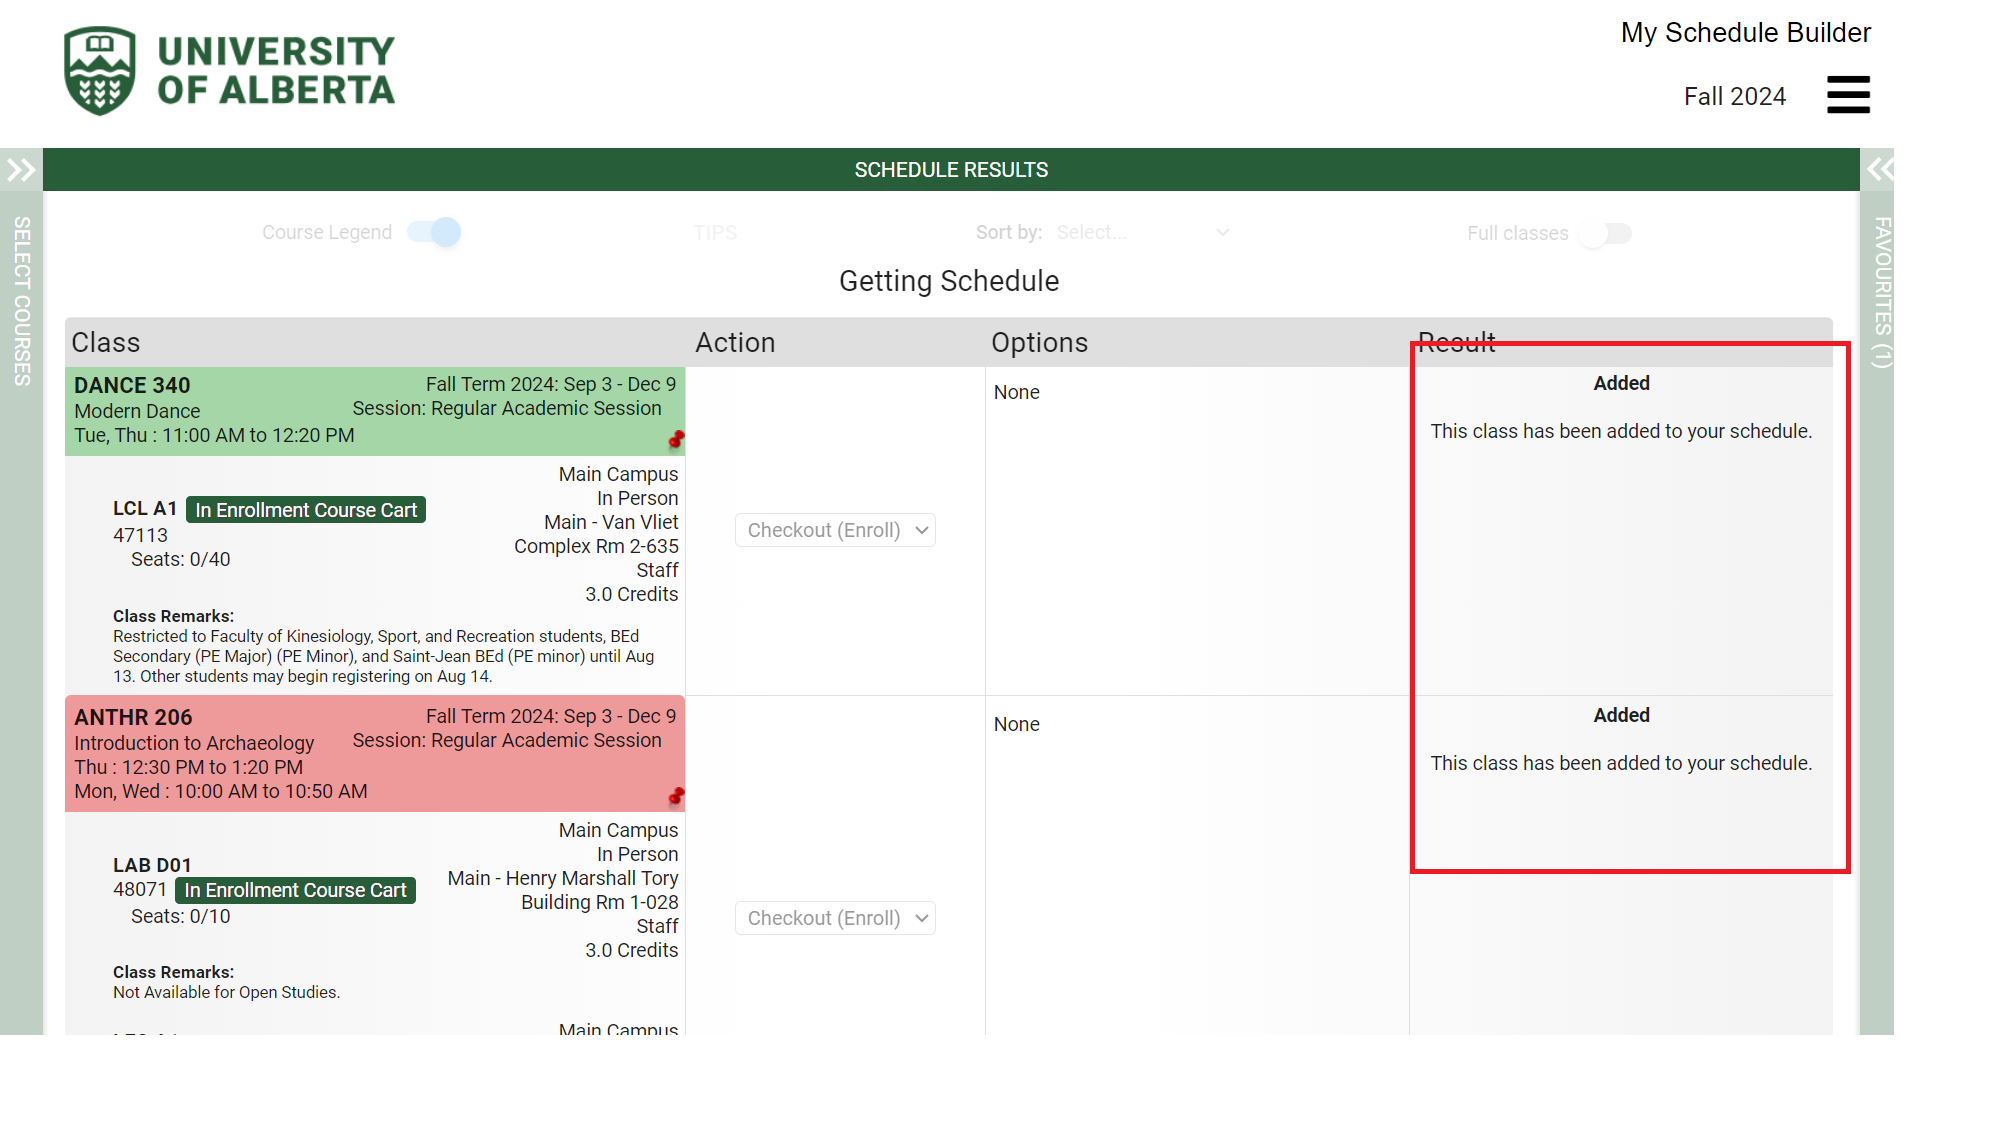
- If restrictions are not met, you will see a message in the result column with details. Return to “Select Courses” and revise your schedule as needed until you have drafted a schedule without registration errors and enrolled in all of your
- If successful, you will see the message “Added - This class has been added to your schedule” in the result column.
- Build your schedule (see “Search for and select courses”). Once you have your preferred schedule built, you can proceed with registration.
- Select “Get this Schedule” from the bottom of the screen.
- Note: You do not need to add courses to your enrolment cart after your enrolment appointment date has arrived. In the “Action” column, each of your courses will display an action of “Enrol” from the drop-down menu.
- Select "Do Actions."
- If successful, you will see the message “Added - This class has been added to your schedule” in the result column.
- If restrictions are not met, you will see a message in the result column with details. Return to “Select Courses” and revise your schedule as needed until you have drafted a schedule without registration errors and enrolled in all of your classes.
See the Enrolment, Watch List, Course Planner in “Manage Classes” for instructions on completing your registration through “Manage Classes.”
- Some classes are closed to web registration. Please speak to an advisor in your faculty and/or department about getting registered in those courses.
- You won't be able to register for courses if you have a financial hold on your account. In Bear Tracks, go to the “Financial Account” tile to see if you have a hold on your record, the amount owing and which department you need to contact to clear the hold. For more information see the Financial Holds webpage.
Manage your watchlist
Watch List functionality is not currently available in My Schedule Builder. Access the Watch List function in the Manage My Classes tile in Bear Tracks to receive notifications when a spot in a course you want to take becomes available!
See the Enrolment, Watch List, Course Planner in “Manage Classes” for instructions on managing your Watch List.
Manage Classes (Drop/Swap/Withdraw)
After you register in courses, you can still add, drop or swap courses (pending space/availability) until the add/delete deadline. After the deadline, only course withdrawals can be processed.
To facilitate multi-year planning and scheduling, use the Planner in the Manage Classes tile.
Drops and withdrawals can be processed in Bear Tracks under the “Manage Classes” tile.
- From the Bear Tracks home page, click on the “Manage Classes” tile.
- Click on “Drop Classes and Withdrawals” from the menu. You will be guided through three steps:
- If you are registered in multiple terms, select the term in which you would like to drop a class. You will be taken directly to the “Drop Classes” page if you are only enrolled in classes for one term.
- Step 1: Review
- Review information on the page carefully and click “Next.”
- Step 2: Select classes to drop
- Click the checkbox to select class(es) you would like to drop and click “Next.”
- Step 3: Review classes to drop
- Confirm you have selected the desired class(es).
- If you would like, select your withdrawal reason from the “Online Withdraw” drop-down. Note: This is optional.
- Click “Submit.”
- Confirm you have selected the desired class(es).
Drops can also be processed through the “My Schedule Builder” tile prior to the add/delete deadline. After the add/delete deadline you must use “Drop Classes and Withdrawals” as noted above.
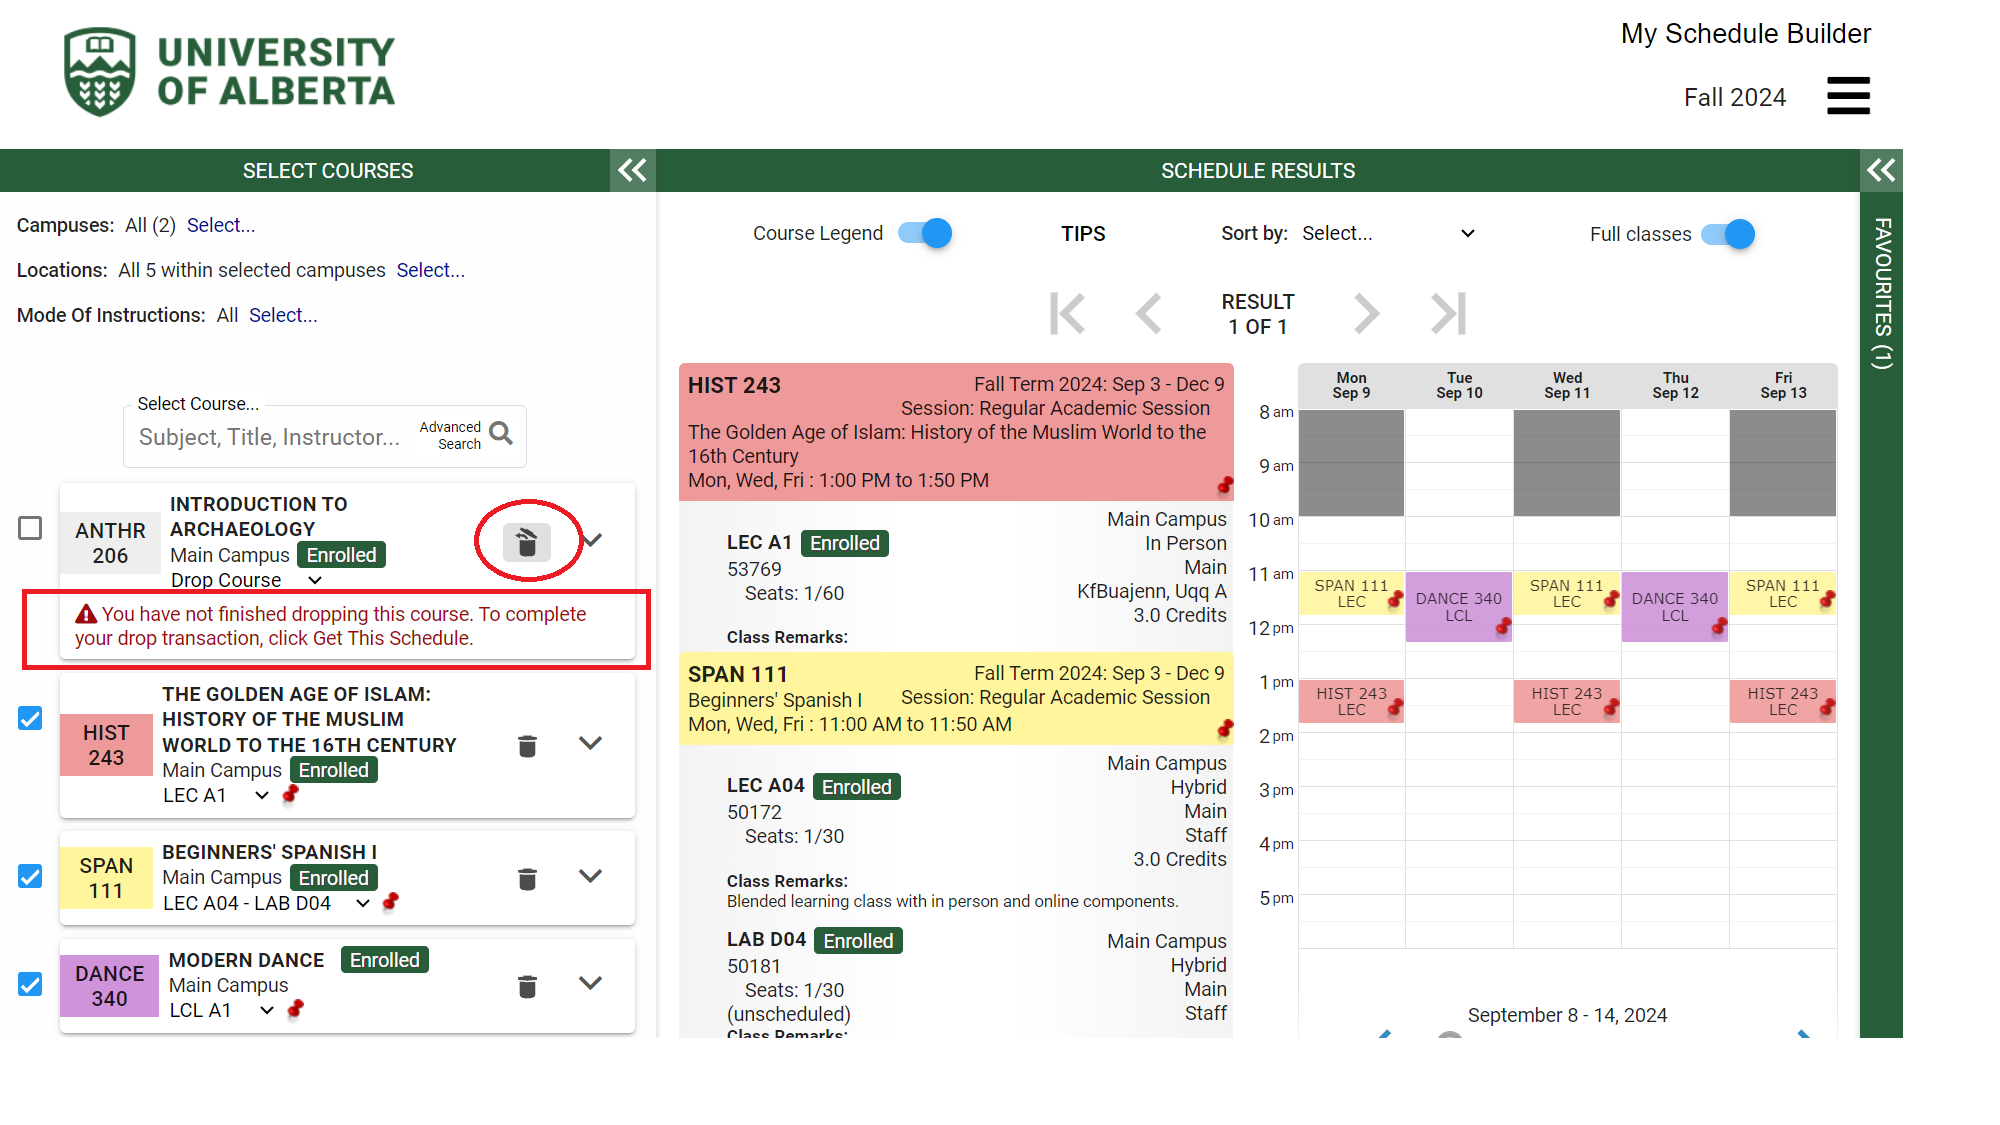
- From the Bear Tracks home page, click on the ‘My Schedule Builder’ tile.
- Select the term in which you would like to drop a class(es).
- You will see your enrolled courses under “Select Courses.”
- Click on the wastebasket icon for the course(s) you wish to drop.
- The course will be removed from your schedule and a message will appear noting that “You have not finished dropping this course.” You can click on the wastebasket icon again if you would like to keep the course.
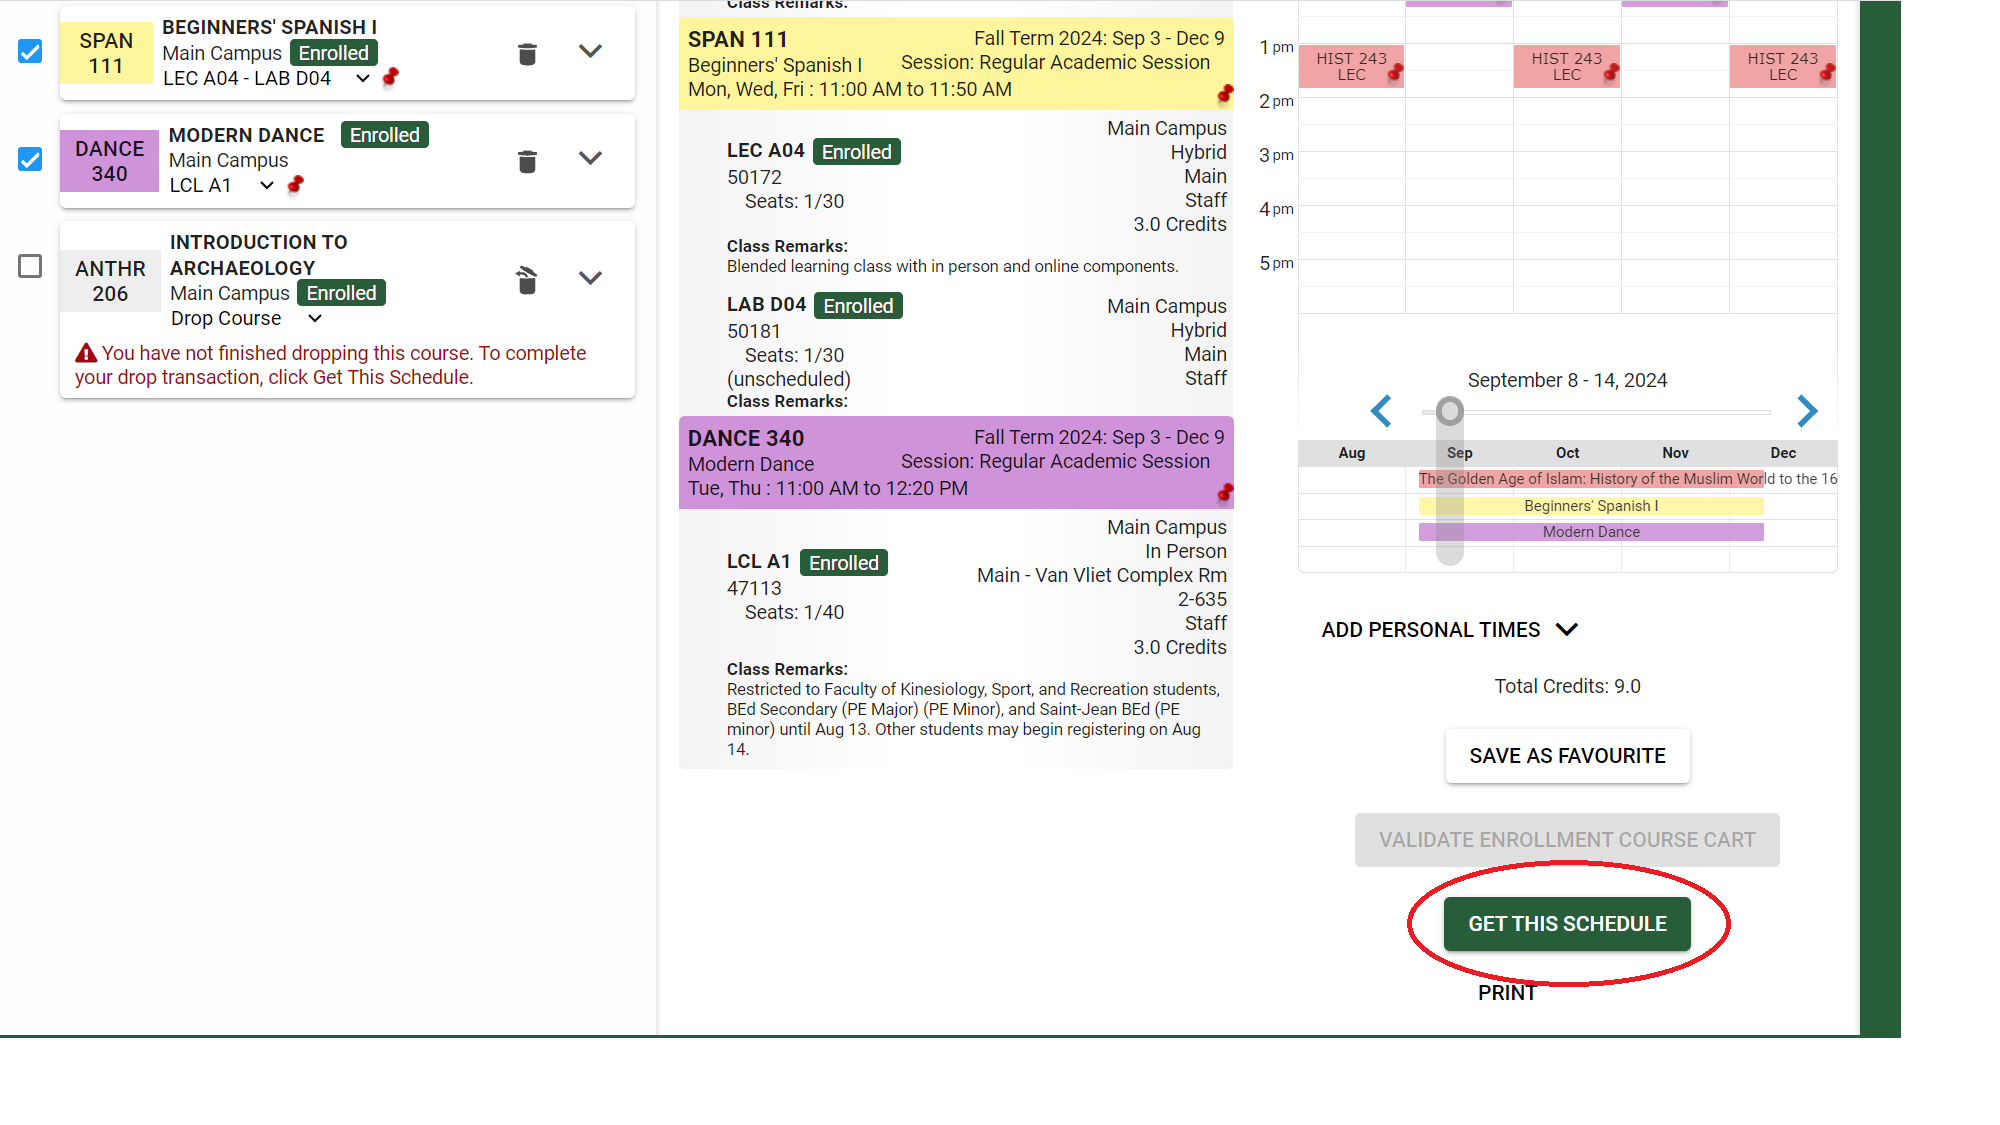
- If you would like to proceed with dropping your course(s), select “Get this Schedule” from the bottom of the screen in your schedule results.
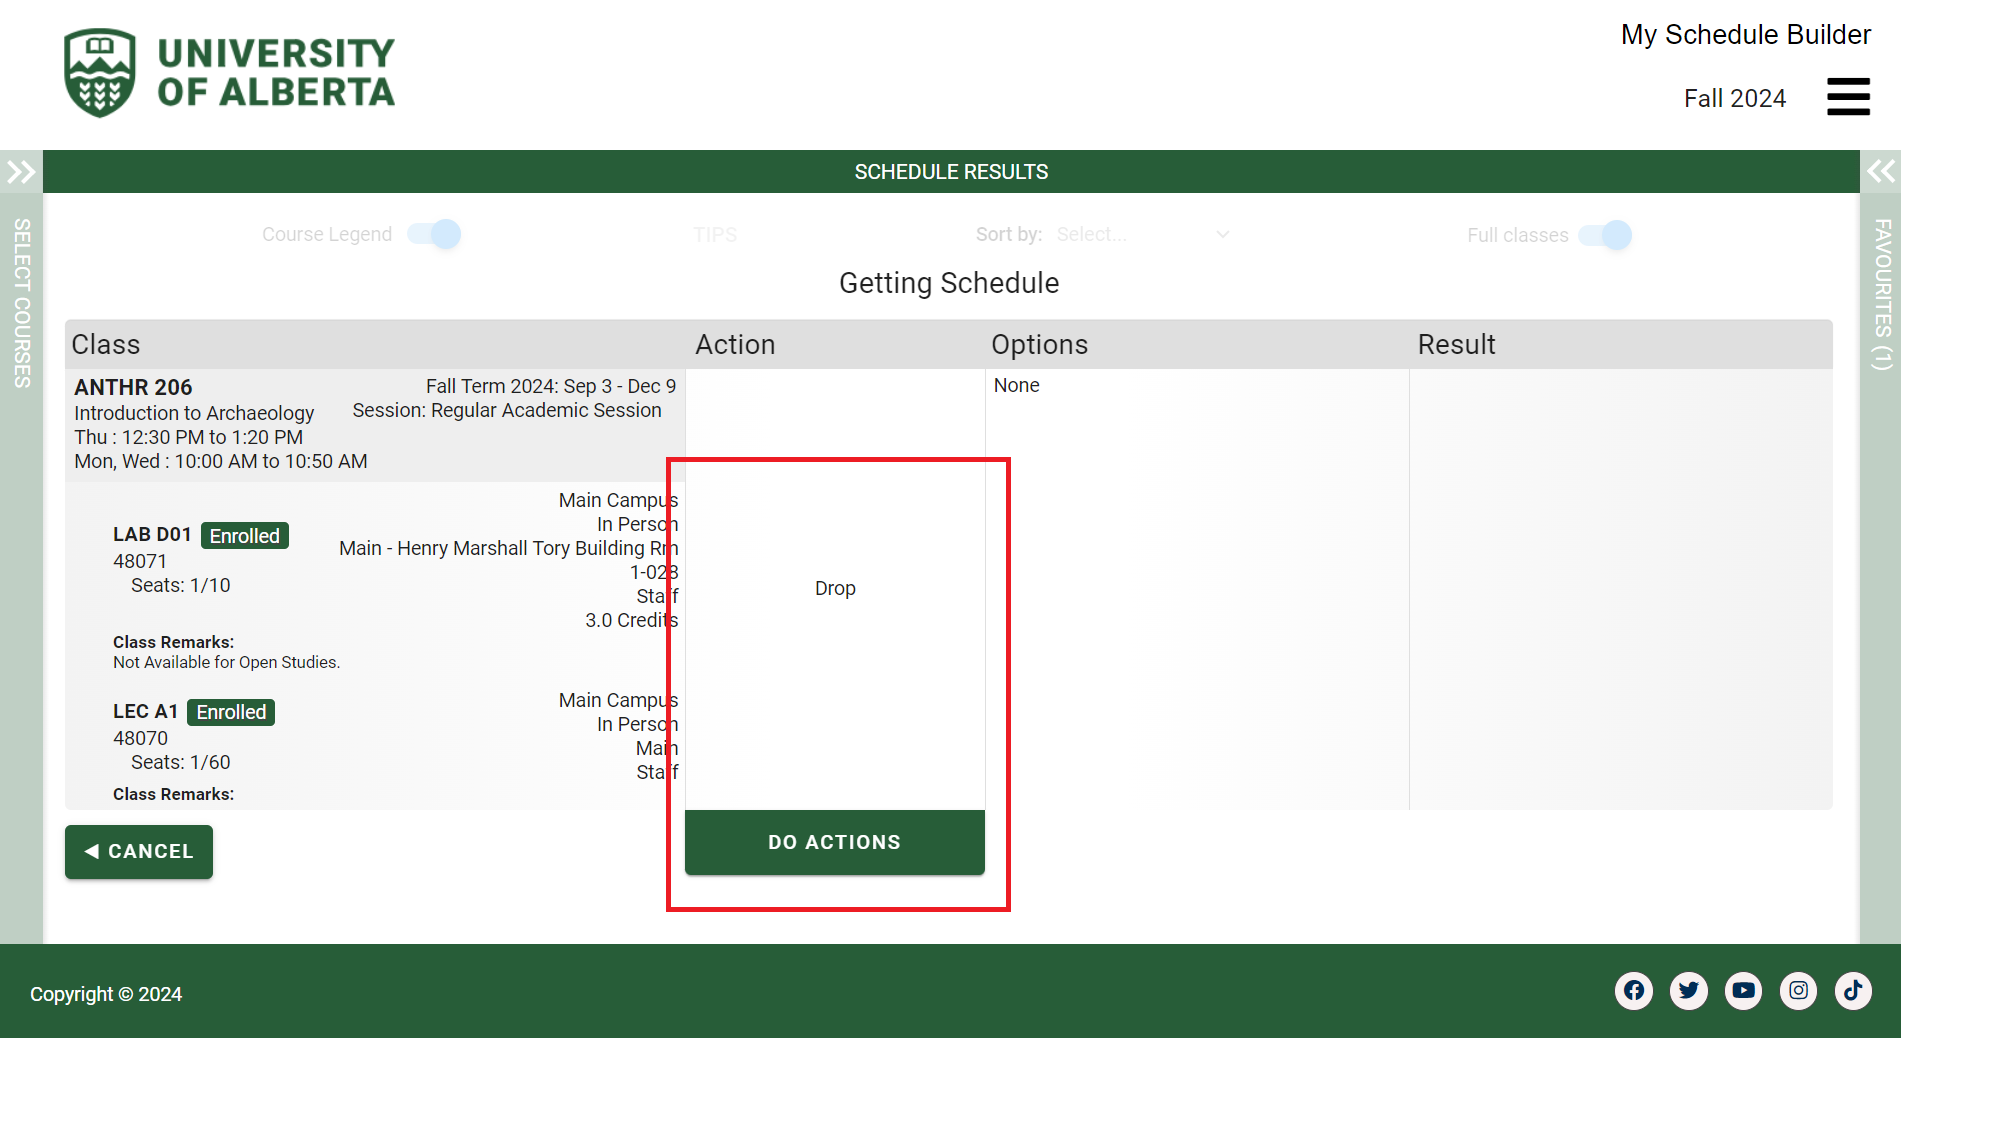
- In the “Actions” column, the course(s) you are attempting to drop will display an action of “Drop.”
- Select "Do Actions."
- If successful, you will see the message “Dropped - This class has been removed from your schedule” in the result column.
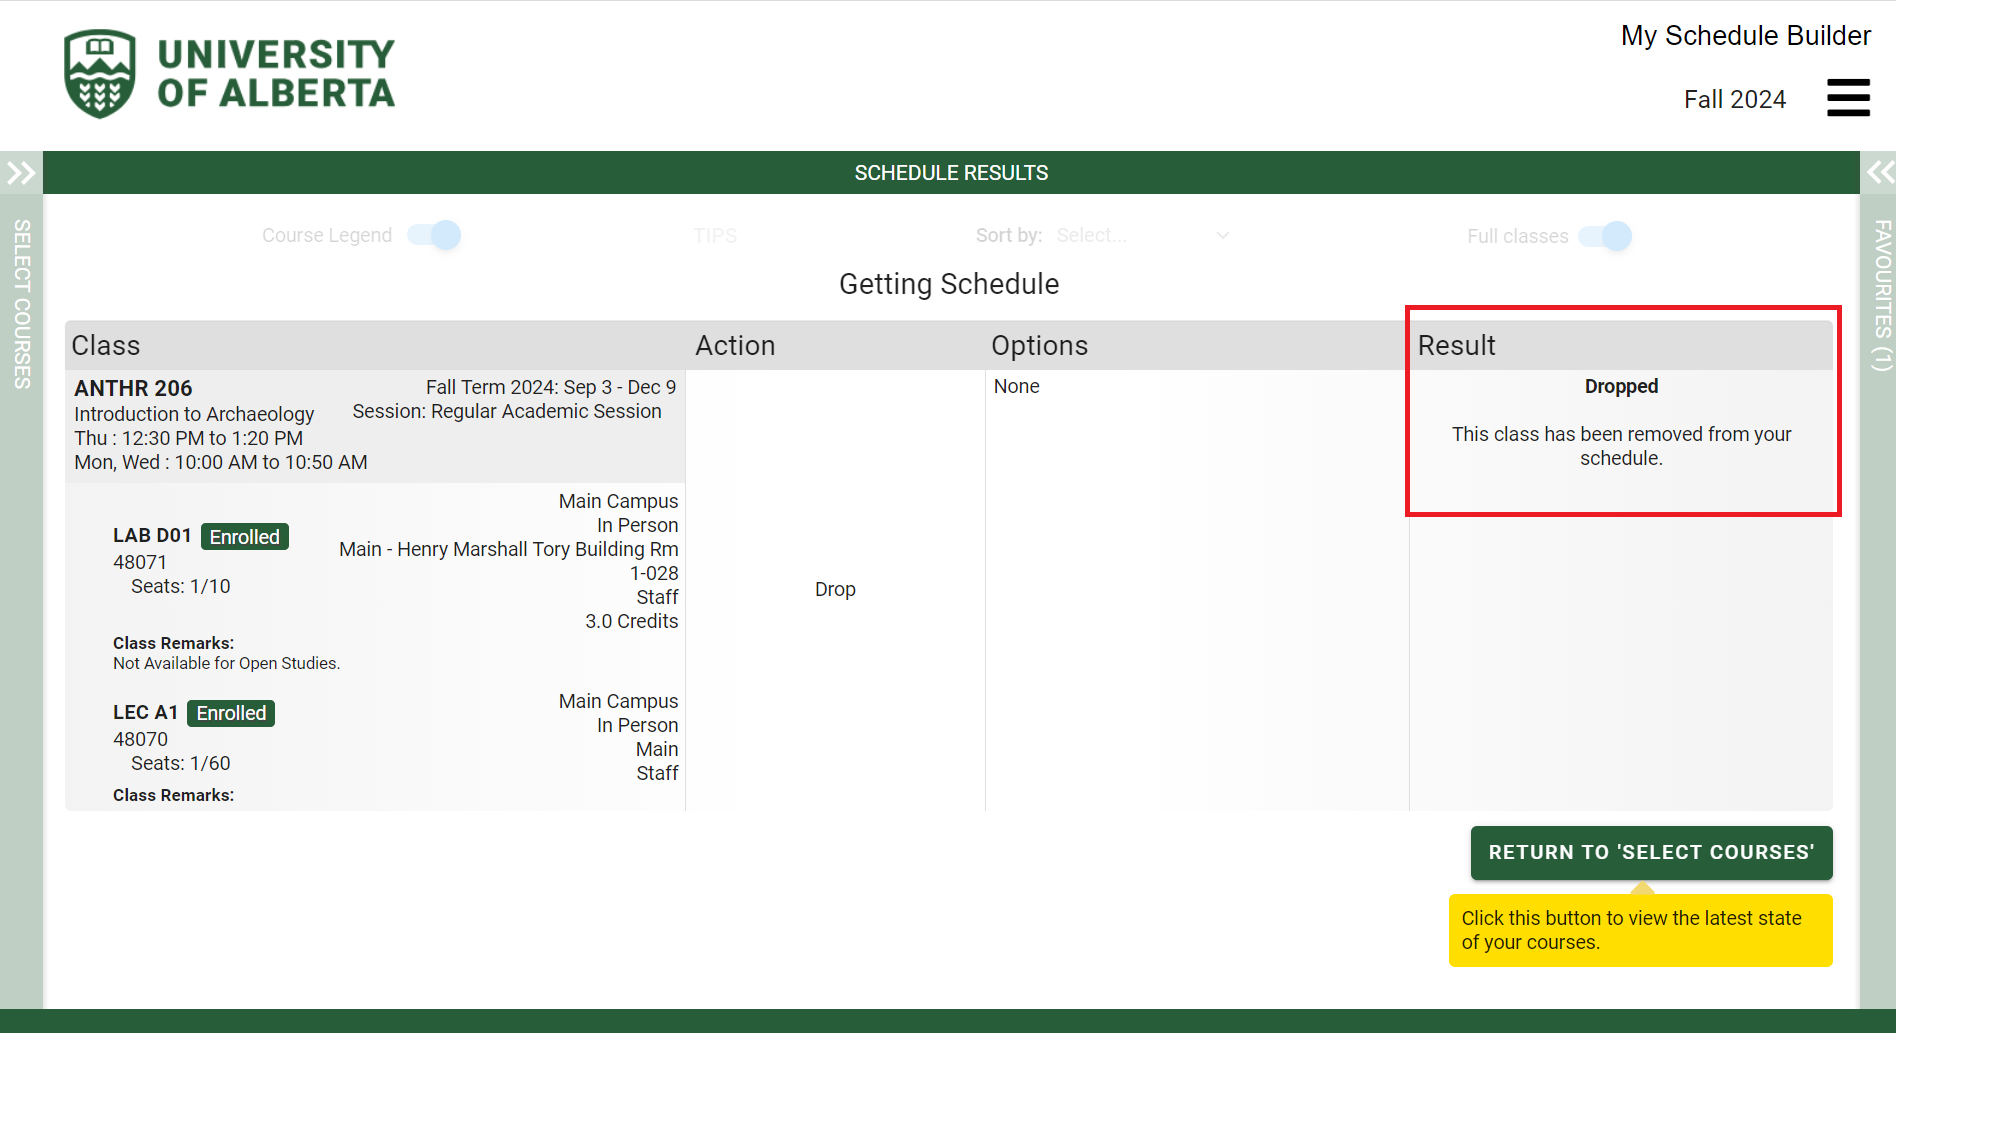
If you drop a class before the add/delete deadline it will be removed from your schedule.
If you drop (withdraw) a class after the add/delete deadline, and it does not require a faculty or department approval, it will be withdrawn from your schedule and will show as withdrawn as follows:
- On your class list in the following locations:
- “Manage Classes” tile > “View My Classes” > “List”
- “My Schedule & Exams” tile > “View My Classes” > “List” (with “Show Withdrawn Classes” option checked)
- Under the “Academic Record” tile > Course History.” Withdrawn classes will show with a Grade of “W.”
- Under the “Academic Records” tile > “View Grades.”
- On your unofficial and official transcript (“Academic Records” > “Unofficial Transcript”).
Note: If the class requires approval for withdrawal, it will still show you as enrolled until approved. Please monitor Bear Tracks for updates. If more information is required, you will be contacted via email. Continue to attend class(es) until you have confirmation that your withdrawal has been approved. Once it has been approved, it will show as stated above.
For more information about withdrawals, please visit the Withdrawals webpage.
Swaps allow you to identify a class you want to drop and swap for a class you want to enrol in, avoiding the risk of the class filling up while you’re in the process of dropping a class.
Important notes
- All students are encouraged to perform class swaps in Bear Tracks using the “Swap” function under the “Manage Classes” tile. Swaps in Bear Tracks are performed at the same time while swaps in the “My Schedule Builder” tile will drop the class prior to adding the new class. Swapping in “Manage Classes” will ensure you get into your new class before your current class is dropped.
- You can use the “Swap” function to swap one class for another, but the “Swap” function will not allow you to swap a class component in a multiple component class (i.e., those with a lecture, lab and/or seminar) for another component. For example, you could swap ECON 101 for POL S 101 using the “Swap” function. But you would not be able to swap one seminar for CHEM 264 with another seminar in CHEM 264. In that case, you would need to swap the lecture-seminar combination you enrolled in for CHEM 264 for a different lecture-seminar combination of CHEM 264.
Swapping classes in “Manage Classes” in Bear Tracks
- From the Bear Tracks home page, click on the “Manage Classes” tile.
- Click on “Swap Classes” from the menu.
- Tip: When using the “Swap Classes” feature, have your existing class schedule open so you know if the new section you are trying to register in will fit in your schedule.
- Choose the class you are interested in swapping under “Swap this Class.”
- Proceed to the appropriate section based upon how you would like to select your desired class via a class search, from your “Shopping Cart”or by entering the class number.
Swap a class by searching for a class
- Ensure the class you want to swap is selected under “Swap This Class” menu option.
- Select “Class Search” under “Search for Classes.”
- Click “Continue.”
- You will be taken to the “Class Search” page.
- Use the search function to find your desired class. If the class is available for you to swap you will see a “Select” button.
- You will be guided through two steps:
- Step 1: Review class selection. If you wish to proceed with the swap, click “Next.” Otherwise, click “x Exit” in the top-left of the page to return to the “Course Information” page.
- Step 2: Confirm class swap. If your class swap details are correct, click “Submit.” Otherwise, click “x Exit” in the top-left corner of the page.
Swap a class with a class in your Shopping Cart in Manage Classes
- Ensure the class you want to swap is selected under “Swap This Class.”
- Select your desired class under “Select from Shopping Cart.” This function is available only if you have items in your Shopping Cart. Click “Continue.”
- You will be guided through two steps:
- Step 1: Review Class Selection. If you wish to proceed with the swap, click “Next” to proceed. Otherwise, click “x Exit” in the top-left of the page to return to the “Course Information” page.
- Step 2: Confirm Class Swap. If the class swap details are correct, click “Submit.” Otherwise, click “x Exit” in the top-left corner of the page.
Swap a class by entering a class number
- Ensure the class you want to swap is selected under “Swap This Class.”
- Enter the 5-digit class code under “Enter Class Number” ( i.e., 45166).
- Click “Continue.”
- You will be guided through two steps:
- Step 1: Review class selection. If you wish to proceed with the swap, click “Next” to proceed. Otherwise, click “x Exit” in the top-left of the page to return to the “Course Information” page.
- Step 2: Confirm class swap. If your class swap details are correct, click “Submit.” Otherwise, click “x Exit” in the top-left corner of the page to return.
Need help?
- See Registration and Courses for additional information related to registration.
- Contact the Student Service Centre for questions on how to register.
- Contact an advisor in your faculty or department for academic advising specific to your program.
- Report an issue if you are experiencing system related issues.